
 View Gallery
1 photo
View Gallery
1 photo
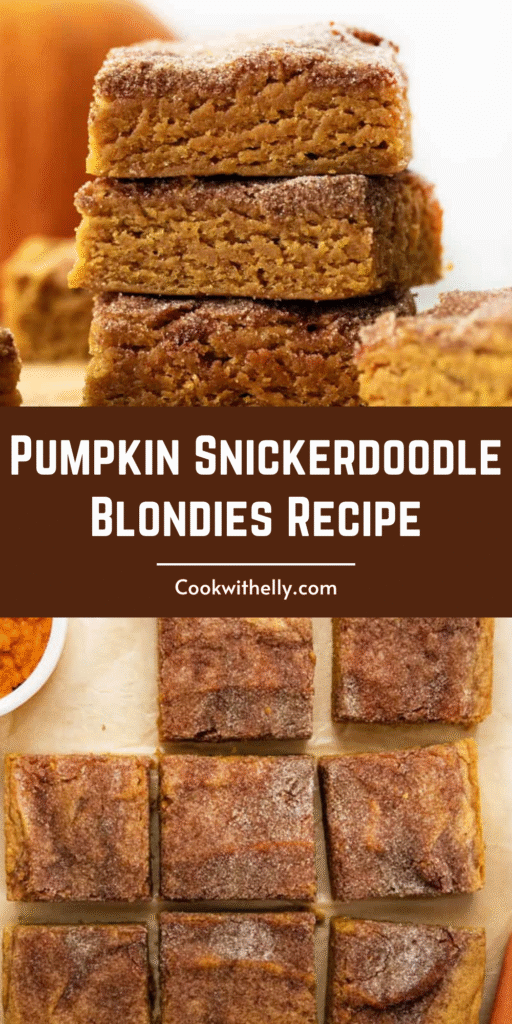
Picture the cozy, spiced charm of a classic snickerdoodle cookie. Now, imagine it transformed into a wonderfully soft, chewy bar, bursting with the warm, earthy flavor of pumpkin. That’s the magic of these Pumpkin Snickerdoodle Blondies.
-119" data-inserter-version="2" data-placement-location="under_page_title">They truly are what autumn dreams are made of, a dessert that feels like a warm hug on a crisp fall day. With a spiced pumpkin base and that signature crunchy cinnamon-sugar topping, they’re an irresistible treat that brings all the best feelings of the season to your table.
Why This Recipe Becomes an Instant Favorite
You’ll find yourself making these blondies again and again, and for good reason. They are ridiculously easy to make, requiring just one bowl and a handful of simple steps, making them totally foolproof for bakers of any level.
Then there’s that iconic snickerdoodle flavor, a nostalgic hit of cinnamon that speaks directly to the soul of any spice lover. And the texture, oh the texture—a soft, chewy base that makes every single bite an absolute delight.
My personal favorite part, and one that truly sets them apart, is the delightful crunch from the generous cinnamon sugar topping. It’s not just a garnish; it’s a essential layer of flavor and texture that makes these bars simply unforgettable.
Ingredients Needed for the Recipe
Gathering your ingredients is the first step to bliss. Using high-quality components, and paying attention to a few key details, will make all the difference in your final bake.
- 1 ¾ cups all-purpose flour, spooned and leveled
- 1 tablespoon pumpkin pie spice
- 1 teaspoon ground cinnamon
- ¾ teaspoon baking soda
- ¾ teaspoon baking powder
- ¾ teaspoon salt
- ½ cup unsalted butter, melted and cooled
- 1 cup light brown sugar, packed
- ½ cup granulated sugar
- 1 large whole egg, room temperature
- 2 large egg yolks, room temperature
- ¾ cup canned pumpkin puree (see crucial note on blotting!)
- 1 tablespoon pure vanilla extract
For the Cinnamon Topping:
- ¼ cup granulated sugar
- 1 tablespoon ground cinnamon
The Secret to the Perfect Pumpkin Puree
This might just be the most important step in the entire recipe, so let’s not skip it. Canned pumpkin puree contains a lot of excess water, and if you add it directly to your batter, you’ll end up with a wet, gummy blondie.
Blotting the pumpkin is a simple but transformative process. You’re essentially removing that extra moisture, which concentrates the pumpkin flavor and allows for that perfect, chewy texture we’re after. It’s the difference between a good blondie and an absolutely exceptional one.
How to make The Best Pumpkin Snickerdoodle Blondies?
Preparing Your Pan and Oven
Begin by preheating your oven to 350°F (175°C). Now, take a moment to properly prepare your 8×8 inch baking pan—this is key for easy removal later. Spray the pan with non-stick spray, then line it with parchment paper, leaving some overhang on two opposite sides to create handy “handles.”
Transforming the Pumpkin Puree
Spread the ¾ cup of pumpkin puree evenly on a flat surface, like a dinner plate or a small sheet pan. Place a few layers of paper towel over the top and press down gently to absorb the liquid. Repeat this process at least five more times, using fresh paper towels, until the pumpkin has lost a significant amount of moisture. You should end up with just over ⅓ cup of thickened, concentrated pumpkin puree.
Creating the Signature Topping
In a small bowl, whisk together the ¼ cup of granulated sugar and the 1 tablespoon of ground cinnamon. This simple mixture is what gives these blondies their iconic snickerdoodle identity, so set it aside with care.
Combining the Dry Ingredients
In a medium-sized bowl, whisk together the flour, pumpkin pie spice, ground cinnamon, baking soda, baking powder, and salt. Whisking these dry ingredients first ensures the leavening agents and spices are evenly distributed throughout the flour, promising a consistent bake and flavor in every square.
Building the Wet Batter Base
In another medium bowl, combine the melted (and cooled!) butter with the packed brown sugar and granulated sugar. Using a whisk, beat them together for a good 2-3 minutes. You’re looking for the mixture to become light, fluffy, and well-combined—this initial step helps create a tender crumb.
Incorporating Eggs and Pumpkin
Whisk in the whole egg, then the two additional egg yolks, one at a time, whisking for about 30 seconds after each addition. The extra yolks are a little trick for incredible richness and chew. Then, add the vanilla extract and your carefully blotted pumpkin puree, whisking just until the batter is smooth and uniformly orange.
Bringing the Batter Together
It’s time to unite the wet and dry worlds. Switch from your whisk to a rubber spatula for this part. Add the dry flour mixture to the wet batter and gently fold it in. Mix only until you no longer see any streaks of flour; overmixing at this stage is the enemy of a tender, soft blondie.
Panning and Adding the Topping
Pour the thick, fragrant batter into your prepared pan. Use the spatula to spread it into an even layer, reaching all the corners. Now, take that reserved cinnamon-sugar topping and sprinkle it generously and evenly over the entire surface of the batter.
Baking to Perfection
Place the pan in the preheated oven and bake for 35-38 minutes. You’ll know they’re done when the center is slightly puffed and a toothpick inserted into the middle comes out with a few moist crumbs clinging to it, but not wet batter. Avoid over-baking for the best, fudgy texture.
The Crucial Cooling Process
This part requires a bit of patience, but it’s so worth it. Allow the blondies to cool completely in the pan, set on a wire rack, for at least 15 minutes before you even think about cutting. This waiting period allows the structure to set, ensuring you get clean, sharp slices and the ideal final texture.
Tips for Blondie Brilliance
A few pro tips can elevate your baking from great to extraordinary. First, always use room temperature eggs; they incorporate into the batter much more smoothly and evenly than cold eggs straight from the fridge.
When measuring your flour, avoid scooping directly from the bag with your measuring cup. Instead, spoon the flour lightly into the cup and level it off with a knife. This “spoon and level” method prevents accidentally using too much flour, which can make your blondies dry and dense.
And for the love of even baking, use a light-colored metal pan if you can. Dark pans absorb more heat and can lead to over-browned, even burnt edges. A light pan ensures your blondies bake gently and evenly from center to edge.
How Should I Serve These Autumnal Treats?
The beauty of these blondies is their incredible versatility. They are sublime all on their own, enjoyed with a hot cup of coffee or a cold glass of milk as a simple afternoon pick-me-up.
For a truly decadent dessert, serve them slightly warm with a scoop of vanilla bean ice cream slowly melting over the top. The contrast of warm spice and cold, creamy ice cream is a little slice of heaven. They also make a stunning addition to any holiday dessert table or a cozy game-day gathering.
Storing and Freezing for Future Enjoyment
To keep your blondies fresh and chewy, store them in an airtight container at room temperature. They’ll stay perfectly delicious for up to 5 days this way. Interestingly, some people, like the recipe creator Elly, swear they taste even better cold, straight from the fridge, as the flavors seem to intensify.
If you want to save some for a rainy day, these blondies freeze beautifully. Wrap individual squares tightly in plastic wrap and then place them in a freezer-safe bag or container. They’ll keep for up to 3 months, ready to thaw whenever a pumpkin spice craving strikes.
Can I Adapt This Recipe for a Different Pan?
Absolutely! If you don’t have an 8×8 inch pan, a 9×9 inch pan will work just fine, though your blondies will be slightly thinner and may bake a few minutes quicker. Keep a close eye on them after the 30-minute mark.
For a 9×13 inch pan, you’ll need to double the entire recipe to achieve the ideal blondie thickness. And yes, this dough can even be transformed into cookies! Use cold, cubed butter instead of melted, scoop the dough, roll it in the cinnamon sugar, and bake until the edges are set.
Pumpkin Snickerdoodle Blondies Recipe
Description
Pumpkin cake layers with a cinnamon swirl, frosted with a brown sugar buttercream and finished with white chocolate ganache spread throughout the cake. This layered dessert brings together cozy fall spices and classic snickerdoodle flavor in every bite.
ingredients
For the cinnamon swirl
For the pumpkin cake
For the snickerdoodle buttercream
For the white chocolate ganache
Instructions
Pumpkin Cake
-
Preheat oven to 325°F (163°C). Grease and line four 6-inch or three 8-inch cake pans with parchment paper.
-
In a medium bowl, whisk together flour, baking powder, pumpkin pie spice, cardamom, cinnamon, ginger, nutmeg, and salt. Set aside.
-
In a stand mixer with paddle attachment, beat granulated sugar, brown sugar, and eggs on medium speed until light and fluffy (~4 minutes).
-
Add oil and vanilla; mix until combined. Add pumpkin purée and mix until smooth.
-
Gradually add dry ingredients on low speed until just combined. Divide batter evenly among pans.
-
Make cinnamon swirl: mix brown sugar, flour, and cinnamon. Stir in melted butter until crumbly. Drop spoonfuls onto each cake layer and swirl gently with a toothpick.
-
Bake 30–35 minutes, or until a toothpick comes out with a few moist crumbs. Cool in pans 10–20 minutes, then transfer to wire racks to cool completely.
Buttercream & Ganache
-
Beat butter and brown sugar until creamy (~3 minutes). Add cinnamon, powdered sugar, cream, vanilla, and salt. Mix on low, then medium-high until smooth.
-
For ganache: heat cream 60 seconds, pour over white chocolate, cover, wait 5 minutes, then stir until smooth. Let cool slightly before using.
Assembly
-
Place first cake layer (top-side up) on cake board. Spread ~1 cup buttercream, then drizzle with ganache. Repeat with remaining layers.
-
Top with final layer (top-side down). Apply thin crumb coat and chill 10–15 minutes.
-
Frost entire cake with remaining buttercream. Drizzle edges with ganache. Optional: sprinkle with cinnamon sugar.
Nutrition Facts
Servings 12
Serving Size 1 slice (1 of 12)
- Amount Per Serving
- Calories 520kcal
- % Daily Value *
- Total Fat 29g45%
- Saturated Fat 16g80%
- Cholesterol 145mg49%
- Sodium 420mg18%
- Potassium 210mg6%
- Total Carbohydrate 64g22%
- Dietary Fiber 2g8%
- Sugars 48g
- Protein 6g12%
- Calcium 80 mg
- Iron 2 mg
* Percent Daily Values are based on a 2,000 calorie diet. Your daily value may be higher or lower depending on your calorie needs.
Note
- Make ahead: Bake cake layers 1–2 days ahead and freeze. Frost the day of serving.
- Gluten-free option: Substitute all-purpose flour with 1:1 gluten-free blend.
- Cardamom substitute: Omit or replace with extra cinnamon if unavailable.
Frequently Asked Questions
Can I make this as cupcakes?
Yes! Bake at 325°F for 23–26 minutes. Add a small swirl of cinnamon mixture to the center of each cupcake before baking.
Can I skip the white chocolate ganache?
You can, but it adds richness and ties the snickerdoodle and pumpkin flavors together beautifully.
How should I store leftovers?
Store covered in the refrigerator for up to 5 days. Bring to room temperature before serving for best texture and flavor.