
 View Gallery
1 photo
View Gallery
1 photo
I have to admit, I used to think a heart-shaped cake required a specialty pan. I’d see them in bakery windows and just assume it was a tool I didn’t own. Then I learned this simple method using two ordinary round cake pans, and it honestly felt like a little baking secret had been unlocked.
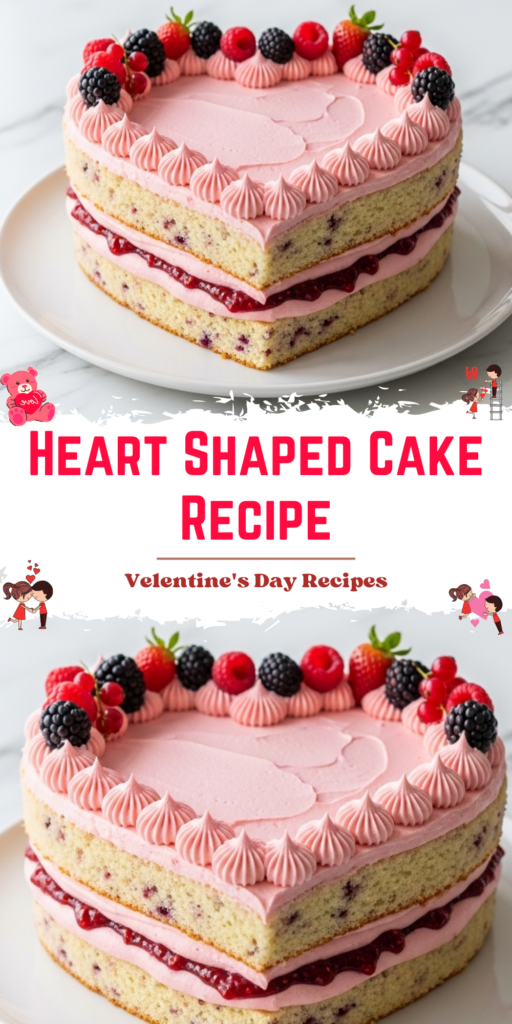
This particular cake is a celebration of berries, through and through. We have tender, lemony cake layers speckled with fresh raspberries, a bright jam filling, and a beautifully pink berry buttercream. It’s a showstopper that feels perfectly suited for Valentine’s Day, an anniversary, a birthday, or just a Tuesday where you want to say “I care about you” with dessert.
The best part is, it’s entirely plant-based. No one will miss the dairy or eggs, I promise. The cake is wonderfully moist, and the frosting is rich and pipeable. Let’s walk through the process together, from mixing the batter to that final, satisfying swipe of frosting. You can absolutely do this.
Ingredients Needed for the Recipe
Gathering everything first makes the process so much smoother. Here’s what you’ll need to create this vegan heart-shaped cake, with a few notes on why each component matters.
- All-purpose flour: The foundation of our cake layers, providing structure. Be sure to spoon it into your measuring cup and level it off for accuracy.
- Granulated sugar: For sweetness and helping to create a soft crumb in the cake.
- Baking powder: Our leavening agent, essential for getting a nice rise on the layers.
- Lemon zest and juice: The zest adds a fragrant, sunny note that complements the berries beautifully, while the juice reacts with the milk to create a vegan “buttermilk” for tenderness.
- Dairy-free milk & neutral oil: The milk provides moisture and the oil ensures the cake stays incredibly soft and moist for days.
- Fresh or frozen raspberries: For the cake batter and the optional homemade jam. They add little bursts of tart flavor and a gorgeous natural color.
- Vegan butter: The base for our buttercream frosting. Using a good quality, firm block-style vegan butter will give you the best results for piping.
- Powdered sugar: Sweetens and thickens the buttercream to a spreadable, pipeable consistency.
- Freeze-dried berry powder or food coloring: This is how we get that lovely pink hue naturally. Freeze-dried strawberry or raspberry powder is my favorite trick.
Getting Your Layers Ready
Before we even think about shaping, we need perfect cake layers. This recipe is wonderfully straightforward, a simple one-bowl method that comes together without fuss. Preheat your oven to 180°C (355°F) and line two 6-inch round cake pans with parchment paper.
In a large bowl, whisk together your dry ingredients: the flour, sugar, baking powder, lemon zest, and that optional pinch of salt. If you have a minute, rub the lemon zest into the sugar with your fingertips. It releases the oils and makes the lemon flavor sing.
Now, pour in your wet ingredients – the dairy-free milk, oil, lemon juice, and vanilla. Whisk it just until the last streaks of flour disappear. A few small lumps are okay, you really don’t want to overmix. Gently fold in the fresh raspberries, trying to distribute them evenly without crushing them too much.
Divide the batter between your two pans, give them a firm tap on the counter to settle, and bake. They’ll need about 45 minutes, but start checking at 43. A toothpick inserted should come out clean or with a few moist crumbs.
Let them cool in the pans for 10 minutes, then turn them out onto a wire rack to cool completely. This is crucial. Trying to shape or frost a warm cake is a recipe for crumbly disaster. Patience here makes all the difference.
Step 1 – Crafting the Heart Shape
Once your cakes are completely cool, the magic happens. Take one cake layer and place it on your work surface. Using the blunt side of a knife, gently score the top into quarters, like you’re cutting a pizza. This is just a visual guide.
Now, with a sharp serrated knife, cut along one of those lines from the center out to the edge. Stop. Turn and cut along the adjacent line, removing a wedge-shaped quarter piece of cake. Repeat on the opposite side, so you remove two quarter wedges in total. These are your scrap pieces, but don’t you dare throw them away.
Slide the main part of the cake over a bit. Take your two scrap wedges and place them on the now-empty side of the cake, with their curved edges facing out. You’ll see the top curves of a heart start to form. Use a tiny dab of frosting to “glue” them in place for now.
Step 2 – Creating the Filling & Stacking
If you’re using the quick raspberry jam, make it now. Simply cook raspberries with a bit of sugar and a cornstarch slurry until thickened, then let it cool. It’s simple and tastes incredibly fresh. A good quality store-bought jam works perfectly too.
Place your first shaped heart layer on a cake board or serving plate. For a jam filling, I do a quick “insurance” step. Spread a very thin layer of plain buttercream over the cake surface. This creates a barrier so the jam doesn’t make the cake soggy.
Next, pipe a thick dam or border of buttercream around the very edge of the cake layer. This is your frosting wall. Inside that wall, spoon and spread your cooled jam. Don’t overfill it, or the layers will slide.
Step 3 – Repeating and Crumb Coating
Carefully place your second full cake layer on top. Now, repeat the exact same shaping process you did with the first layer. Score, cut the two wedges, position them to form the heart top, and secure with a bit of frosting.
Look at that. You have a beautiful, two-layer heart cake. Now, we crumb coat. This is just a thin, initial layer of frosting that traps all the loose crumbs and seals in the jam.
Using an offset spatula, spread a thin layer of your pink buttercream over the entire cake. Don’t worry about it looking perfect. Get it covered, then pop the whole cake in the fridge for 20-30 minutes. This chills the frosting so it’s firm to the touch.
Step 4 – The Final Frost & Decorate
Once the crumb coat is set, you’re ready for the final, beautiful layer of frosting. Spread a generous amount of buttercream all over the cake, using your spatula or a cake scraper to smooth it as much as you like.
I love adding some simple piped decorations. Fit a piping bag with a star tip, fill it with some of the pink buttercream or even some plain white, and pipe shells or rosettes along the base and top edges. Finally, artfully pile fresh raspberries and sliced strawberries on top just before serving.
That first slice is the real reward. You’ll see the lovely layers, the ribbon of red jam, and the specks of berry throughout the cake. It’s a labor of love, but every single step is completely achievable.
Customizing Your Creation
The beauty of this method is that the shape is the star, but the flavors can be whatever you dream up. That berry-lemon combo is a classic for a reason, but don’t feel limited by it. You can use this shaping technique with almost any cake recipe.
For a rich, dramatic look, a vegan red velvet cake would be stunning. A simple vanilla cake would be a perfect blank canvas for any frosting color. You could even do a chocolate cake with cherry jam filling and a pink vanilla frosting.
The decorations are where your personality can shine. Instead of fresh berries, consider a drizzle of dark chocolate ganache. Use vegan sprinkles in heart shapes, or press crushed freeze-dried berries around the sides for an ombre effect. It’s your cake, make it speak to you and the person you’re making it for.
Tips
- For perfectly flat layers that need little to no trimming, wrap the outside of your cake pans with wet fabric cake strips before baking. They insulate the edges, allowing the cake to rise evenly.
- If using natural fruit powders to color the frosting, know they deepen in color over time, especially in the fridge. Start with less, you can always add more.
- Make components ahead. The cake layers can be baked, wrapped tightly, and frozen for up to a month. Thaw before assembling. The frosting can be made and refrigerated for a week, just let it come to room temperature and re-whip before using.
- When applying the final frosting over the crumb coat, don’t be shy. Use a generous amount on your spatula. It’s easier to smooth a plentiful amount of frosting than it is to smooth a scant layer that’s pulling at the crumbs underneath.
- If a little crack appears when you’re positioning the cake wedges, don’t panic. The crumb coat and final frosting are fantastic spackle. It will all come together.
Serving and Storing Your Cake
This cake is best served at room temperature. If you’ve stored it in the fridge, take it out about an hour before you plan to slice it. This allows the frosting to soften slightly and the cake to regain its full tenderness and flavor.
To store, place any leftovers in an airtight container. It will keep at room temperature in a cool spot for a day, or in the refrigerator for up to three days. The cake itself stays wonderfully moist thanks to the oil in the batter.
If you’ve decorated with fresh fruit, just be aware that the berries may soften and release a little juice after a day. It’s still delicious, but for the prettiest presentation, add the fresh fruit garnish as close to serving time as possible. Otherwise, you’ve made something truly special, a homemade gift that comes straight from the heart, in every sense of the word.
Heart Shaped Cake Recipe
Description
This tutorial shows how to make a heart-shaped cake using round cake pans (no special cake pan needed). The cake consists of vegan berry cake layers, jam filling and berry buttercream. And it’s perfect for Valentine’s Day, Mother’s Day or any special celebration.
ingredients
Cake Dry Ingredients
Cake Wet Ingredients
Quick Raspberry Jam (or use store-bought jam), optional
Pink Buttercream Frosting
Instructions
To make the cake:
-
Preheat your oven to 180°C (355°F). Line 2 x 15cm (6-inch) round cake pans with parchment paper.
-
Add all the dry ingredients to a large bowl and whisk until well combined. If desired, rub the sugar with the lemon zest for more lemon flavor and color. Add all the wet ingredients (except the raspberries) and whisk until just combined. Add the raspberries and gently fold through.
-
Divide the cake batter between your prepared pans. Make sure the raspberries are evenly distributed and haven't clumped together. Firmly tap the cake pans on the kitchen bench to remove any big air bubbles.
-
Bake the cakes for 43-48 or until you can insert a toothpick in the middle and it comes out with no wet batter on it (a few moist crumbs are fine).
-
Allow the cakes to cool in their pans for 10 minutes then transfer them to a cooling rack to cool completely.
Make the quick jam (optional):
-
Add the raspberries, sugar and a dash of water to a small saucepan over medium heat. Cook for 5 minutes and mash the berries with the back of a fork.
-
In a small bowl, combine the cornstarch with a dash of water and mix. Add the cornstarch slurry to the raspberry mixture and cook until thickened. For a thicker jam, cook for longer, or for a runnier jam, add a dash of water. Set aside to cool completely.
Make the buttercream:
-
Add the butter to a large mixing bowl (if using an electric mixer) or the bowl of a stand mixer. Whip until light and fluffy.
-
Add the powdered sugar, berry powder or food color and vanilla to the bowl. Whip the mixture on low speed until combined. Increase the speed to high and beat until light and fluffy. Add a dash of milk for a softer frosting, or more color as desired.
Assemble the heart cake:
-
If your cakes have any domes, trim them off with a serrated knife. Using the blunt side of a knife, gently score the surface of the 2 cakes into quarters. Then use a sharp knife to cut two 'segments' off each cake (refer to the images in the post). This will be the bottom of your heart cake.
-
Place the first cake layer on a serving plate or cake board. Use a little frosting to stick the two cake 'segments' to the other side of the cake to form the top of the heart. Trim the cake as needed.
-
If you want a jam filling, spread a little frosting on the surface of the cake layer. Pipe a 'dam' of frosting on the border of the cake and spoon the jam in the middle. If you don't want a jam filling, top your cake layer with about 3/4 cup of frosting.
-
Place the remaining cake layer on top of the first layer. Repeat the process with the cake 'segments' to form a heart shape and trim as needed. Crumb coat the heart cake by spreading a thin layer of frosting on the sides and top. Chill the cake in the fridge for at least 20 minutes or until the frosting is dry to the touch.
-
Add a thicker layer of frosting to the heart cake and smooth it with an offset spatula or cake scraper. Use a piping bag with a star or circular piping tip to decorate the rest of the heart cake. Just before serving, add fresh berries on top of the cake.
-
Store the frosted heart cake in an airtight container at room temperature for 1 day or in the fridge for up to 3 days. If it's a hot day, store the fridge in the fridge. Let the cake come to room temperature before serving.
Nutrition Facts
Servings 8
Serving Size 1 slice
- Amount Per Serving
- Calories 350kcal
- % Daily Value *
- Total Fat 14g22%
- Saturated Fat 4g20%
- Sodium 220mg10%
- Potassium 180mg6%
- Total Carbohydrate 50g17%
- Dietary Fiber 2g8%
- Sugars 35g
- Protein 3g6%
- Calcium 40 mg
- Iron 1 mg
* Percent Daily Values are based on a 2,000 calorie diet. Your daily value may be higher or lower depending on your calorie needs.
Note
- For a different cake size, scale the recipe by tapping on the number next to ‘Yield’. For an 8-inch cake, scale up to 10 servings. For a 4-inch cake, scale down to 4 servings.
- Frosting option: You can use strawberry frosting flavored with whole strawberries. Avoid cream cheese frosting—it’s too soft for this cake.
- Natural color note: If using natural powders like raspberry, strawberry, or beetroot in frosting, color will darken over time—especially when refrigerated. Start with less and add gradually.
Frequently Asked Questions
Can I make this cake ahead of time?
Yes! Bake and freeze undecorated cake layers up to 4 weeks ahead. Thaw at room temperature before decorating. Frosted cake keeps at room temp for 1 day or refrigerated for up to 3 days.
Do I need special tools to shape the heart?
No! All you need are round cake pans, a sharp knife, and patience. The tutorial includes step-by-step visual guidance for shaping the heart from standard round layers.