

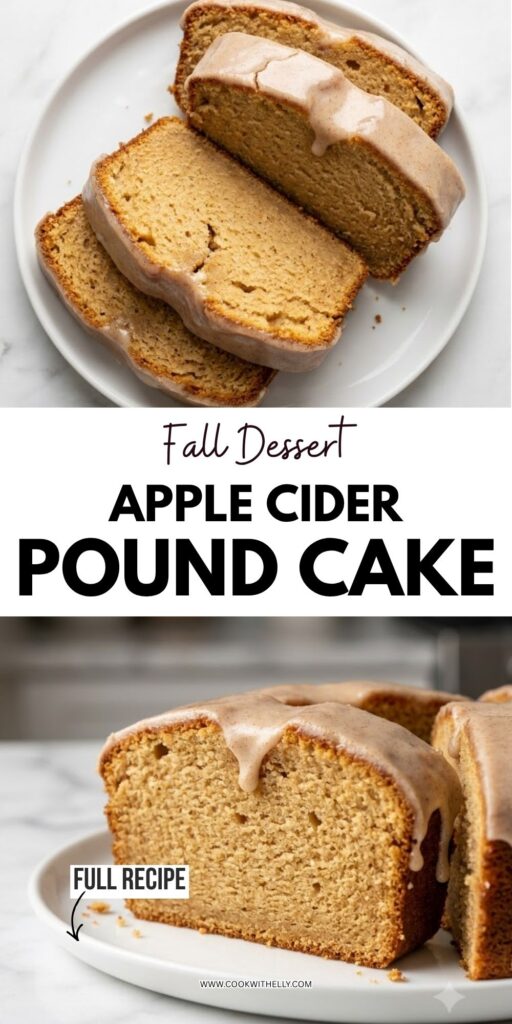

I start getting serious about apple cider desserts when the air finally feels a little cooler, even if I am still wearing sandals and pretending summer is not over yet. Apple cider pound cake is one of those recipes that makes my kitchen feel like fall without requiring a complicated dessert project.
I love how simple this cake looks when it comes out of the oven. It is just a golden loaf with a little glaze, but the flavor is much bigger than the appearance. The butter makes it rich, the apple cider gives it that sweet apple flavor, and the tiny bit of cinnamon in the glaze makes the whole thing taste especially cozy.
I have made plenty of pound cakes that looked perfect and then turned out heavier than I wanted. I learned pretty quickly that I cannot get impatient with the batter. Room-temperature ingredients and gentle mixing make a bigger difference here than I used to think.
My Favorite Thing About This Apple Cider Cake
I am usually torn between apple and pumpkin desserts once fall baking starts, but this cake always pulls me toward the apple side. There is something about apple cider that tastes a little brighter than pumpkin, especially when it is mixed with plenty of butter and sugar.
The cake itself is dense in the way I want a pound cake to be, but it is still moist and tender. I do not want a fluffy cake for this recipe. I want something substantial enough to slice thickly and eat with a cup of coffee in the morning.
I also like that the cider flavor does not need a long list of spices to make itself known. There is no need for a whole cabinet of fall spices. The apple cider does most of the work, while the cinnamon glaze gives it a little extra warmth at the end.
One thing I have learned from making this cake is that the glaze should wait. I used to be tempted to pour glaze over anything that had cooled for five minutes because I wanted to get to the slicing part. That does not work well here. Warm cake makes the glaze slide right off, and I end up with a puddle on the plate instead of that pretty coating across the top.
Ingredients I Used for the Recipe
- 3/4 cup unsalted butter, softened: I use softened butter to build the rich, buttery base of the pound cake and help it cream smoothly with the sugar.
- 1 1/2 cups granulated sugar: I use regular granulated sugar to sweeten the cake and help create that classic pound cake texture.
- 3 large eggs, room temperature: I add the eggs one at a time so they blend evenly into the butter and sugar mixture.
- 1 1/2 cups all-purpose flour: I use all-purpose flour for the structure of the cake and that pleasantly dense pound cake crumb.
- 1/4 teaspoon baking powder: I add just a small amount for leavening without turning the cake into something light and airy.
- 1/4 teaspoon salt: I use salt to balance the sweetness and bring out the buttery flavor.
- 1/2 cup apple cider: I use apple cider for the main apple flavor and a little extra moisture in the batter. I let it come closer to room temperature before mixing it in.
- 1 cup powdered sugar, sifted: I use powdered sugar for the smooth glaze that goes over the cooled cake.
- 1 to 2 tablespoons apple cider: I add just enough cider to the powdered sugar to create a glaze that pours easily but is not watery.
- Pinch of cinnamon: I add a small pinch to the glaze because I want the cinnamon to support the apple cider instead of taking over.
How to Make Apple Cider Pound Cake
Step 1 – Prepare the Loaf Pan
I start with a 9×5-inch loaf pan because the size works well for this amount of batter. I line the pan with parchment paper and leave some excess hanging over the sides. Those little parchment handles make removing the finished cake so much easier.
I also spray the parchment and exposed sides generously with nonstick cooking spray. I have skipped this part before, thinking the parchment would be enough, and I regretted it when a stubborn corner of cake refused to release.
Step 2 – Cream the Butter and Sugar
I put the softened butter and granulated sugar into the bowl of a stand mixer and beat them until the mixture becomes light and fluffy. I do not rush this part because it gives the batter a nice starting texture.
The butter needs to be soft enough to mix easily, but I do not want it melted. Melted butter behaves differently and can leave me with a cake that does not have the texture I am looking for.
Step 3 – Add the Eggs One at a Time
I crack the eggs into the mixture one at a time, beating after each addition until the egg is completely incorporated. This takes a little patience, but I find it helps keep the batter smooth.
I also prefer room-temperature eggs. Cold eggs straight from the refrigerator can make the butter mixture look curdled and uneven, and I would rather avoid that little battle before I even add the flour.
Step 4 – Mix the Dry Ingredients
In a separate bowl, I whisk together the flour, baking powder, and salt. I like doing this before adding anything to the wet mixture because it spreads the small amount of baking powder and salt throughout the flour.
There is no need to make this complicated. A quick whisk is enough. I just want everything evenly combined before it goes into the batter.
Step 5 – Add the Flour and Cider Gradually
I add about one-third of the dry ingredients to the butter mixture, followed by about one-third of the apple cider. I mix until everything is just combined, then repeat the process two more times.
This is probably the part where I have to remind myself to stop mixing. I used to keep beating because I wanted the batter to look perfectly smooth, but too much mixing can make the finished cake tougher. Once the flour disappears, I am done.
Step 6 – Fill the Pan and Remove Air Bubbles
I transfer the batter to the prepared loaf pan and smooth the top. Then I give the pan one or two gentle drops against the counter. This helps bring larger air bubbles toward the surface.
I do not bang it around aggressively. A couple of firm little taps are plenty, especially since I am not trying to flatten the batter or knock all the air out of it.
Step 7 – Bake the Pound Cake
I bake the cake at 350°F for about 40 to 50 minutes. My oven tends to have its own personality, so I start checking toward the earlier end of that range instead of blindly waiting for the full 50 minutes.
I test the center with a butter knife. When it comes out clean, I know the cake is ready. If I still see wet batter clinging to it, I give the cake a little more time and check again.
Step 8 – Cool the Cake Carefully
I let the baked cake cool in the pan for about 10 to 15 minutes. Then I run a clean knife around any edges touching the pan before lifting the cake out using the parchment paper.
I transfer the loaf to a wire rack and let it cool completely. This is another place where I have learned not to rush. The cake needs to be completely cool before I glaze it, or the glaze will melt and run away.
Step 9 – Make the Apple Cider Glaze
I sift the powdered sugar into a bowl, then add one tablespoon of apple cider and whisk. If the glaze is too thick, I add a little more cider, a small amount at a time.
I finish it with a pinch of cinnamon. I like the glaze thick enough to sit on the cake for a moment while still being easy to pour. There is a sweet spot between frosting and apple cider drizzle, and I try to stay right in the middle.
Step 10 – Glaze and Slice
Once the cake is completely cool, I pour the glaze evenly over the top. I let it sit for a little while so it can set before slicing.
I usually cut thick slices because thin slices feel a little silly with a pound cake this rich. A warm drink alongside it is pretty much all I need.
Little Tips That Make My Cake Better
- I bring the cold ingredients to room temperature. Soft butter and room-temperature eggs blend much more easily, and I get a smoother batter without having to fight with it.
- I measure the flour carefully. Too much flour can make a pound cake heavier and drier, so I avoid packing extra flour into the measuring cup.
- I stop mixing as soon as the batter comes together. I have learned that more mixing does not make a better cake. Once the flour is incorporated, I leave it alone.
- I check the cake before the maximum baking time. Every oven is a little different, and I would rather check the center than accidentally bake the loaf longer than necessary.
- I cool the cake completely before glazing. This is one of those small details that I used to ignore and now never skip.
- I adjust the glaze slowly. I start with one tablespoon of cider and add more only when needed. It is much easier to thin a thick glaze than fix one that has become too runny.
- I skip the glaze sometimes. When I want something less sweet, I dust the cooled cake with cinnamon sugar instead. It is simple and still feels very fall-like.
How I Serve and Store It
I like serving this cake in the afternoon when I want something sweet but do not want to make an entire dessert production out of it. A thick slice with coffee is probably my favorite combination, although tea works just as well.
I also think this cake works beautifully as a breakfast treat. It has enough richness to feel special, but the apple cider keeps it from tasting like an overly sweet frosted dessert.
For storage, I keep the cooled cake in an airtight container at room temperature. I get the best flavor and texture when I eat it within about five days.
I can refrigerate it when I need a longer storage time, but I prefer the room-temperature version. The refrigerator tends to change the texture of pound cake, making it firmer than I want.
If I know I am serving the cake later in the day, I usually make it earlier and let it cool completely before glazing. That gives the glaze time to settle, and the slices look much cleaner when I finally cut into the loaf.
For me, apple cider pound cake is one of those recipes that does not need much fuss to feel seasonal. I get buttery cake, real apple cider flavor, a little cinnamon, and a simple glaze all in one loaf. It is the kind of dessert I can bake on an ordinary weekend and somehow make the whole kitchen feel like fall.
Apple Cider Pound Cake Recipe
Description
I bake this buttery apple cider pound cake for a simple fall dessert with a moist, tender crumb and plenty of real apple cider flavor. I finish each thick slice with a smooth cinnamon cider glaze that makes the whole loaf feel cozy without adding much fuss.
ingredients
Apple Cider Pound Cake
For the Pan
Instructions
Prepare and Bake the Cake
-
Prepare the loaf pan
I line a 9x5-inch loaf pan with parchment paper, leaving some parchment hanging over the sides to create handles. I spray the parchment and exposed sides generously with nonstick cooking spray.The parchment handles make it easier to lift the baked cake from the pan. -
Cream the butter and sugar
I add the softened butter and granulated sugar to the bowl of a stand mixer and beat until the mixture is light and fluffy.I make sure the butter is softened but not melted so the cake develops the intended pound cake texture. -
Add the eggs
I add the room-temperature eggs one at a time, beating after each addition until completely incorporated before adding the next egg.Using room-temperature eggs helps keep the butter mixture smooth and even. -
Combine the dry ingredients
I whisk the flour, baking powder, and salt together in a separate bowl until evenly combined.A quick whisk is enough to distribute the baking powder and salt throughout the flour. -
Alternate flour and cider
I add about one-third of the dry ingredients to the butter mixture, followed by about one-third of the apple cider. I mix just until combined, then repeat twice more until all the flour and cider are incorporated.I stop mixing as soon as the flour disappears because overmixing can make the pound cake tougher. -
Fill the pan
I transfer the batter to the prepared loaf pan and smooth the top. I give the pan one or two gentle taps against the counter to help release larger air bubbles.I avoid banging the pan aggressively so I do not flatten the batter. -
Bake the cake
I bake the pound cake at 350°F for 40 to 50 minutes. I begin checking toward the earlier end of the baking range and test the center with a butter knife. If wet batter remains, I continue baking and check again.The cake is ready when the center tester comes out clean. Baking time can vary between ovens. -
Cool the cake
I let the cake cool in the pan for 10 to 15 minutes. I run a clean knife around any edges touching the pan, then lift the cake out using the parchment handles and transfer it to a wire rack. I let it cool completely.The cake must be completely cool before glazing so the glaze does not melt and run off. -
Make the apple cider glaze
I sift the powdered sugar into a bowl and whisk in 1 tablespoon of apple cider. If the glaze is too thick, I add additional cider a little at a time, up to 2 tablespoons total, then stir in a pinch of cinnamon.I aim for a glaze that pours easily but is thick enough to sit on the cake rather than becoming watery. -
Glaze and slice
I pour the glaze evenly over the completely cooled cake and let it sit for a little while to set. I then slice the loaf into thick pieces and serve.I prefer thick slices with coffee or tea. For a less sweet version, I can skip the glaze and use cinnamon sugar instead.
Nutrition Facts
Servings 8
Serving Size 1 thick slice
- Amount Per Serving
- Calories 514kcal
- % Daily Value *
- Total Fat 23.6 gg37%
- Saturated Fat 14.3 gg72%
- Trans Fat 0.9 gg
- Cholesterol 116 mgmg39%
- Sodium 188 mgmg8%
- Potassium 91 mgmg3%
- Total Carbohydrate 72.4 gg25%
- Dietary Fiber 1.0 gg4%
- Sugars 55.9 gg
- Protein 5.0 gg10%
- Calcium 22 mg mg
- Iron 1.4 mg mg
* Percent Daily Values are based on a 2,000 calorie diet. Your daily value may be higher or lower depending on your calorie needs.
Note
I get the best texture when I use room-temperature eggs and softened butter, measure the flour carefully, and stop mixing as soon as the flour disappears. I cool the cake completely before glazing and store the finished cake in an airtight container at room temperature for up to about five days. For longer storage, I can refrigerate it, although the cake will become firmer.
Frequently Asked Questions
Can I use cold eggs?
I prefer room-temperature eggs because they blend more smoothly with the creamed butter and sugar. Cold eggs can make the mixture look curdled and uneven.
Can I use melted butter instead of softened butter?
I would not. The recipe is designed around softened butter that can be creamed with the sugar. Melted butter can change the texture of the finished pound cake.
How do I keep the pound cake from becoming tough?
I measure the flour carefully and stop mixing as soon as the flour disappears into the batter. Overmixing after adding the flour can make the cake tougher.
How do I know when the pound cake is done?
I start checking around 40 minutes and test the center with a butter knife. When the tester comes out clean without wet batter, I take the cake from the oven.
Why does my glaze slide off the cake?
The cake is probably still too warm. I let the pound cake cool completely before adding the glaze so it stays on top instead of melting and running away.
How should I store apple cider pound cake?
I keep the cooled and glazed cake in an airtight container at room temperature and enjoy it within about five days for the best texture and flavor.