

There is something comforting about chili. It is warm, familiar, and always feels right when the weather cools down or a crowd gathers around the table.
Over the years, I realized that serving chili doesn’t have to mean one pot and one ladle. Turning it into a full board changes the whole mood of the meal.
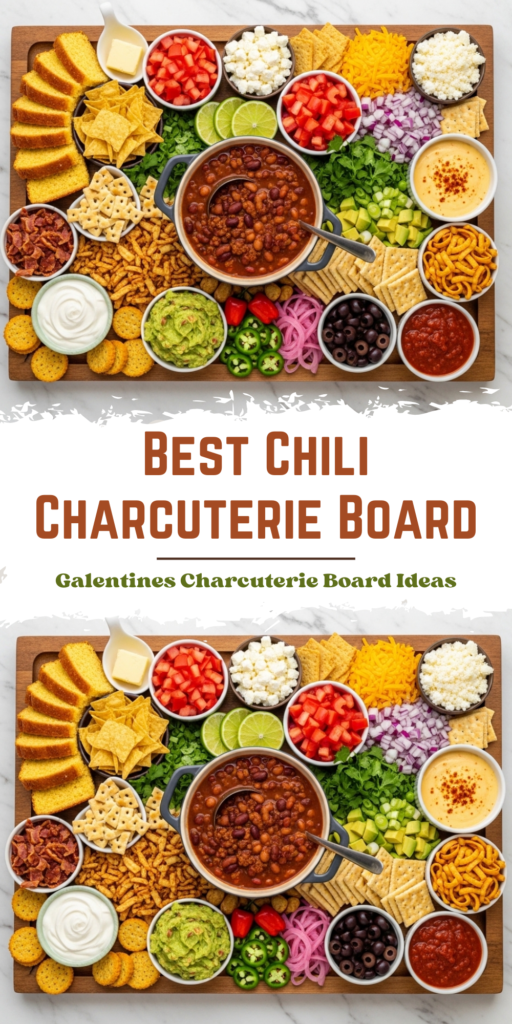
The Best Chili Charcuterie Board takes that classic bowl and opens it up. Everyone builds their own, adds what they love, and skips what they don’t.
It feels casual but thoughtful at the same time, which is honestly my favorite way to host. Low stress, high comfort, and plenty of flavor.
Why a Chili Charcuterie Board Works So Well
Chili already brings bold flavor, but the toppings are where personality shows up. A board lets guests lean into creamy, crunchy, spicy, or fresh.
I also love how interactive it is. People hover, chat, scoop, and snack, instead of sitting quietly waiting for plates.
It works for game days, family dinners, or even casual parties where you want something filling without being fussy.
And if I’m being honest, it looks impressive without requiring much extra effort. That alone makes it worth doing.
Ingredients Needed for the Recipe
- Chili – This is the base of the board, kept warm in a pot or slow cooker so everyone can serve themselves.
- Shredded cheddar or Mexican blend cheese – Adds creaminess and a salty bite that melts perfectly into hot chili.
- Sour cream – Cools things down and balances spicy flavors.
- Fresh cilantro – Brings a pop of freshness and color.
- Green onions – Add mild onion flavor and a little crunch.
- Red onion – Sharper and bolder, great for guests who like extra bite.
- Jalapeños – For heat lovers who want to turn things up.
- Diced avocado – Creamy and mellow, especially good with spicy chili.
- Lime wedges – A squeeze brightens the whole bowl.
- Fresh tomatoes – Light and juicy, adding contrast to the richness.
- Queso dip – Extra cheesy and indulgent, perfect for drizzling.
- Bacon bits – Smoky, salty, and always popular.
- Crispy fried onions – Crunchy texture that stands out.
- Pickled red onions – Tangy and slightly sweet for balance.
- Tortilla chips or Fritos – Crunchy scoops and great for topping bowls.
- Crackers – A simple, sturdy option for dipping.
- Black olives – Salty and savory with a different flavor note.
- Salsa – Adds extra tomato flavor and heat.
- Cornbread – A classic side that pairs naturally with chili.
- Baked potatoes or rice – Hearty bases for turning chili into a full meal.
How to make The Best Chili Charcuterie Board?
Step 1 – Prepare the chili
Start by making your favorite pot of chili. Whether it’s homemade or store-bought, make sure you have enough for everyone.
I like using a slow cooker because it keeps the chili warm without needing attention. That alone makes hosting easier.
Step 2 – Prep the toppings
Chop, dice, slice, and shred all the toppings ahead of time. This part takes a little patience, but it makes assembly smooth.
Place each topping in its own small bowl so flavors stay clean and guests can easily see their options.
Step 3 – Set up the board
Place the pot of chili right in the center of a large board or platter. Always use a hot pad underneath to protect the surface.
Arrange the bowls of toppings around the chili, spacing them out so nothing feels crowded.
Step 4 – Fill in with sides
Use open spaces on the board for cornbread slices, chips, crackers, or Fritos. These help fill the board visually and practically.
I like mixing textures here. Soft cornbread next to crunchy chips just works.
Step 5 – Add serving tools
Set out spoons, tongs, and small ladles so guests can serve themselves comfortably.
This small step keeps the board tidy and helps everything flow smoothly.
Serving Ideas for a Chili Party
A chili charcuterie board fits easily into a larger spread. I often pair it with simple drinks and an easy dessert.
Brownies, cinnamon rolls, or cookies work well because they feel cozy and familiar after a hearty meal.
If you’re hosting a bigger group, consider offering two types of chili. One classic and one vegetarian keeps everyone happy.
Turning it into a chili buffet or cook-off adds energy and gives guests something fun to talk about.
Tips
- Label toppings so guests know exactly what they’re adding.
- Keep extra chili warm in the kitchen for easy refills.
- Offer mild and spicy options to suit different preferences.
- Use sturdy bowls that won’t slide around the board.
- Prep toppings earlier in the day to reduce last-minute stress.
Variations to Keep Things Interesting
Once you’ve made a chili board once, it’s hard not to keep experimenting. Small changes can make it feel brand new.
Chili dogs are always a hit. Adding hot dogs and buns lets guests build something totally different.
Cincinnati-style boards with spaghetti offer a fun twist that surprises people in a good way.
Tex-Mex versions with guacamole, extra salsa, and jalapeños lean into bold flavors and spice.
You can even try an international approach with unexpected toppings like feta or yogurt for contrast.
Substitutions and Dietary Options
A good board should work for everyone at the table. Substitutions make that possible without much effort.
Vegan chili and plant-based toppings keep the experience inclusive and just as satisfying.
Gluten-free cornbread or rice works well for guests with restrictions.
Dairy-free cheeses and sour cream alternatives blend in easily and still look great on the board.
The key is flexibility. Let guests build something that fits their tastes and needs.
The Best Chili Charcuterie Board isn’t about perfection. It’s about warmth, choice, and sharing a meal that feels relaxed and generous.
Every time I serve it, the board empties fast and the conversations linger longer. That’s always a good sign.
The Best Chili Charcuterie Board
Description
Transform a humble bowl of chili into a fun, interactive, and customizable meal with this Chili Charcuterie Board! Perfect for game day, winter gatherings, or a cozy dinner party, this board lets guests build their own dream bowls of chili with an array of toppings, sides, and proteins. Serve it with your favorite homemade chili—like Ground Beef and Bean Chili or Texas Roadhouse Chili—and watch it disappear!
ingredients
Main Component
Cheese Toppings
Fresh Toppings
Creamy & Tangy Toppings
Crunchy & Savory Add-ons
Heat & Flavor Boosters
Optional Sides
Instructions
-
Prepare your favorite chili recipe ahead of time and keep it warm in a slow cooker or pot.
-
Place the pot or slow cooker of chili in the center of a large charcuterie board or serving platter. Use a trivet or hot pad underneath to protect the surface.
-
Arrange small bowls around the chili for toppings like sour cream, queso, guacamole, salsa, and pickled onions.
-
Fill remaining space on the board with crunchy items like tortilla chips, Fritos, crackers, and cornbread slices.
-
Add serving utensils: small spoons for dips, tongs for chips/cornbread, and ladles for chili.
-
Let guests build their own custom bowls of chili using the variety of toppings and sides!
Nutrition Facts
Servings 6
Serving Size 1 bowl (customizable)
- Amount Per Serving
- Calories 520kcal
- % Daily Value *
- Total Fat 31gg48%
- Saturated Fat 14gg70%
- Trans Fat 0.5gg
- Cholesterol 75mgmg25%
- Sodium 980mgmg41%
- Potassium 820mgmg24%
- Total Carbohydrate 38gg13%
- Dietary Fiber 7gg29%
- Sugars 6gg
- Protein 24gg48%
- Calcium 20 mg
- Iron 25 mg
* Percent Daily Values are based on a 2,000 calorie diet. Your daily value may be higher or lower depending on your calorie needs.
Note
- Make it gluten-free: Use certified GF cornbread and avoid cracker options that contain wheat.
- Vegan option: Offer plant-based chili, dairy-free cheese, and skip sour cream or use a vegan alternative.
- Keep it warm: Use a slow cooker or chafing dish to maintain chili temperature throughout your event.
- Label everything: Use small chalkboard signs or sticky notes so guests know what each topping is.
Frequently Asked Questions
Can I prep the board ahead of time?
Yes! Prep all toppings and sides up to a day in advance and store them separately. Assemble the board just before guests arrive to keep everything fresh and crisp.
What if I don’t have a large charcuterie board?
No problem! Use a large baking sheet, countertop tray, or even multiple smaller boards grouped together. The key is visual appeal and easy access.