 View Gallery
1 photo
View Gallery
1 photo
Let’s clear something up right from the start, because it’s important.
This isn’t a traditional sourdough bread, and it makes no claims to be one.
A Happy Solution for Your Starter Jar
If you keep a sourdough starter, you know the weekly dilemma all too well.
You’re left with that half-cup of discard, and tossing it feels just plain wrong.
You could make pancakes, sure, but sometimes you just crave a proper loaf of bread.
That’s where this recipe swoops in to save the day, and your conscience.
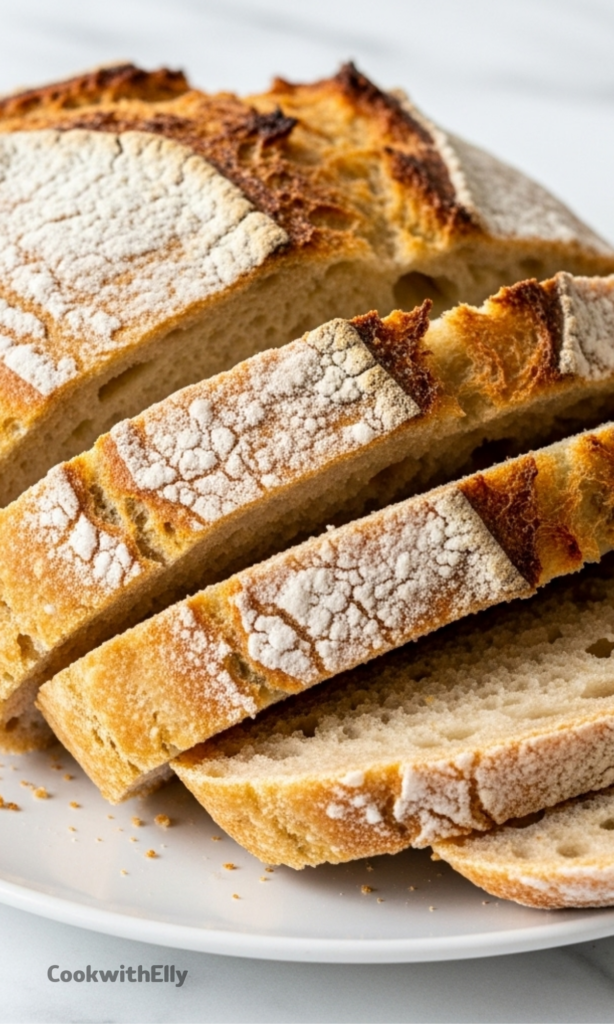
It’s an everyday bread with a beautiful secret—it uses your discard for a wonderful depth of flavor.
You get a soft, tender crumb with a gorgeous, crackly crust that sings when you cut into it.
Ingredients Needed for the Recipe
Gather these simple ingredients. Each one has a specific role to play in creating your loaf.
- All-Purpose Flour (1.5 cups): This provides the main structure and a light, airy texture.
- Whole Wheat Flour (1.5 cups): Adds a subtle nuttiness and wholesome heartiness to the bread.
- Salt (1 1/4 tsp): Crucial for enhancing all the other flavors in the dough.
- Sourdough Discard (1/3 cup): The star of the show, giving a gentle tang and incredible moisture.
- Yeast (1 1/2 tsp): Our reliable friend that ensures a predictable and satisfying rise.
- Water (1 1/4 cups): Hydrates the flours and activates the yeast for a perfect dough.
- Sugar (1 tsp): Just a pinch to wake up the yeast and get it bubbling happily.
The Magic of a Hybrid Loaf
This bread is the best of both worlds, a beautiful hybrid that respects your time.
It combines the complex flavor of sourdough with the straightforward timeline of a yeasted bread.
You don’t need a sourdough master’s schedule or any special equipment.
Just your hands, a bowl, and a little bit of patience while the magic happens.
The result is bliss you might not have tasted before—a tiny burst of tang with a bit of a chewy underbite.
It looks artisanal and impressive, yet the process is wonderfully simple.
How to make Easy Sourdough Discard Bread?
The journey from flour to finished loaf is a rewarding one. Let’s begin.
Step 1- Wake Up the Yeast
Take your warm water and combine it with the yeast and sugar in a small bowl.
Give it a quick stir and let it sit in a cozy, draft-free corner for about 10 to 15 minutes.
Step 2- Mix the Dry Ingredients
While the yeast gets frothy, whisk together both flours and the salt in a large bowl.
This ensures the salt is evenly distributed, which is key for consistent flavor.
Step 3- Bring the Dough Together
Make a well in the center of your flour mixture and pour in the bubbly yeast water.
Add your sourdough discard right into that same well.
Step 4- The Initial Mix
Use a fork or your hands to mix everything into a rough, shaggy mass.
It will look messy and uneven, and that is exactly what you want at this stage.
Step 5- The First Kneading
Turn that scraggy dough out onto a lightly floured surface. Now, the fun begins.
Push the dough away from you with the heel of your hand, then fold it back over itself.
Rotate, push, and fold. Repeat this motion for a good 8 to 10 minutes.
You’ll feel the dough transform under your hands, becoming smooth, supple, and elastic.
If your arms get tired, and they might, just cover the dough and take a short break.
Come back in a few minutes—the dough will be waiting, and you’ll be refreshed.
Step 6- The First Proofing
Shape your kneaded dough into a neat ball and place it in a lightly greased bowl.
Cover it with a damp tea towel or cling wrap to keep the surface from drying out.
Find that warm spot in your kitchen again and let the dough rest there.
Give it 2 to 3 hours, until it has confidently doubled in size.
Understanding Your Dough’s Personality
Dough is alive, and it reacts to its environment in fascinating ways.
A warm summer kitchen will speed things up, while a chilly winter counter slows it down.
Don’t watch the clock, watch the dough. The doubling in size is your true signal.
This flexibility is what makes baking feel more like an art than a rigid science.
Step 7- Shape with Purpose
Once doubled, gently turn the dough out onto your work surface. No need to punch it down.
Give it a brief, gentle knead for just a minute or two—this is called “knocking back” the air.
Step 8- The Final Form
Now, shape it. You can form a tight ball, a longer oval, or even a simple round loaf.
Place your shaped dough on a parchment-lined baking tray, seam side down.
Step 9- The Second Proofing
Cover the shaped loaf again with your trusty tea towel for one final rise.
This shorter proof, about 45 minutes, lets the dough relax and become beautifully puffy.
Step 10- Preheat for Power
While the dough proofs, preheat your oven. Crank it up as high as it will go.
A scorching-hot oven, around 250°C, is your secret weapon for a fantastic crust.
Step 11- Score and Bake
When the dough is puffy, dust the top lightly with flour. This gives a lovely rustic finish.
Using a very sharp knife or razor, make a few confident slashes on the top.
Scoring isn’t just decorative, it controls where the bread expands in the oven.
Slide the tray into the hot oven and immediately reduce the temperature to 230°C.
The Secret to a Crunchy Crust
For that professional, crackly crust, you need steam in the first few minutes of baking.
Place an empty metal tray on the bottom oven rack while preheating.
As you slide your bread in, carefully pour a cup of hot water into that preheated tray.
Shut the door quickly to trap the burst of steam—it makes all the difference.
Step 12- The Grand Finale
Bake for 35 to 40 minutes. The loaf will turn a deep, glorious golden brown.
You’ll know it’s done when the bottom sounds hollow when you give it a firm tap.
Tips
- Use a digital scale for measuring flour if you can. It’s the most accurate way and leads to consistent results.
- Your discard can be fresh from feeding or straight from the fridge. Either works perfectly fine here.
- Resist the urge to slice the bread while it’s warm. Let it cool completely for at least 90 minutes.
- This allows the internal structure to set, so you get clean slices instead of a gummy mess.
Flavor Adventures and Variations
This recipe is a fantastic canvas, ready for your personal touch.
After the first proof, during the brief shaping knead, you can incorporate all sorts of mix-ins.
Try a handful of chopped walnuts and raisins for a breakfast loaf.
Or knead in a generous amount of fresh rosemary and a crack of black pepper.
Sun-dried tomatoes and sliced olives with a sprinkle of Italian herbs create a savory masterpiece.
Even a blend of seeds—pumpkin, sunflower, sesame—pressed into the loaf before baking adds wonderful texture.
Storing Your Homemade Bread
Once completely cool, store your bread in a paper bag at room temperature for up to two days.
The crust will stay wonderfully crisp. For longer storage, slice and freeze the loaf.
You can pop frozen slices straight into the toaster for a instant taste of homemade goodness.
Never store fresh, crusty bread in a plastic bag—it turns the crust soft and sad.
Baking this bread fills your kitchen with an aroma that feels like an accomplishment.
It’s a fuss-free, gratifyingly rewarding way to use your discard. Give it a whirl.
Easy Sourdough Discard Bread Recipe
Description
This easy sourdough discard bread is soft and tender with a gorgeous crackly crust! You get a tiny burst of tang—slightly more than regular bread—with a bit of a chewy underbite. It’s not true sourdough (it uses yeast for a faster rise), but it’s a brilliant way to use up your sourdough starter discard while still enjoying artisanal-style bread with minimal effort.
ingredients
Instructions
-
In a small bowl, dissolve yeast and sugar in warm water. Let stand for 10–15 minutes until foamy.
-
In a large bowl, mix both flours and salt.
-
Make a well in the center and add the sourdough discard and the bubbly yeast mixture.
-
Mix well with a fork or your hand until a rough, shaggy dough forms.
-
Turn the dough onto a well-floured surface and knead for 8–10 minutes using the heel-of-hand technique: push, fold, turn, repeat—until the dough becomes smooth, supple, and slightly tacky.
-
Shape the dough into a ball, place it in a lightly oiled bowl, cover with a tea towel or cling film, and let rise in a warm, draft-free spot for 2–3 hours or until doubled.
-
After the first rise, gently punch down the dough and knead for 1–2 minutes on a floured surface.
-
Shape into a loaf (baguette or boule) and place on a parchment-lined baking tray.
-
Cover loosely and let rise again for 30–45 minutes until puffy.
-
While the dough proofs, preheat your oven to 250°C (482°F). Place an empty tray on the bottom rack.
-
Once risen, sprinkle the loaf with flour and score the top with a sharp knife.
-
Immediately place the bread in the oven, reduce temperature to 230°C (446°F), and pour 1 cup of hot water into the preheated tray below to create steam.
-
Bake for 35–40 minutes until golden brown and the bottom sounds hollow when tapped.
-
Let cool completely on a wire rack for at least 90 minutes before slicing to preserve structure and texture.
Nutrition Facts
Servings 8
Serving Size 1 slice
- Amount Per Serving
- Calories 180kcal
- % Daily Value *
- Total Fat 2gg4%
- Saturated Fat 0.3gg2%
- Trans Fat 0gg
- Cholesterol 0mgmg0%
- Sodium 370mgmg16%
- Potassium 120mgmg4%
- Total Carbohydrate 35gg12%
- Dietary Fiber 3gg12%
- Sugars 1gg
- Protein 6gg12%
- Calcium 15 mg
- Iron 1.8 mg
* Percent Daily Values are based on a 2,000 calorie diet. Your daily value may be higher or lower depending on your calorie needs.
Note
- Flour flexibility: You can use 100% all-purpose or 100% whole wheat flour—just adjust water slightly for hydration.
- Add-ins: After the first rise, fold in cheese, herbs, sun-dried tomatoes, nuts, seeds, or chocolate chips.
- Oven spring secret: Steam is key! The water tray trick creates moisture for a crackly crust and better rise.
- Not true sourdough: This loaf uses commercial yeast + discard for ease and speed—perfect for beginners!
Frequently Asked Questions
Can I make this bread without sourdough discard?
Yes! Replace the discard with an equal amount of all-purpose flour and water (e.g., 2 tbsp flour + 2 tbsp water). But using discard adds subtle flavor and reduces waste.
Why do I need to wait so long to slice the bread?
Cutting too soon releases steam trapped inside, causing the crumb to collapse and become gummy. Cooling fully (about 90 minutes) sets the structure for perfect slices.
Can I shape this into rolls or buns?
Absolutely! Divide the dough after the first rise, shape into 8–10 rolls, and adjust the second proof to 25–30 minutes. Bake for 20–25 minutes at 230°C.