
 View Gallery
1 photo
View Gallery
1 photo
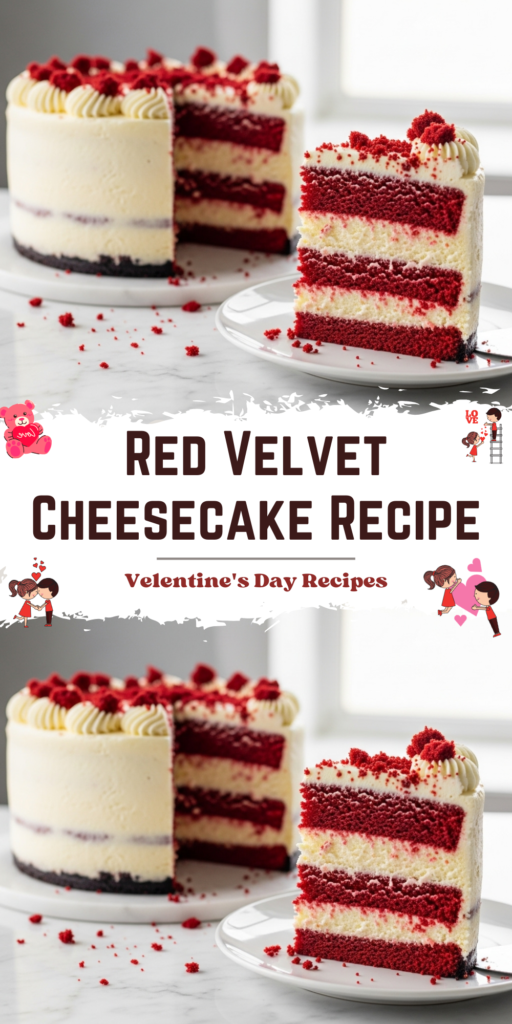
This Red Velvet Cheesecake is one of those desserts that makes people pause mid-sentence when they see it. The deep red layers against creamy cheesecake just look dramatic, in the best way. It feels fancy without being fussy, which is my favorite kind of recipe.
I first made this when I wanted something more exciting than a regular cheesecake but still comforting and familiar. Red velvet has that subtle cocoa flavor and softness I love, and pairing it with cheesecake felt like a no-brainer. One bite in, and I knew this was a keeper.
What really makes this dessert special is the balance. It is rich, but not heavy. Sweet, but not cloying. Each slice gives you cake, cheesecake, and frosting in one forkful, and somehow none of it feels like too much.
If layered desserts make you nervous, take a breath. I promise this is very doable at home. I will walk you through every part, including the small details that make the final result look clean and bakery-worthy.
Why this Red Velvet Cheesecake Works So Well
Red velvet on its own is already a crowd-pleaser, but when baked alongside cheesecake, something extra happens. The tang from the cream cheese cuts through the sweetness of the cake beautifully. Each layer supports the other instead of competing.
The textures also play really nicely together. You get soft, tender cake and that dense, creamy cheesecake in the same bite. It feels intentional and satisfying, not messy or overdone.
I also love that this recipe does not require a water bath. The gradual cooling method keeps the cheesecake smooth and crack-free without extra steps. Less stress in the kitchen always wins.
Ingredients Needed for the Recipe
- All-purpose flour – gives structure to the red velvet cake layers.
- Unsweetened cocoa powder – adds that subtle chocolate note classic to red velvet.
- Baking soda – helps the cake layers rise gently.
- Salt – balances sweetness in both the cake and cheesecake.
- Unsalted butter – creates a rich, tender crumb in the cake batter.
- Granulated sugar – sweetens both batters evenly.
- Brown sugar – adds moisture and depth of flavor.
- Eggs – bind the batters and give structure.
- Buttermilk – keeps the red velvet cake soft and moist.
- Vanilla extract – rounds out the flavors.
- White vinegar – reacts with cocoa and baking soda for classic red velvet texture.
- Red gel food coloring – gives the cake its vibrant color without thinning the batter.
- Cream cheese – the heart of the cheesecake and frosting.
- Sour cream – adds creaminess and a gentle tang to the cheesecake.
- Powdered sugar – sweetens and smooths the frosting.
Before You Start Baking
This is one of those recipes where preparation really matters. Set everything out ahead of time, especially the cream cheese, eggs, and buttermilk. Room temperature ingredients blend more smoothly and bake more evenly.
I also recommend reading through the full process once before starting. There are a few moving parts, but none of them are hard. Knowing what comes next keeps things relaxed and fun.
How to make Red Velvet Cheesecake?
Step 1 – Prepare the Pan and Oven
Preheat your oven to 350°F and line the bottom of your springform pan with parchment paper. Lightly grease the sides and the parchment so nothing sticks later.
If you are using an 8-inch pan, make sure it is tall enough. This cheesecake has layers, and you want room for everything to bake evenly without spilling over.
Step 2 – Mix the Dry Cake Ingredients
In a bowl, whisk together the flour, cocoa powder, baking soda, and salt. This step may seem small, but evenly mixed dry ingredients mean a consistent crumb.
Set this bowl aside and move on to the wet ingredients. Keeping things organized helps the batter come together smoothly.
Step 3 – Cream the Butter and Sugars
Beat the butter until it looks pale and creamy, then add both sugars. Let them mix until fluffy, scraping the bowl once or twice.
This step builds air into the batter, which helps the cake layers stay soft instead of dense.
Step 4 – Add Eggs and Flavorings
Add the eggs one at a time, mixing well after each addition. Then blend in the vanilla, vinegar, and red gel food coloring.
The color should look vibrant but not neon. You can adjust slightly, but gel coloring goes a long way.
Step 5 – Finish the Red Velvet Batter
Add the dry ingredients and buttermilk in alternating additions. Start and end with the dry mixture, mixing just until combined.
Overmixing here can make the cake tough, so stop as soon as everything looks incorporated.
Step 6 – Make the Cheesecake Batter
Beat the softened cream cheese until smooth and creamy. Add the sugars and mix until fully combined and glossy.
Blend in the sour cream, then add the eggs one at a time. Finish with vanilla and salt, mixing gently.
Step 7 – Assemble the Layers
Pour a layer of red velvet batter into the prepared pan, smoothing it lightly. Add a scoop of cheesecake batter in the center, letting it spread naturally.
Continue alternating layers until both batters are used, finishing with cheesecake on top.
Step 8 – Bake and Cool Slowly
Bake until the edges are set and the center jiggles slightly. If the top browns too fast, loosely cover with foil.
Turn off the oven, crack the door, and let the cheesecake sit inside for about 20 minutes before cooling fully.
Step 9 – Chill and Set
Once cooled to room temperature, refrigerate the cheesecake for at least six hours or overnight. This step is non-negotiable for clean slices.
Do not remove the pan ring until the cheesecake is fully chilled and firm.
Step 10 – Frost and Decorate
Beat the cream cheese and butter until smooth, then add powdered sugar and vanilla. Whip until light and fluffy.
Spread the frosting over the chilled cheesecake and finish with red velvet crumbs for that classic look.
Serving Ideas
This cheesecake shines on its own, but I love serving it slightly chilled with a hot cup of coffee. The contrast in temperature makes every bite more interesting.
For special occasions, a few fresh berries on the side add color and a bit of freshness. They do not overpower the dessert, just complement it.
If you are serving a crowd, slice with a warm, clean knife between cuts. It makes a surprising difference in presentation.
Tips
- Use room temperature ingredients for smoother batters.
- Do not overmix the cheesecake batter to avoid cracks.
- Cool the cheesecake slowly to prevent sinking.
- Use gel food coloring for bold color without thinning.
- Chill overnight for the cleanest slices.
Storage and Make-Ahead Notes
This Red Velvet Cheesecake stores beautifully, which makes it perfect for planning ahead. Keep it covered in the refrigerator, and it will stay fresh for up to four days.
You can also freeze it for longer storage. Wrap it tightly and thaw overnight in the fridge before serving. The texture holds up surprisingly well.
I often make this a day ahead for gatherings. It actually tastes better once everything has had time to settle and meld together.
Variations You Can Try
If you want to switch things up, a thin layer of chocolate ganache under the frosting adds extra richness. It turns the dessert a little more indulgent, which is not always a bad thing.
Mini versions are another great option. Bake the layers in lined muffin tins for personal-sized cheesecakes that are easier to serve.
During the holidays, I sometimes add a festive topping like crushed candy or seasonal sprinkles. Small changes can make this dessert feel brand new.
I hope you enjoy making and sharing this Red Velvet Cheesecake as much as I do. It is one of those recipes that feels celebratory every single time, and honestly, that is reason enough to bake it.
Red Velvet Cheesecake Recipe
Description
Hey friends! If you love the bold, classic flavor of red velvet cake and the creamy richness of cheesecake, this dessert combines the best of both worlds. With alternating layers of red velvet cake batter and smooth cheesecake filling, this Red Velvet Cheesecake is as pretty to look at as it is delicious to eat. Finished with a luscious cream cheese frosting and a sprinkle of red velvet crumbs, it’s the kind of showstopper dessert that feels perfect for Valentine’s Day, birthdays, or anytime you want something extra special.
Ingredients
Red Velvet Cake Batter
Cheesecake Batter
Cream Cheese Frosting
Instructions
Red Velvet Cake Batter
-
Preheat oven to 350°F (175°C). Line the bottom of an 8- or 9-inch springform pan (at least 3" tall) with parchment paper. Grease well.
-
In a bowl, whisk together flour, cocoa powder, baking soda, and salt. Set aside.
-
In a stand mixer, beat butter for 1 minute. Add granulated and brown sugars; beat 2 more minutes until fluffy.
-
Add eggs one at a time, beating well after each. Scrape bowl between additions.
-
Mix in vanilla, vinegar, and red gel food coloring until fully blended.
-
Add ⅓ of dry ingredients, mix. Add ½ buttermilk, mix. Repeat with another ⅓ dry, remaining buttermilk, then final ⅓ dry. Mix just until combined. Set aside.
-
(Optional) Reserve ⅓ cup batter; bake as a cupcake for 12 minutes to use for topping crumbs.
Cheesecake Batter
-
Beat cream cheese 1 minute until smooth.
-
Add both sugars; beat 1 minute, scrape bowl, beat 30 seconds more.
-
Mix in sour cream until incorporated.
-
Add eggs one at a time, mixing gently. Add vanilla and salt with last egg.
-
Set batter aside for assembly.
Assembly & Baking
-
Pour ⅓ red velvet batter into pan. Top with ⅓ cheesecake batter in center.
-
Repeat layering: red velvet → cheesecake → red velvet → cheesecake. Finish with cheesecake on top.
-
Bake 50 minutes until edges are set and center jiggles slightly. Cover with foil if edges brown too quickly.
-
Turn off oven, prop door open, and let cheesecake rest inside for 20 minutes.
-
Cool completely on wire rack, then refrigerate at least 6 hours or overnight.
Frosting & Decoration
-
Beat cream cheese and butter 30 seconds until smooth.
-
Add powdered sugar; mix on low, then beat 1 minute on medium-high.
-
Stir in vanilla.
-
Remove chilled cheesecake from pan. Spread frosting evenly over top.
-
Top with crumbled baked red velvet cupcake.
Nutrition Facts
Servings 12
Serving Size 1 slice
- Amount Per Serving
- Calories 420kcal
- % Daily Value *
- Total Fat 23gg36%
- Saturated Fat 14gg70%
- Trans Fat 0gg
- Cholesterol 95mgmg32%
- Sodium 320mgmg14%
- Potassium 180mgmg6%
- Total Carbohydrate 48gg16%
- Dietary Fiber 1gg4%
- Sugars 36gg
- Protein 6gg12%
- Calcium 80 mg
- Iron 1 mg
* Percent Daily Values are based on a 2,000 calorie diet. Your daily value may be higher or lower depending on your calorie needs.
Note
- Avoid cracks: Alternate batters carefully and don’t overmix. Cooling slowly prevents sinking.
- Room temp ingredients: Ensure cream cheese, eggs, and buttermilk are at room temperature.
- Use gel food coloring for vibrant red without thinning batter.
- No water bath needed, but slow cooling in oven is key.
Frequently Asked Questions
Can I use natural food coloring?
Yes, though the color will be more muted compared to gel coloring.
Do I need a water bath?
No—this recipe is designed without one, but cooling slowly in the oven helps prevent cracks.
Can I make this ahead of time?
Absolutely! Since it needs to chill overnight, it’s the perfect make-ahead dessert.
What kind of cocoa should I use?
Stick with natural cocoa powder, not Dutch-process, for the classic red velvet flavor and proper reaction with the vinegar and baking soda.