
Mini sandwiches are one of those party foods that quietly steal the show. They’re small, neat, and just easy to grab without thinking too much. I often put these together when I want something reliable that still feels a bit special.
These ham and cheese mini sandwiches come together in about 10 minutes, which still surprises me every time. There’s no complicated prep, no long waiting, just simple layering and slicing. And yet, they look like you spent way more effort.
I like how flexible they are. You can serve them at a birthday, a casual brunch, even a baby shower. They fit everywhere without trying too hard, and people almost always reach for seconds.
Ingredients Needed for the Recipe
- Cream cheese – adds a smooth, creamy base that holds the sandwich layers together.
- Mustard – brings a slight tang that balances the richness of the cheese and ham.
- Bread slices – forms the structure; soft sandwich bread works best for clean cuts.
- Cheddar cheese slices – gives a sharp, savory flavor and a bit of bite.
- Deli ham slices – adds protein and a light salty taste that pairs well with cheese.
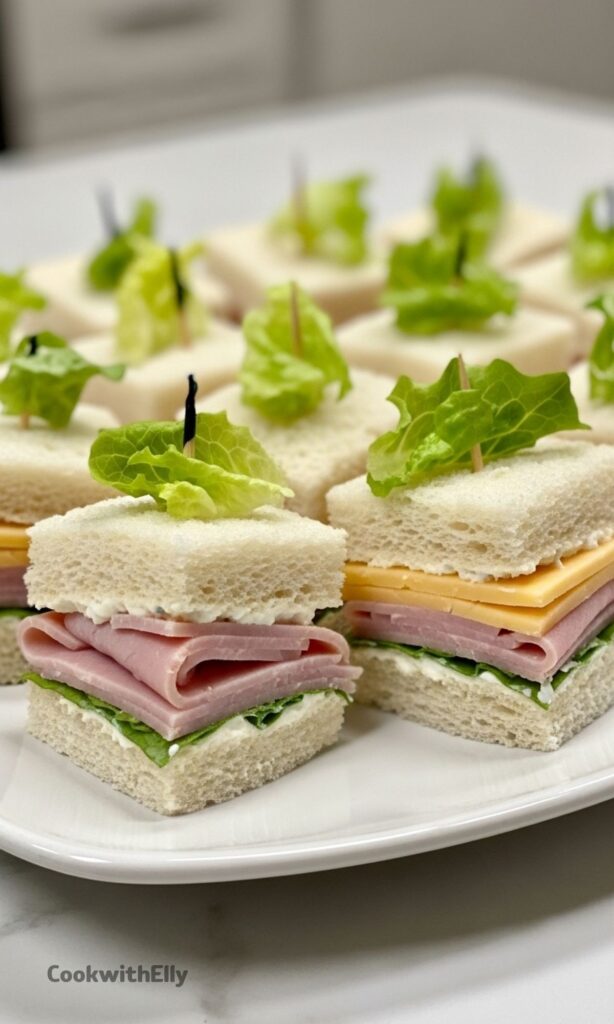
- Baby lettuce leaves – adds freshness and a slight crunch to keep things from feeling too heavy.
How to make Mini Sandwiches for Party?

Step 1 – Prepare the spread
In a small bowl, mix the cream cheese and mustard until smooth. I usually take an extra minute here to make sure there are no lumps, because it spreads better that way.
The mixture should feel creamy and slightly tangy. If it tastes balanced to you, it’s ready. This simple spread really carries the whole sandwich.
Step 2 – Lay out the bread
Place three slices of bread on a flat surface. Spread a thin layer of the cream cheese mixture on each slice, making sure to go all the way to the edges.
This helps keep the sandwiches moist and prevents dry corners later. It’s a small step, but it makes a difference when serving.
Step 3 – Build the first layer
Take one slice and layer it with cheese, ham, and a few baby lettuce leaves. If your ham is thin, using two slices adds better flavor without making it bulky.
The layers should feel even, not overloaded. You want everything to stay in place when cutting later.
Step 4 – Add the middle layer
Place the second slice of bread on top, spread side down. Then repeat the layering again with cheese, ham, and lettuce.
This double-layer structure makes the mini sandwiches more satisfying, even though they’re small.
Step 5 – Finish the sandwich stack
Top everything with the final slice of bread, spread side facing down. Press gently with your hands so the layers settle together.
Don’t press too hard, just enough so the sandwich holds its shape. You’ll notice it feels firm but still soft.
Step 6 – Slice and secure
Cut the sandwich in half first. Then insert toothpicks evenly across each half before slicing into smaller pieces.
This step keeps everything from slipping apart. Once secured, cut around the toothpicks to create neat mini sandwiches.
Step 7 – Serve
Arrange the mini sandwiches on a tray and serve right away. They look clean, bite-sized, and honestly quite inviting.
If you’re making more batches, just repeat the same steps. It goes faster after the first round.
Serving Ideas That Work Every Time
These mini sandwiches pair well with both simple and slightly fancy setups. I usually place them on a flat platter with a bit of spacing so they don’t look crowded.
If it’s a larger gathering, I like mixing them with other small bites. It creates variety, and guests can pick what they feel like eating without committing to one thing.
You can also stack them in small layers on a tray. It gives a fuller look without needing extra effort, which is always a win during busy prep.
Tips
- Use soft sandwich bread for easier cutting and cleaner edges.
- If your bread has crusts, trim them off for a more polished look.
- Choose mustard that you already enjoy, as its flavor stands out.
- For thin ham slices, use two layers for better taste.
- Insert toothpicks before cutting to keep layers from sliding.
- Do not overload fillings or the sandwiches may fall apart.
- Serve shortly after making for the best texture and freshness.
- If preparing ahead, store in an airtight container to avoid drying.
Storage and Make-Ahead Notes
These sandwiches are best enjoyed fresh, but they can be made a few hours ahead without much trouble. I usually store them in an airtight container in the fridge until serving time.
If you prepare them the night before, the lettuce might soften a bit. It’s not a deal breaker, but something to keep in mind if texture matters to you.
For smaller gatherings, I often just make them right before serving. It’s quick enough, and the freshness really shows.
Easy Variations to Try
One of the things I like most is how easy it is to change things up. You can swap the ham for chicken slices or even go completely vegetarian with grilled vegetables.
Different cheeses also bring different flavors. Mozzarella makes it milder, while gouda adds a slightly richer taste. It depends on what you feel like serving.
You can even switch the spread. A light herbed cream cheese or a mild mayo mix works nicely if you want something less tangy than mustard.
Once you try a few combinations, it becomes a bit of a habit to experiment. And honestly, guests usually enjoy the variety more than a single version.
Mini sandwiches might look simple, but they do a lot at a party. They’re quick, flexible, and always get picked up first. That’s usually all I need from a good appetizer.
Mini Sandwiches Recipe
Description
Mini sandwiches are a great snack not only for kids' lunchboxes, but they are also perfect for brunch, parties, baby showers, or picnics. Ready in just 10 minutes, these simple ham and cheese mini sandwiches are always a crowd-pleaser. Affordable, easy to assemble, and customizable, they are ideal for any gathering where finger foods shine.
Ingredients
Instructions
-
In a bowl, mix cream cheese and mustard until smooth and well combined.
-
Lay 3 slices of bread on a work surface and spread each evenly with the cream cheese mixture.
-
Layer cheese slices, ham, and lettuce leaves on one slice. Cover with a second slice and repeat layering. Finish with the third slice of bread (spread side down).
-
Press gently and cut the sandwich in half.
-
Insert 6 toothpicks into each half and cut around them to create mini sandwiches (12 pieces per sandwich).
-
Repeat with remaining ingredients. Arrange on a serving tray and serve immediately or chill until needed.
Nutrition Facts
Servings 4
Serving Size 6 mini sandwiches
- Amount Per Serving
- Calories 120kcal
- % Daily Value *
- Total Fat 7gg11%
- Saturated Fat 3gg15%
- Trans Fat 0gg
- Cholesterol 15mgmg5%
- Sodium 280mgmg12%
- Potassium 90mgmg3%
- Total Carbohydrate 10gg4%
- Dietary Fiber 1gg4%
- Sugars 2gg
- Protein 5gg10%
- Calcium 10% mg
- Iron 6% mg
* Percent Daily Values are based on a 2,000 calorie diet. Your daily value may be higher or lower depending on your calorie needs.
Note
- Use any bread: White, wholegrain, or multigrain bread all work well.
- Customize flavors: Swap ham for chicken, turkey, or vegetarian fillings.
- Make ahead: Store in an airtight container in the fridge for a few hours before serving.
- Serving tip: Use decorative toothpicks for a party-ready presentation.
Frequently Asked Questions
How many mini sandwiches per person?
If serving only these sandwiches, plan for about 4 pieces per person per hour. If serving with other appetizers, 1–2 pieces per person is sufficient.
Can I prepare mini sandwiches in advance?
Yes, you can prepare them a few hours in advance and store in an airtight container. For best freshness, avoid making them too far ahead.