
Charcuterie boards have always felt a little special to me. They are relaxed but thoughtful, simple but indulgent, and they somehow turn snacking into an event. Over the years, I’ve made plenty of large boards for gatherings, but sometimes that feels like too much.
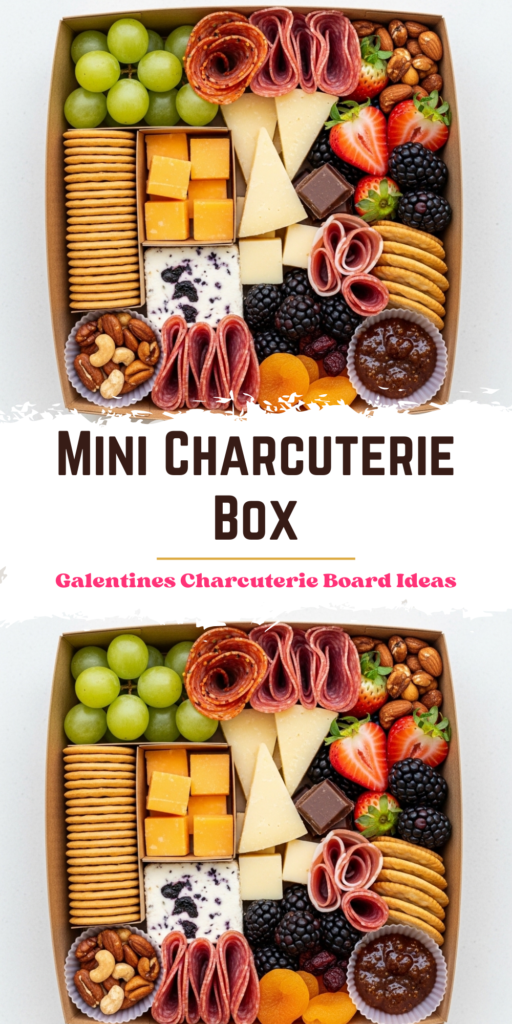
r-119" data-inserter-version="2" data-placement-location="under_page_title">That’s where the mini charcuterie box quietly shines. It gives you all the flavors and textures you love, just scaled down into a personal-sized box that feels both practical and indulgent. No crowd required, no leftovers stressing you out later.
I started making these for road trips, lake days with my kids, and cozy nights when dinner felt optional. They are easy to transport, easy to customize, and honestly, kind of fun to put together.
A mini charcuterie box is proof that good food doesn’t need to be complicated. It just needs a little care, a bit of balance, and ingredients you actually enjoy eating.
Why Mini Charcuterie Boxes Are Worth Making
There’s something satisfying about having your own little box of snacks that feels complete. You get salty, sweet, crunchy, creamy, all in one place. No passing plates, no double dipping, no mess.
I also love how flexible they are. You can dress them up for a gathering or keep them casual for a weekday treat. They fit just as well in a picnic bag as they do on a coffee table.
And let’s be honest, portioning everything into a mini charcuterie box helps keep snacking intentional. You get enough to feel satisfied without accidentally demolishing an entire cheese wedge.
Ingredients Needed for the Recipe
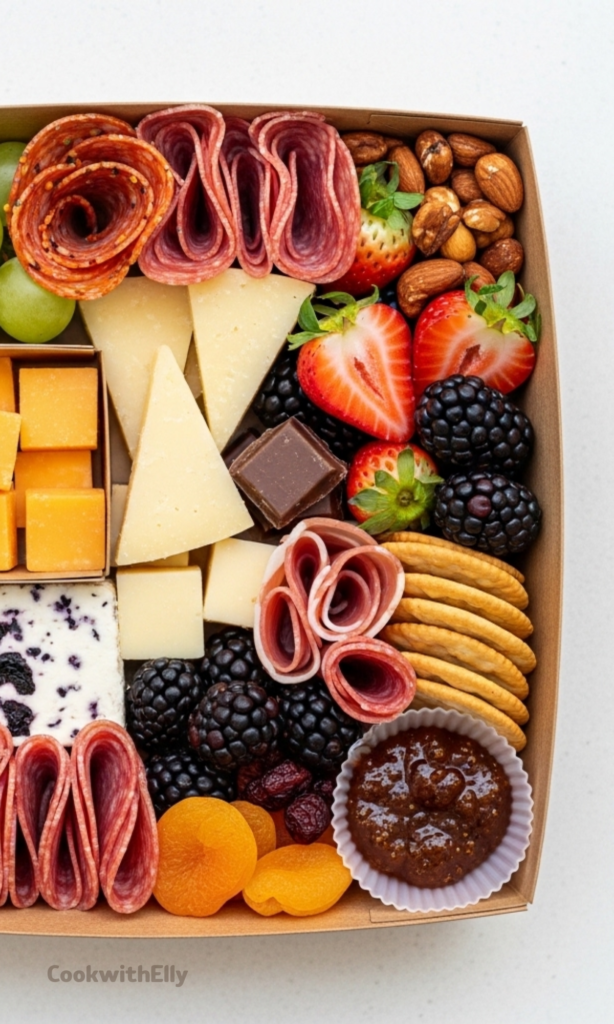
- Crackers – These add crunch and act as the base for cheeses, meats, and spreads.
- Cheese – The heart of the box, bringing creaminess and bold flavor.
- Cured Meats – Salty and savory, they balance the richness of the cheese.
- Nuts – For texture and a satisfying bite between softer items.
- Fresh Fruit – Adds brightness and a juicy contrast to salty elements.
- Dried Fruit – Concentrated sweetness that pairs beautifully with cheese.
- Chocolates – A small treat to finish things off on a sweet note.
- Honey or Jam – Brings sweetness and ties everything together.
Choosing the Right Ingredients
The beauty of a mini charcuterie box is that you don’t need dozens of options. A few well-chosen items go a long way. I usually aim for variety rather than quantity.
For crackers, I like mixing textures. Something crisp and light paired with a seed-heavy cracker keeps each bite interesting. It’s a small detail, but it makes a difference.
When it comes to cheese, crowd-pleasers work best. Cheddar is always welcome, manchego cuts nicely into triangles, and a flavored goat cheese adds color and contrast without overpowering the box.
Cured meats should be thinly sliced and easy to fold. Peppered salami, Italian dried salami, and prosciutto all behave well in small spaces and look great tucked into corners.
Fresh fruit keeps everything feeling balanced. Grapes, berries, and sliced citrus add freshness and prevent the box from feeling too heavy.
How to make Mini Charcuterie Box?
Step 1 – Prepare the Ingredients
Start by gathering everything you plan to include. Wash and dry the fresh fruit, then slice any cheeses that need cutting. I like bite-sized pieces that don’t require extra work while eating.
Fold or roll the cured meats gently. This keeps them from sticking together and makes them easier to grab later.
Step 2 – Choose Your Box Layout
Before placing anything inside, take a second to think about spacing. Larger items like cheese and crackers should go in first, creating natural sections in the box.
This step sounds minor, but it helps prevent overcrowding and keeps softer items from getting squished.
Step 3 – Add the Main Components
Place the crackers along one side or corner of the box. Add the cheeses next, spacing them out so different flavors aren’t touching too much.
Tuck the cured meats into open spaces. Folding them adds height and makes the box feel fuller without adding more food.
Step 4 – Fill in with Fruits and Nuts
Fresh fruit goes in next, ideally where it won’t leak onto crackers. Grapes and berries work well in small clusters.
Sprinkle nuts into gaps where they fit naturally. They act like edible filler and keep everything snug.
Step 5 – Finish with Sweet Touches
Add dried fruit and chocolates last. These are usually smaller, so they slide easily into remaining spaces.
Place a small jar of honey or jam securely in the box. Make sure the lid is tight before closing everything up.
Step 6 – Store Until Ready to Serve
Once assembled, cover the box and refrigerate until you’re ready to enjoy it. This keeps everything fresh and safe.
If you’re taking it on the go, keep it chilled until serving time whenever possible.
When to Serve a Mini Charcuterie Box
I reach for these boxes more often than full boards now. They are perfect for solo lunches, afternoon snacks, or casual evenings when cooking feels unnecessary.
They also work beautifully for gatherings where individual servings make sense. Everyone gets their own, and there’s no awkward hovering over a shared platter.
For travel days, these boxes are lifesavers. No one gets hangry, and everything feels a little more special than standard snacks.
Tips
- Stick to a balance of salty, sweet, crunchy, and creamy items.
- Cut cheeses into small, easy-to-eat pieces.
- Use empty spaces wisely to keep items from shifting.
- Keep wet ingredients away from crackers.
- Don’t overcrowd the box, less is often better.
Storage and Make-Ahead Notes
Mini charcuterie boxes are best assembled the same day they’ll be eaten. That said, you can prep ingredients ahead to save time.
Cheeses can be sliced, fruits washed, and nuts portioned earlier in the day. Store everything separately until assembly to maintain freshness.
Once assembled, keep the box refrigerated. If you’re packing it for later, a small ice pack nearby helps keep everything safe.
Personal Variations I Love
Over time, I’ve learned to adjust these boxes based on mood and season. Sometimes I lean savory with extra nuts and sharper cheeses.
Other days, I add more fruit and chocolate for a sweeter feel. That flexibility is part of what makes the mini charcuterie box so enjoyable.
You can also theme them around a favorite cheese or color palette. It’s subtle, but it adds personality without extra effort.
At the end of the day, there’s no wrong way to build one. If it makes you happy and keeps you full, you’ve done it right.
Mini Charcuterie Box
Description
A personal-sized grazing box packed with gourmet cheeses, cured meats, fresh and dried fruits, nuts, chocolates, and sweet spreads—perfect for picnics, road trips, cozy nights in, or individual servings at gatherings. This mini charcuterie box delivers big flavor in a compact, elegant package.
ingredients
Classic Mini Charcuterie Selection
Instructions
Assembling Your Mini Charcuterie Box
-
Gather all ingredients and prepare by slicing cheeses, halving fruits if needed, and portioning cured meats.
-
Select a small compartmentalized box or bento-style container (approx. 6–8 inches).
-
Start by placing cheeses in separate sections to anchor the layout.
-
Add cured meats by folding or rolling them for visual appeal.
-
Fill remaining spaces with crackers, fresh fruit, dried fruit, nuts, and chocolates.
-
Place a tiny jar or silicone cup with jam or honey in an open corner.
-
Optionally garnish with edible flowers for color and elegance.
-
Cover and refrigerate until ready to serve (up to 4 hours for best freshness).
Nutrition Facts
Servings 1
Serving Size 1 box
- Amount Per Serving
- Calories 580kcal
- % Daily Value *
- Total Fat 35g54%
- Saturated Fat 16g80%
- Cholesterol 85mg29%
- Sodium 980mg41%
- Potassium 420mg12%
- Total Carbohydrate 42g15%
- Dietary Fiber 4g16%
- Sugars 28g
- Protein 24g48%
- Calcium 20 mg
- Iron 10 mg
* Percent Daily Values are based on a 2,000 calorie diet. Your daily value may be higher or lower depending on your calorie needs.
Note
- Crackers: Use your favorite type. Recommended: La Panzanella Croccantini or Raincoast Crisps.
- Cheese: Mix textures—sharp cheddar, creamy goat cheese, firm manchego.
- Cured Meats: Peppered salami, Italian dry salami, and prosciutto offer variety in flavor and texture.
- Nuts: Roasted garlic & herb almonds from Costco are ideal, but any unsalted nut works.
- Fresh Fruit: Green grapes, strawberries, blackberries, raspberries, or orange slices add brightness.
- Dried Fruit: Dried apricots, cranberries, cherries, or candied oranges balance savory elements.
- Chocolates: Dark chocolate squares, sea salt caramels, or chocolate-covered almonds add indulgence.
- Honey or Jam: Fig jam, raspberry preserves, or raw honey in a mini jar elevates the board.
- Storage: Keep refrigerated until serving. Best consumed within 4–6 hours of assembly.
Frequently Asked Questions
Can I make this ahead of time?
Yes! Assemble up to 4 hours in advance and keep refrigerated. Add delicate items like berries or chocolate just before serving if possible.
Is this keto-friendly?
It can be! Skip dried fruit and sugary jams, use low-carb crackers or cucumber slices, and focus on cheeses, meats, nuts, and fresh berries.
Where can I buy the boxes?
Small compartmentalized boxes are available on Amazon. Search for 'bento snack boxes' or 'charcuterie lunch boxes'.