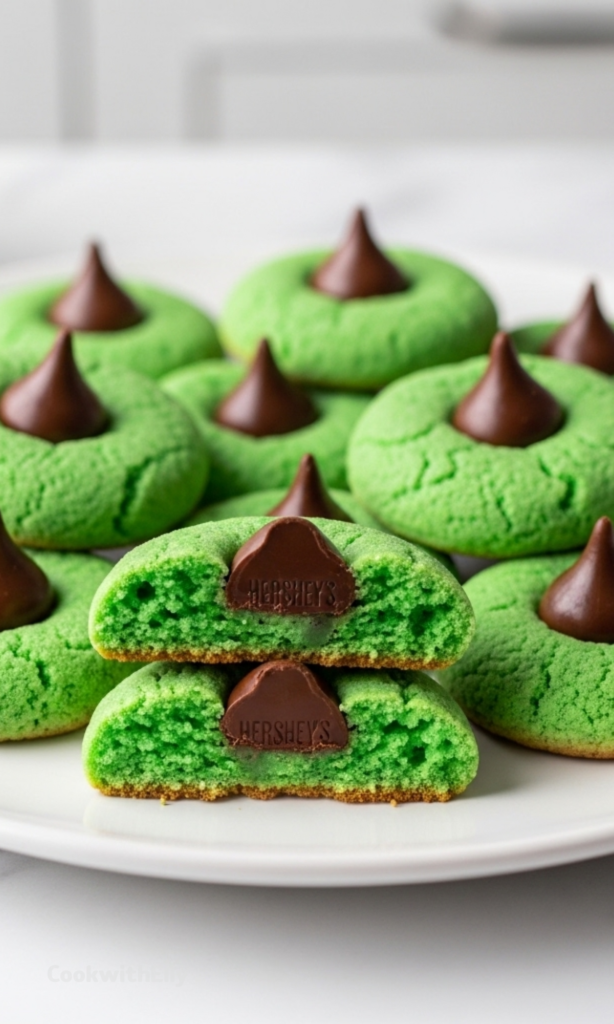

I make these cookies every year the moment March rolls around. Not because they’re fancy, not because they take skill, but because they’re just plain fun. Bright green, soft in the middle, and topped with chocolate. That’s a mood all on its own.
The first time I made them, I remember thinking they were almost too easy. Like, should something this cute really take so little effort? But then I watched a whole tray disappear in minutes, and that answered my question.
These are the kind of cookies you bake when you want something festive without turning your kitchen upside down. No complicated steps. No chilling dough for hours. Just mix, bake, press, and try not to eat three while they’re still warm.
I also love that they feel a little playful. Holidays don’t always need to be serious or traditional. Sometimes a green cookie with a chocolate kiss right in the center is exactly the right energy.
Ingredients Needed for the Recipe
- Sugar cookie mix – This keeps the recipe simple and gives you a soft, reliable cookie base.
- Softened butter – Adds richness and helps create that tender texture.
- Egg – Binds everything together and gives structure to the dough.
- Green food coloring – Brings the festive look that makes these cookies stand out.
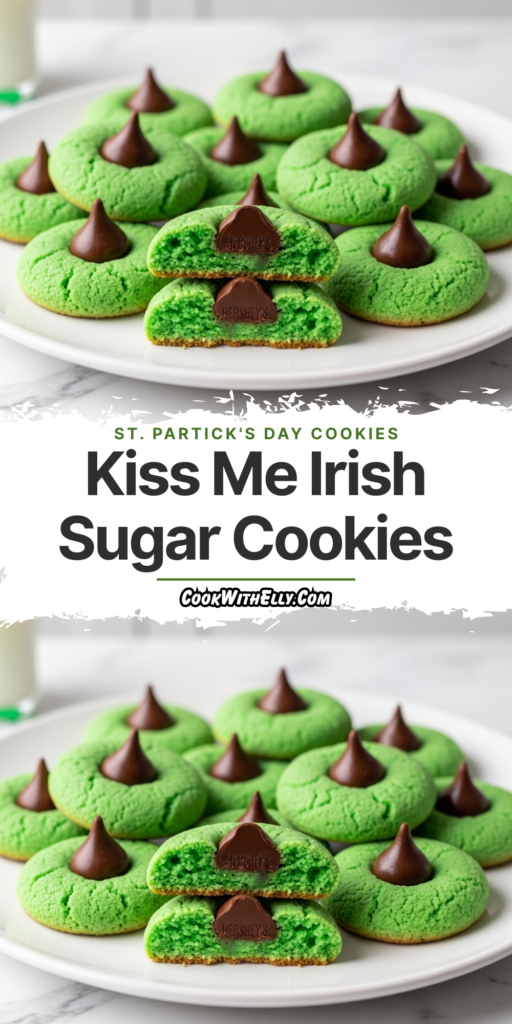
- Chocolate kisses (unwrapped) – The star of the show, pressed into the center for a creamy chocolate finish.
Why These Cookies Are So Fun to Make
I don’t always want a baking project. Sometimes I just want to bake. There’s a difference, and these cookies live firmly in the second category. They come together fast, which makes them perfect for busy days.
If you have kids around, this is one of those recipes where they can actually help without things getting chaotic. Stirring, adding color, placing the chocolate. All very manageable, and honestly, more fun with extra hands.
I also like that you can make them a little imperfect. The green can be lighter or darker. The cookies don’t have to be identical. That relaxed feel is part of their charm.
How to make Kiss Me I’m Irish Sugar Cookies?
Step 1 – Preheat and Prepare
Start by preheating your oven according to the directions on your cookie mix package. Getting the oven ready first means you won’t be waiting around later with dough sitting on the counter.
Line up your baking sheet and unwrap the chocolate kisses now. Trust me, doing this ahead of time makes things much smoother once the cookies come out of the oven.
Step 2 – Mix the Egg and Color
In a small bowl, beat the egg with several drops of green food coloring. Keep stirring until the color looks even and cheerful. You can adjust the shade depending on how bold you want them.
I usually go for a bright green because it feels more festive, but a softer pastel works too. There’s no wrong answer here.
Step 3 – Make the Dough
Combine the cookie mix, the colored egg, and the softened butter according to the package directions. Stir until everything comes together into a soft dough.
The dough should be easy to handle and not sticky. If it feels too soft, let it sit for a minute. It usually firms up on its own.
Step 4 – Scoop the Cookies
Drop rounded teaspoons of dough onto an ungreased cookie sheet. Give them a little space because they will spread slightly as they bake.
They don’t need to look perfect. In fact, slightly uneven scoops give them that homemade look everyone loves.
Step 5 – Bake Until Just Set
Bake the cookies for about 9 minutes, or until the edges are just lightly browned. You don’t want to overbake them because that soft texture is what makes these so good.
They may look slightly underdone in the center, and that’s exactly right. They’ll finish setting as they cool.
Step 6 – Add the Chocolate Kiss
As soon as the cookies come out of the oven, gently press a chocolate kiss into the center of each one. Do this quickly while they’re still warm so the chocolate settles nicely.
The cookie will crack a little around the edges when you press down. That’s normal, and honestly, it makes them look even better.
Step 7 – Let Them Rest
Allow the cookies to sit on the hot baking sheet for about a minute. This helps the chocolate soften just enough without completely melting.
After that, transfer them to a wire rack or plate to cool completely. This keeps the bottoms from overcooking.
Step 8 – Try Not to Sneak One
Once they’re cool, they’re ready to serve. Though I’ll admit, I almost always grab one while it’s still a little warm.
It’s hard not to. The chocolate gets just creamy enough, and the cookie stays soft. That combination is tough to beat.
Tips
- Unwrap all the chocolate kisses before baking so you can work quickly once the cookies are done.
- Use softened butter, not melted, for the best texture.
- Add food coloring gradually so you can control the shade of green.
- Do not overbake. Slightly soft centers keep the cookies tender.
- Press the chocolate gently, not too hard, to avoid flattening the cookie.
- Let cookies cool fully before storing so the chocolate sets properly.
- If baking multiple batches, allow the baking sheet to cool between rounds.
- For cleaner shapes, roll the dough lightly in your hands before placing it on the tray.
Fun Variations to Try
Once you’ve made these once, it’s hard not to start playing around with them. The base recipe is simple, which makes it perfect for small tweaks.
For a slightly richer flavor, you can add a splash of Irish cream liqueur to the dough. It gives a subtle warmth without overpowering the sweetness.
Another version I love uses a softer cookie texture by mixing in a little pudding mix. It makes the cookies extra tender and gives them a bakery-style feel.
You can also roll the dough balls in green-colored sugar before baking. That adds sparkle and a tiny bit of crunch on the outside.
Sometimes I swap the dark chocolate kisses for milk chocolate or even a white chocolate version. Each one changes the personality of the cookie just enough to feel new.
Serving and Storing These Cookies
These cookies are best served once they’ve cooled and the chocolate has set. They’re soft, a little chewy, and just the right level of sweet.
I like putting them on a simple plate without much decoration. They’re already bright and festive, so they don’t need much help.
If you’re bringing them to a gathering, they travel well. Just layer them gently in a container so the chocolate tops don’t get smudged.
To store them at home, keep them in an airtight container at room temperature. They stay fresh for several days, though they rarely last that long around here.
If you want to make them ahead, you can bake them a day or two early without losing quality. That’s another reason I keep coming back to this recipe.
They’re reliable. Easy. Cheerful. And sometimes that’s exactly the kind of baking we need.
And yes, I still tell people they owe me a kiss if they take one. It’s part of the tradition now, and I don’t see any reason to stop.
Kiss Me Irish Sugar Cookies Recipe
Description
These festive Kiss Me I'm Irish Sugar Cookies are a delightful St. Patrick's Day treat! Soft, buttery sugar cookies tinted green and topped with a rich Hershey's dark chocolate kiss make for an easy, crowd-pleasing dessert. Perfect for parties, school events, or gifting to loved ones—with a fun tradition of sharing a kiss with every cookie!
ingredients
Instructions
-
Prepare Dough
Preheat your oven according to the cookie mix package directions (typically 350°F/175°C). In a small bowl, beat the egg with several drops of green food coloring until you reach your desired shade of green. Follow package directions to combine the cookie mix, colored egg, and softened butter until a soft dough forms. -
Bake Cookies
Drop dough by rounded teaspoons onto an ungreased cookie sheet, spacing about 2 inches apart. Bake for about 9 minutes, or until the edges are just lightly browned and centers look set. -
Add the Kiss
Work quickly! Immediately after removing cookies from the oven, gently press an unwrapped Hershey's kiss into the center of each warm cookie. The residual heat will help the chocolate adhere. -
Cool
Let cookies rest on the hot baking sheet for about 1 minute to allow the chocolate to set slightly. Then transfer to a wire rack or plate to cool completely before serving or storing.
Nutrition Facts
Servings 18
Serving Size 1 cookie with kiss
- Amount Per Serving
- Calories 150kcal
- % Daily Value *
- Total Fat 7gg11%
- Saturated Fat 4gg20%
- Trans Fat 0gg
- Cholesterol 20mgmg7%
- Sodium 80mgmg4%
- Potassium 50mgmg2%
- Total Carbohydrate 20gg7%
- Dietary Fiber 0gg0%
- Sugars 14gg
- Protein 2gg4%
- Calcium 2% mg
- Iron 4% mg
* Percent Daily Values are based on a 2,000 calorie diet. Your daily value may be higher or lower depending on your calorie needs.
Note
- Make it from scratch: Prefer homemade dough? Use your favorite sugar cookie recipe and add 1/4 tsp green gel food coloring to the wet ingredients.
- Adult twist: Add 1–2 tbsp Irish cream liqueur to the dough for an Irish Cream Kiss Cookie variation.
- Sparkly finish: Roll dough balls in green-colored sugar before baking for extra festive flair.
- Storage tip: Store cooled cookies in an airtight container at room temperature for up to 5 days, or freeze for up to 1 month.
Frequently Asked Questions
Can I use white chocolate kisses instead?
Absolutely! White chocolate kisses offer a sweeter, creamier contrast to the green cookie. You can also try mint-flavored kisses for an extra Irish twist.
How do I get vibrant green cookies without altering taste?
Use gel food coloring instead of liquid—it provides richer color with less moisture, so your cookie texture stays perfect. Start with a small amount and add more as needed.
Can I make these ahead of time?
Yes! Bake and cool cookies completely, then store in an airtight container. Add the chocolate kisses just before serving for the best appearance and texture.