
There’s something about simple, no-bake treats that makes holidays feel extra relaxed. These Easter Egg Oreo Cookie Balls are exactly that kind of dessert – easy, playful, and just a little messy in the best way.
I always find myself coming back to recipes like this when I want something festive without spending hours in the kitchen. And honestly, these are just fun to make. Especially when kids are involved, things get a little chaotic, but that’s part of the charm.
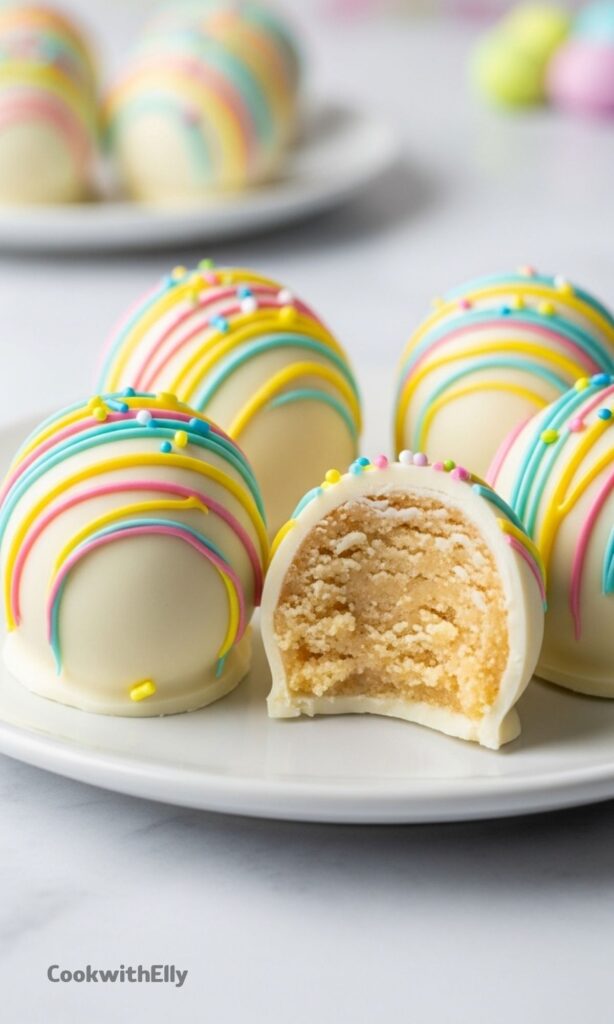
The texture is what really makes them special. Soft, creamy inside with that smooth candy coating on the outside. It’s like a bite-sized dessert that feels way more impressive than the effort it takes.
Plus, you only need a handful of ingredients. Nothing fancy, nothing complicated – just a few things you probably already love, turned into something bright and celebratory.
Ingredients Needed for the Recipe
- Golden Oreo cookies (14.3 oz / about 36 cookies) – These form the base and give a sweet vanilla flavor that works perfectly under a white coating.
- Cream cheese (8 oz, room temperature) – This binds everything together and creates that rich, truffle-like texture.
- White candy coating (about 10 oz) – Used to coat the eggs and give them that smooth, clean finish.
- Extra white candy coating (about 1 oz per color) – Melted and tinted for decorating and drizzling.
- Gel icing colors – These bring the eggs to life with bright, festive colors.
A Few Things I Learned While Making These
The first time I made these, I didn’t crush the cookies enough. It still worked, but shaping the eggs felt tricky and uneven. Now I make sure the crumbs are really fine, and everything comes together much smoother.
Another small thing – room temperature cream cheese makes a big difference. Cold cream cheese doesn’t mix well and leaves little lumps behind, which you don’t want when you’re shaping something delicate like this.
And yes, dipping can get messy. I’ve accepted it. A toothpick helps, but there will still be a few imperfect ones. That’s okay. They still taste amazing.
How to make Easter Egg Oreo Cookie Balls?

Step 1 – Crush the Cookies
Add the Golden Oreo cookies to a food processor or blender and crush them into fine crumbs. Try to avoid leaving big chunks, since they can make shaping the eggs harder later.
If you don’t have a processor, you can use a zip bag and rolling pin. It takes a bit longer, but it works just fine.
Step 2 – Mix with Cream Cheese
Transfer the cookie crumbs into a bowl and add the softened cream cheese. Mix everything until it becomes a smooth, thick mixture.
You’ll know it’s ready when it holds together easily and feels slightly dough-like when pressed between your fingers.
Step 3 – Shape into Eggs
Scoop about 1 1/2 tablespoons of the mixture and gently shape it into an egg. It doesn’t have to be perfect, just slightly oval.
Place each shaped piece onto a lined tray. I like using parchment paper so nothing sticks later.
Step 4 – Chill the Eggs
Put the tray into the fridge for about an hour. This step helps the eggs firm up so they don’t fall apart when dipping.
Skipping this step might save time, but it usually leads to soft, messy results, so it’s worth waiting.
Step 5 – Coat with Candy
Melt the white candy coating until smooth. Dip each chilled egg into the melted coating, making sure it’s fully covered.
Using a toothpick inserted at the base makes dipping easier. Gently tap off excess coating and place the egg back on parchment paper.
If a small hole is left behind, just dab a bit of melted coating over it. It blends right in once it sets.
Step 6 – Decorate
Once the coating has hardened, melt small batches of candy coating and tint them with gel colors. One color at a time works best so nothing hardens too quickly.
Drizzle, pipe, or swirl the colors over the eggs. You can keep it simple or go all out with patterns – there’s no right or wrong here.
Creative Decoration Ideas
Sometimes I keep the design minimal, just a light drizzle across the top. Other times, I go a bit overboard with stripes, dots, and zig-zags. It really depends on the mood.
If you’re making these with kids, let them take over this part. The designs might be uneven or extra colorful, but those are always the most memorable batches.
You can even divide them into themes. Pastel shades for a soft look, or bright colors if you want something more playful and bold.
Tips
- Make sure the cookie crumbs are very fine for better shaping and texture.
- Always use room temperature cream cheese for smooth mixing.
- Chill the eggs fully before dipping to prevent them from breaking.
- Work in small batches when melting candy coating so it doesn’t harden too fast.
- Use a toothpick or fork for easier dipping and less mess.
- Tap off excess coating gently to avoid thick layers.
- If decorating with sprinkles, add them before the coating sets.
- Keep extra melted coating nearby to fix small cracks or holes.
Fun Variations to Try
While Golden Oreos give a nice clean look under white coating, you can easily switch things up. Chocolate Oreos work great too, especially if you coat them in milk or dark chocolate instead.
There are so many Oreo flavors now, and honestly, most of them can work here. Lemon ones are surprisingly fresh and perfect for spring.
If you want to skip the colored drizzle altogether, sprinkles are a quick and easy alternative. Just add them right after dipping while the coating is still wet.
You can also play with texture a bit. A light dusting of sanding sugar adds a subtle crunch that contrasts nicely with the creamy center.
Storage and Serving Ideas
Once finished, store the Oreo eggs in the refrigerator. They stay fresh for about a week, and the texture actually gets even better after a day or two.
I usually keep them in an airtight container, layered with parchment paper so they don’t stick together.
When serving, you can place them in a bowl, arrange them on a tray, or even tuck them into Easter baskets. They look great no matter how you present them.
If you’re making them ahead for a gathering, just take them out of the fridge a few minutes before serving. They soften slightly and taste even more indulgent.
These little treats might be simple, but they always disappear fast. And every time I make them, I end up sneaking one straight from the fridge before anyone else gets to them.
Easter Egg Oreo Cookie Balls Recipe
Description
These Easter Egg Oreo Cookie Balls are a fun and tasty treat for Easter! They are a great thing to make with kids and can be enjoyed by all! With just 4 simple ingredients and no baking required, these festive no-bake treats are perfect for holiday parties, Easter baskets, or a fun family baking activity. Golden Oreos meet creamy cream cheese, coated in smooth white candy and decorated with colorful drizzles for an adorable egg-shaped dessert everyone will love.
ingredients
Instructions
-
Crush Cookies
Add the Golden Oreo cookies to a food processor or blender and crush into fine crumbs.Avoid large chunks to help the eggs hold together well. -
Mix Ingredients
Mix the cream cheese and cookie crumbs together in a bowl until well combined.The mixture should easily form balls when pressed together. -
Form Eggs
Form Easter eggs from the cookie mixture using about 1 1/2 tablespoons per egg.Shape into oval egg shapes with lightly dampened hands to prevent sticking. -
Chill Eggs
Put the eggs in the fridge for about 1 hour to firm up.This helps them hold their shape during dipping. -
Coat with Candy
Melt the 10 ounces of white candy coating and dip the chilled eggs into the melted coating. Set on parchment paper to dry.Use a toothpick for dipping: insert into bottom of egg, dip, shake off excess, place on parchment, then gently twist and remove toothpick. Fill the small hole with a dab of coating. -
Add Decorations
Once dry, melt additional candy coating one color at a time, add gel icing color, then pipe or drizzle over the Oreo eggs.Use about 1 oz of coating per color. For single color designs, use 3-4 oz total. Add sprinkles before coating sets for extra flair. -
Store
Store finished Oreo eggs in an airtight container in the refrigerator.They will stay fresh for about 1 week. Let sit at room temperature 5 minutes before serving for best texture.
Nutrition Facts
Servings 20
Serving Size 1 egg
- Amount Per Serving
- Calories 132kcal
- % Daily Value *
- Total Fat 9 gg14%
- Saturated Fat 5 gg25%
- Trans Fat 0 gg
- Cholesterol 13.7 mgmg5%
- Sodium 56.3 mgmg3%
- Potassium 45 mgmg2%
- Total Carbohydrate 11.6 gg4%
- Dietary Fiber 0.3 gg2%
- Sugars 10.6 gg
- Protein 1.6 gg4%
- Calcium 2% mg
- Iron 3% mg
* Percent Daily Values are based on a 2,000 calorie diet. Your daily value may be higher or lower depending on your calorie needs.
Note
- Use gel colors: Gel icing colors work best for coloring candy melts without changing consistency or causing seizing.
- Sprinkle option: Skip the drizzling and use Easter sprinkles or sanding sugar for easier, kid-friendly decorating.
- Oreo variations: Try lemon Golden Oreos for a citrus spring twist, or use chocolate Oreos with chocolate coating for a classic look.
- Storage tip: Keep these no-bake treats in the fridge in an airtight container for up to 1 week. Let sit at room temperature 5 minutes before serving.
Frequently Asked Questions
Can I use regular chocolate Oreos instead of Golden Oreos?
Yes, you can! However, the dark cookie crumbs may show through the white candy coating. If using chocolate Oreos, consider using chocolate candy melts for coating instead of white for a more uniform look. The flavor will still be delicious either way!
How should I store these Easter Egg Oreo Cookie Balls?
Store the finished cookie balls in an airtight container in the refrigerator. They will stay fresh for about 1 week. Let them sit at room temperature for 5 minutes before serving for the best texture and flavor.
Can kids help make these?
Absolutely! This is a great recipe for kids to help with. Depending on their age, they can help crush the cookies (with supervision), roll the egg shapes, and decorate with sprinkles or drizzled candy. Just be prepared for a little mess and have fun with it!
Can I make these ahead of time?
Yes! These no-bake treats are perfect for making ahead. You can prepare them up to 2-3 days in advance and store them in the fridge until you're ready to serve. They also freeze well for up to 1 month—thaw in the fridge before serving.
What if my candy coating is too thick?
If your candy melts are too thick for dipping, add 1/2 teaspoon of vegetable shortening (not butter or oil) per cup of melts and stir until smooth. This helps create a thinner, smoother coating that sets beautifully.