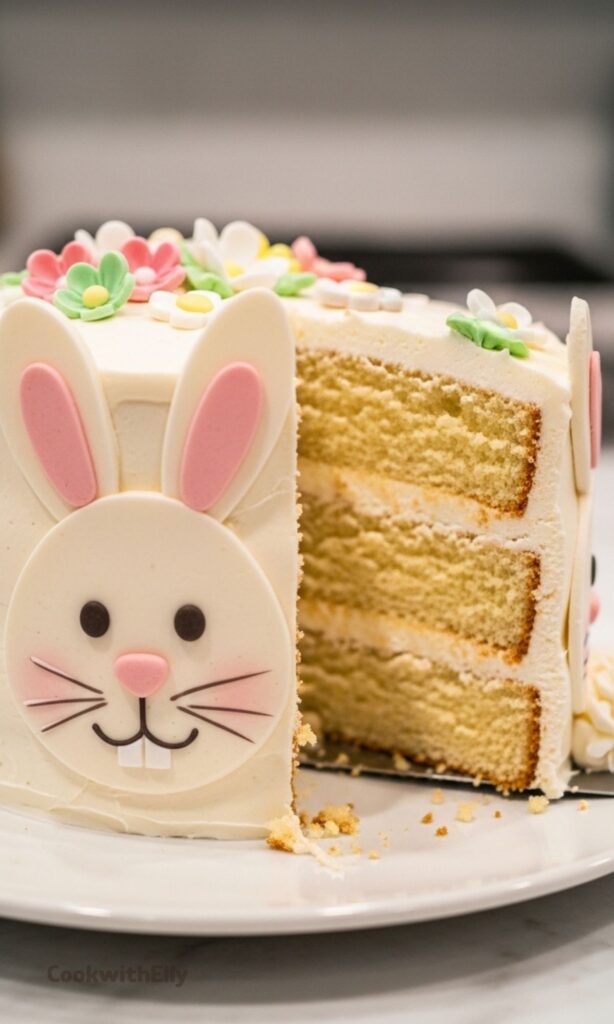

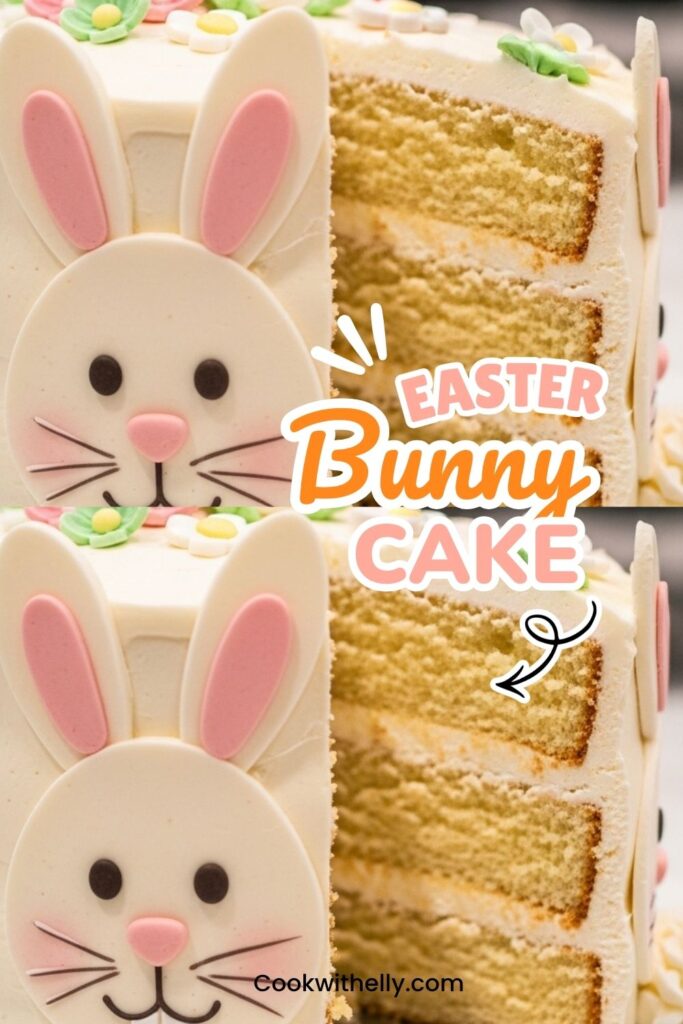
I’ve made a lot of celebration cakes over the years, but this Easter bunny cake has a special place in my kitchen. It started as a playful idea after I baked a unicorn cake for my daughter, and somehow, it turned into this soft, sweet, slightly whimsical bunny that everyone kept talking about long after the party ended.
What I love most is how approachable it is. It looks like something you’d spend hours stressing over, but honestly, once you break it down, it’s just a few layers, some creamy frosting, and a little decorating fun. Nothing fancy, just thoughtful steps and a bit of patience.
The flavor is simple and comforting too. I went with a vanilla sponge and a creamy frosting that’s not overly sweet. It balances everything out, especially if you’re serving it to a mixed crowd where not everyone wants something too rich.
And the decorating part, that’s where you can really relax. You can go all out or keep it minimal. Either way, it still ends up looking like something made with care, which honestly matters more than perfection.
Ingredients Needed for the Recipe
- Butter or margarine (room temperature) – creates a rich, soft base for the sponge.
- Caster sugar – adds sweetness and helps give the cake a light texture.
- Eggs (beaten) – bind everything together and add structure.
- Self-raising flour (or plain flour with baking powder) – gives the cake its rise and softness.
- Vanilla extract – adds that warm, classic flavor.
- Butter (for frosting) – forms the creamy base of the frosting.
- Cream cheese – adds a slight tang and smooth texture to balance sweetness.
- Icing sugar – sweetens and thickens the frosting.
- Vanilla extract (for frosting) – enhances the overall flavor.
- Sugar paste (pink, white, black) – used to create bunny features.
- Edible sugar flowers – for decorating and adding a soft, festive look.
A Few Thoughts Before You Start Baking
I always like to pause for a second before jumping into baking, especially with layered cakes like this one. It’s not hard, but it does help to have everything ready, measured, and within reach. That way you’re not scrambling halfway through.
Also, room temperature ingredients matter more than people think. Cold butter just won’t cream properly, and that affects the whole texture of your cake. I’ve learned that the slow way, more than once.
How to Make an Easter Bunny Cake ?
Step 1 – Prepare the Cake Pans
Start by greasing and lining four round cake pans with parchment paper. I like doing this first so it’s out of the way and I can focus on the batter without rushing.
If you don’t have four pans, don’t worry. You can bake in batches. It just takes a bit more time, but the result stays the same.
Step 2 – Cream Butter and Sugar
In a large bowl, beat the butter and sugar together until it turns pale and fluffy. This step sets the tone for the texture, so I don’t rush it.
You’ll notice it getting lighter in color and softer in consistency. That’s exactly what you want.
Step 3 – Add Eggs Gradually
Pour in the beaten eggs a little at a time, mixing well after each addition. It might look slightly curdled at some point, and that’s okay.
Just keep going slowly. It smooths out once everything comes together.
Step 4 – Fold in the Flour
Gently fold in half of the flour using a spoon, then add the rest. I always try not to overmix here because that can make the cake dense.
The batter should feel soft and smooth, not stiff.
Step 5 – Add Vanilla and Divide Batter
Stir in the vanilla extract, then divide the batter evenly between your prepared pans. I usually eyeball it, but you can measure if you want perfect layers.
Smooth the tops lightly so they bake evenly.
Step 6 – Bake the Cake Layers
Bake the cakes at 190°C until they feel firm and a skewer comes out clean. The smell alone at this stage is honestly one of my favorite parts.
Let them cool in the pans first, then transfer to a rack. Don’t rush this step. Warm cake and frosting don’t mix well.
Step 7 – Make the Cream Cheese Frosting
Beat the butter, cream cheese, and vanilla together until smooth. Then add the icing sugar in parts, mixing well each time.
You’re looking for a creamy, spreadable texture. Not too runny, not too stiff.
Step 8 – Level and Stack the Cakes
Trim the tops of the cakes if needed so they’re flat. Then stack them one by one with frosting in between each layer.
This is where the cake starts to take shape, and it always feels a bit satisfying seeing it come together.
Step 9 – Crumb Coat the Cake
Spread a thin layer of frosting all around the cake to lock in crumbs. It doesn’t have to look perfect.
Chill it briefly so it sets. This step makes the final layer much smoother.
Step 10 – Final Frosting Layer
Add a thicker layer of frosting and smooth it out as much as you like. I usually go for a soft finish instead of perfectly sharp edges.
Place it back in the fridge while you prep the decorations.
Step 11 – Create Bunny Decorations
Shape the bunny ears, nose, eyes, and cheeks using sugar paste. This part is honestly a little playful.
You can keep it simple or get creative. There’s no strict rule here.
Step 12 – Decorate the Cake
Attach the bunny features to the cake using a bit of frosting. Then add the sugar flowers on top.
And just like that, the cake transforms. It’s always a small wow moment when you step back and look at it.
Flavor Variations You Can Try
I usually stick with vanilla because it’s safe and everyone enjoys it, but there’s plenty of room to switch things up. Sometimes I add a bit of lemon zest for a fresher taste.
Chocolate works well too, especially if you’re making this for kids. You can even mix layers, one vanilla and one chocolate, just to make it a bit more interesting.
- Add lemon or orange zest to the batter for a citrus twist.
- Replace part of the flour with cocoa powder for a chocolate version.
- Use flavored extracts like almond for a slightly different note.
- Layer with fruit preserves between cakes for extra flavor.
Tips
- Always use room temperature ingredients for a smoother batter.
- Don’t skip the crumb coat, it really helps the final look.
- Let cakes cool completely before frosting to avoid melting.
- Use a serrated knife for clean leveling.
- Chill between frosting steps for better structure.
- Keep decorations simple if you’re short on time.
- Store in a cool place to keep the frosting firm.
Serving and Storage Ideas
I usually serve this cake slightly chilled but not too cold. That way the frosting stays firm, but the sponge is still soft and easy to slice.
It works really well as a centerpiece dessert. You can slice it right at the table, which always gets a few smiles, especially from kids.
If you have leftovers, just cover the cake and keep it in the fridge. It stays good for a couple of days, though in my house it rarely lasts that long.
Before serving again, I let it sit out for a bit so the texture softens slightly. It just tastes better that way, at least to me.
Easter Bunny Cake Recipe
Description
This Easter Bunny Cake is an adorable, delicious centerpiece for your Easter celebrations or bunny-themed party! Inspired by a unicorn birthday cake, this vanilla Victoria sponge layered with creamy vanilla cream cheese frosting is surprisingly easy to bake and decorate. Store-bought edible flowers and simple sugar paste decorations make it look professionally crafted while keeping the process stress-free. Perfect for pleasing crowds with a crowd-pleasing vanilla flavor that pairs beautifully with the tangy-sweet frosting.
ingredients
Victoria Sponge Cake Batter
Cream Cheese Frosting
Bunny Cake Decoration
Instructions
Victoria Sponge Cake Batter
-
Prepare pans
Grease and line four 18 cm (7 inch) round baking pans with parchment paper. -
Cream butter and sugar
Beat butter and sugar together until fluffy and pale in color.Use a stand mixer or hand mixer for best results -
Add eggs
Add beaten eggs a little at a time, beating well after each addition to prevent curdling. -
Fold in flour
Fold half of the flour in with a metal spoon, then gently fold in the remaining flour until just combined.Don't overmix to keep the sponge light -
Bake
Divide batter evenly into the four prepared pans, level tops, and bake at 190°C (375°F, Gas Mark 5) for 15-20 minutes until firm to touch and a skewer inserted comes out clean.Rotate pans halfway through for even baking -
Cool
Let cakes cool completely in pans, then turn out onto a wire rack before frosting.Cakes must be completely cool to prevent frosting from melting
Cream Cheese Frosting
-
Mix base
In a mixer fitted with paddle attachment, beat butter, cream cheese, and vanilla extract until smooth and fully combined.Ensure ingredients are at room temperature for smooth mixing -
Add sugar
Add half the icing sugar and beat until smooth, then gradually add the remaining sugar and beat until fluffy.Sift sugar first to avoid lumps -
Prepare piping
Transfer frosting to a piping bag fitted with a large round tip (like 1A size) for easy assembly.
Assembling the Bunny Cake
-
Level layers
Use a serrated knife or cake leveler to trim the tops of all four cake layers so they are flat and even.Save trimmed pieces for cake pops! -
Stack and fill
Place first layer on cake board or plate, pipe or spread a generous layer of frosting, then repeat with remaining layers.Use a turntable for easier assembly -
Crumb coat
Apply a thin layer of frosting all over the cake to seal in crumbs, then chill in fridge for 10 minutes to set.This step ensures a smooth final finish -
Final frosting
Apply a second, thicker layer of frosting, smoothing with an offset spatula or bench scraper. Chill again while preparing decorations.Dip spatula in hot water for ultra-smooth finish -
Create decorations
Shape sugar paste into bunny ears, nose, cheeks, and eyes. Use a little frosting on the back of each piece to adhere to the cake.Work with clean, dry hands; dust surface with cornstarch to prevent sticking -
Final touches
Arrange edible sugar flowers on top of the cake around the bunny face. Refrigerate until ready to serve.Bring cake to room temperature 30 minutes before serving for best flavor and texture
Nutrition Facts
Servings 10
Serving Size 1 slice (1/10 of cake)
- Amount Per Serving
- Calories 1410kcal
- % Daily Value *
- Total Fat 75gg116%
- Saturated Fat 45gg225%
- Trans Fat 0gg
- Cholesterol 200mgmg67%
- Sodium 400mgmg17%
- Potassium 180mgmg6%
- Total Carbohydrate 180gg60%
- Dietary Fiber 1gg4%
- Sugars 150gg
- Protein 12gg24%
- Calcium 8% mg
- Iron 6% mg
* Percent Daily Values are based on a 2,000 calorie diet. Your daily value may be higher or lower depending on your calorie needs.
Note
- Make ahead tip: Bake cake layers up to 2 days in advance; wrap tightly and store at room temperature. Frost and decorate the day of serving.
- Flavor variations: Add lemon or orange zest to the batter for a citrus twist, or substitute 50g flour with cocoa powder for chocolate layers.
- No sugar paste? Use fondant, marzipan, or even pipe buttercream details for the bunny face.
- Storage: Keep frosted cake refrigerated in an airtight container for up to 3 days. Bring to room temperature 30 minutes before serving.
- Freezing: Unfrosted cake layers freeze well for up to 1 month. Thaw overnight in fridge before assembling.
Frequently Asked Questions
Can I make this cake gluten-free?
Yes! Substitute the self-raising flour with a 1:1 gluten-free flour blend that includes xanthan gum. Add 2 tsp baking powder if your blend doesn't contain leavening. Results may vary slightly in texture but will still be delicious.
How do I get smooth frosting without air bubbles?
Beat frosting on low speed for the final minute to remove air bubbles. For an ultra-smooth finish, dip your offset spatula in hot water, wipe dry, and gently glide over the frosting surface.
Can I use store-bought cake mix?
Absolutely! Use two boxes of vanilla cake mix baked in four 7-inch pans. Follow package instructions for ingredients and baking time. The homemade cream cheese frosting will still make it special.
What if I don't have four cake pans?
Bake in two pans in batches. Cool, clean, and re-line pans before baking the second batch. Keep baked layers covered with a clean kitchen towel while the second batch bakes to prevent drying.