
I have a soft spot for recipes that feel like a quiet memory, and this Chocolate Swirl Milk Bread is exactly that. It’s the kind of bread I reach for when I want something comforting, something that pairs just right with a warm cup of tea.
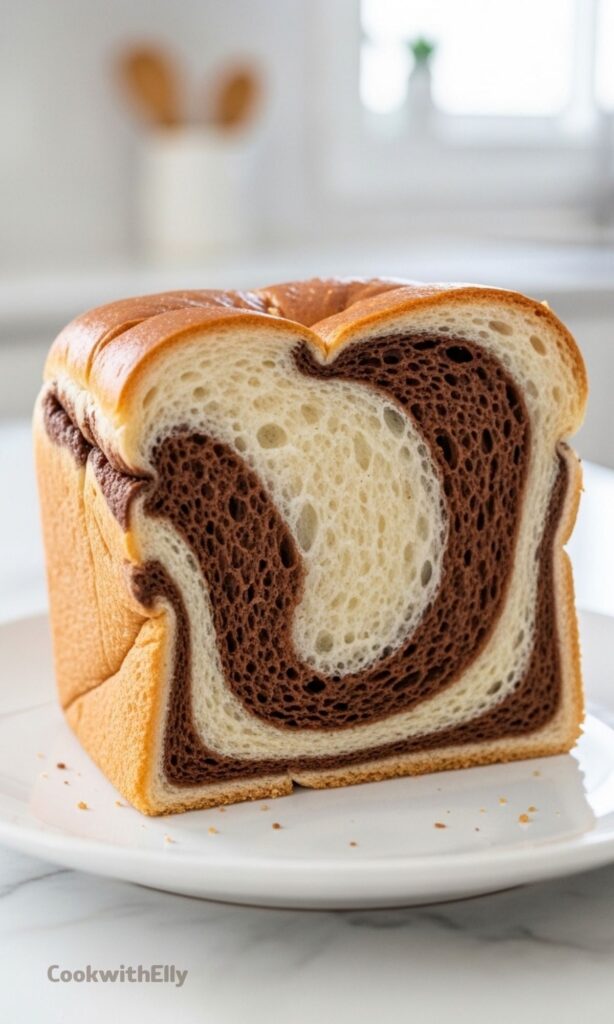
The texture is what really gets me every time. It’s tender, slightly sweet, and has that gentle pull when you tear into it. The chocolate and vanilla swirl isn’t just pretty – it gives every bite a little contrast that keeps things interesting.
I also love how simple it is once you get into the rhythm. A bit of kneading, some patience while it rises, and then the fun part – shaping those beautiful swirls. It feels almost meditative, honestly.
And when it bakes? The kitchen smells like warmth and cocoa and butter. It’s hard to wait, but letting it cool is worth it. The slices come out neat, soft, and just… perfect.
Ingredients Needed for the Recipe
- All-purpose flour – forms the base of the dough and gives structure to the bread.
- Salt – balances the sweetness and enhances overall flavor.
- Lukewarm milk – helps activate the yeast and keeps the crumb soft and rich.
- Sugar – adds sweetness and feeds the yeast for a good rise.
- Active dry yeast – makes the bread rise and gives it that fluffy texture.
- Butter (melted) – adds richness and keeps the bread tender.
- Egg – enriches the dough and improves texture and color.
- Vanilla extract – brings a warm, sweet aroma to the vanilla dough.
- Cocoa powder – transforms half of the dough into the chocolate layer.
- Milk (for chocolate dough) – helps blend the cocoa smoothly into the dough.
- Egg (for brushing) – gives the bread a shiny, golden crust.
Why This Bread Feels Special
There’s something about a swirled bread that feels a little more thoughtful than a plain loaf. It looks like you spent hours on it, even though the process is actually quite manageable.
I also like how flexible it is. Some days I keep it simple, just vanilla and chocolate. Other times, I go a bit extra and add chocolate chips or a thin layer of something creamy inside.
It’s the kind of recipe that grows with you. The more you make it, the more you tweak it, and somehow it becomes your own version without losing its charm.
How to make Chocolate Swirl Milk Bread?
Step 1 – Activate the Yeast
Start by mixing the yeast with a teaspoon of sugar and some lukewarm milk. Let it sit quietly for about 5 to 10 minutes until it becomes foamy.
This step is small but important. It tells you your yeast is alive and ready, which makes everything else go much smoother later on.
Step 2 – Prepare the Dough
In a large bowl, combine flour, sugar, and salt. Then add the remaining milk, the activated yeast, beaten egg, vanilla extract, and melted butter.
Start kneading until the dough becomes smooth and begins to pull away from the sides. It might feel sticky at first, but give it time, it settles beautifully.
Step 3 – Divide and Flavor the Dough
Once the dough is ready, divide it into two equal parts. One will stay as the vanilla base, so shape it into a ball and set it aside.
Take the second half and knead in cocoa powder and a bit of milk. Keep going until the color is even and rich. Now you have your chocolate dough.
Step 4 – Let the Dough Rise
Place both dough portions into separate lightly oiled bowls. Cover them and let them rest in a warm spot for about an hour.
They should double in size. This part always feels slow, but it’s where the softness of the bread really begins.
Step 5 – Roll Out the Dough
Roll the vanilla dough into a rectangle, roughly 8×12 inches. Then do the same with the chocolate dough.
Place the chocolate layer right over the vanilla one. Gently roll them together a bit more so they stick nicely.
Step 6 – Shape the Swirl
Roll the layered dough into a log, stopping just before the end. Then slice it into about 10 strips.
Twist some of the strips to create that lovely pattern. It doesn’t have to be perfect. Slightly uneven swirls actually look more homemade.
Step 7 – Assemble and Rest
Roll everything back together and place it into a lined loaf pan. Let it rest again for about 30 minutes.
This short rest helps the dough relax and puff up a bit more before baking. It’s a small step, but it makes a difference.
Step 8 – Bake the Bread
Brush the top with beaten egg, then place it in a preheated oven. Start at a higher temperature, then reduce it slightly for even baking.
Bake for around 40 minutes. If the top browns too quickly, loosely cover it with foil. Once done, let it cool completely before slicing.
Ways to Customize the Flavor
One of my favorite things about this bread is how easily it adapts. You can keep the base recipe the same and just change a few elements to create something new.
If you want a richer chocolate taste, try spreading a thin layer of chocolate spread before rolling. It melts into the layers and makes every slice more indulgent.
Sometimes I swap cocoa for coffee powder, which gives a deeper, slightly bitter edge that pairs beautifully with the sweet dough. It’s subtle, but noticeable.
You can also experiment with matcha for a green swirl, or even add chopped nuts or dried fruit. It’s a simple dough that welcomes creativity.
Tips
- Make sure your milk is warm, not hot – too much heat can affect the yeast.
- Knead patiently; the dough becomes smoother the more you work it.
- Don’t rush the rising time, it’s key for a soft texture.
- When rolling, keep the thickness even for a consistent swirl.
- If the dough sticks, lightly oil your surface instead of adding more flour.
- Twist gently to avoid tearing the layers.
- Always let the bread cool fully before slicing to keep the structure intact.
- If the top browns too fast, cover loosely with foil midway through baking.
Serving and Storage Ideas
This bread is best enjoyed slightly warm or at room temperature. I usually slice it thick and serve it with a cup of tea in the afternoon. It feels like a small pause in the day.
For breakfast, it’s lovely toasted lightly with a bit of butter. The edges crisp up just enough while the inside stays soft and chocolatey.
If you have leftovers, store them in an airtight container at room temperature for a couple of days. It stays soft longer than you’d expect.
You can also freeze slices individually. Just reheat them gently when needed, and they come back surprisingly close to fresh.
Chocolate Swirl Milk Bread Recipe
Description
This Chocolate Swirl Milk Bread features a soft, tender crumb with beautiful vanilla and chocolate swirls woven throughout. Perfect for breakfast with coffee or tea, or as an afternoon snack, this classic combination never goes out of style. The dough is enriched with milk, butter, and egg for a luxurious texture, while the marbled chocolate swirl adds visual appeal and delicious flavor in every bite.
ingredients
Main Dough
For Chocolate Dough
For Brushing
Instructions
Prepare the Dough
-
Activate Yeast
In a medium bowl, combine yeast, 1 tsp (5g) sugar, and ⅓ cup lukewarm milk. Let rest for 5-10 minutes until foamy.Ensure milk is lukewarm (not hot) to avoid killing the yeast -
Mix Dough
In a large bowl, whisk together flour, remaining sugar, and salt. Add remaining milk, activated yeast, beaten egg, vanilla extract, and melted butter. Knead until dough pulls away from bowl sides.Knead by hand (10 min) or use stand mixer with dough hook (5-7 min) -
Divide Dough
Divide dough into two equal pieces. Shape one piece into a ball for vanilla dough. Transfer to an oiled bowl and cover with plastic wrap. -
Make Chocolate Dough
To the second piece of dough, add cocoa powder and 1 tbsp milk. Knead until cocoa is fully incorporated and dough is evenly colored. Transfer to an oiled bowl and cover. -
First Rise
Let both doughs rise in a warm place for about 1 hour, or until doubled in size.Cover bowls with plastic wrap or damp towel to prevent drying
Roll and Shape the Bread
-
Roll Vanilla Dough
On an oiled surface, roll the vanilla dough into an 8×12 inch (20x30cm) rectangle.Lightly oil rolling pin to prevent sticking -
Roll Chocolate Dough
Roll the chocolate dough into a similar 8×12 inch rectangle. -
Layer Doughs
Place the chocolate dough rectangle on top of the vanilla dough. Gently roll together to form an 8×20 inch (20x50cm) rectangle.Press edges gently to seal layers -
Roll and Cut
Start rolling the layered dough tightly from one long edge. Before reaching the end, cut the rolled portion into about 10 strips. Twist some strips to alternate colors.Use a sharp knife or bench scraper for clean cuts -
Final Roll and Pan
Continue rolling the dough into a log. Transfer seam-side down to an 8½ x 4½-inch loaf pan lined with parchment paper. -
Second Rise
Let the shaped loaf rest at room temperature for 30 minutes to rise slightly.Cover loosely with plastic wrap
Bake the Bread
-
Preheat and Prep
Preheat oven to 350°F (180°C). Brush the top of the risen loaf with beaten egg for a golden finish.Egg wash creates beautiful shine and color -
Adjust Temperature
Reduce oven temperature to 320°F (160°C) before placing bread inside.Lower temperature prevents over-browning -
Bake
Bake for about 40 minutes. If the top browns too quickly, loosely cover with aluminum foil after 15 minutes.Bread is done when internal temperature reaches 190°F (88°C) -
Cool
Remove from oven and let the bread cool completely in the pan for 10 minutes, then transfer to a wire rack to cool fully before slicing.Cutting while warm can cause the bread to become gummy
Nutrition Facts
Servings 10
Serving Size 1 slice (1/10 of loaf)
- Amount Per Serving
- Calories 210kcal
- % Daily Value *
- Total Fat 5.5gg9%
- Saturated Fat 3.2gg16%
- Trans Fat 0gg
- Cholesterol 40mgmg14%
- Sodium 120mgmg5%
- Potassium 85mgmg3%
- Total Carbohydrate 35gg12%
- Dietary Fiber 1.5gg6%
- Sugars 9gg
- Protein 6gg12%
- Calcium 45mg mg
- Iron 1.8mg mg
* Percent Daily Values are based on a 2,000 calorie diet. Your daily value may be higher or lower depending on your calorie needs.
Note
- Extra chocolatey? Before rolling, spread a thin layer of Nutella or chocolate ganache over the chocolate dough for an indulgent twist.
- Make ahead: Prepare the dough the night before and let it rise slowly in the refrigerator. Shape and bake the next morning for fresh bread at breakfast.
- Storage: Store cooled bread in an airtight container at room temperature for up to 3 days, or freeze slices for up to 1 month.
- Variations: Swap cocoa for matcha powder for a vanilla-matcha swirl, or add instant coffee for a mocha version. Add chocolate chips, dried fruit, or chopped nuts for extra texture.
Frequently Asked Questions
Can I use instant yeast instead of active dry yeast?
Yes! Use the same amount of instant yeast, but skip the activation step. Mix it directly with the dry ingredients and proceed with the recipe.
Why did my bread not rise properly?
Common causes include yeast that's expired or killed by liquid that was too hot, a cold rising environment, or over-kneading. Ensure your milk is lukewarm (105-110°F/40-43°C) and let the dough rise in a warm, draft-free spot.
Can I make this recipe dairy-free?
Absolutely! Substitute the milk with unsweetened almond, oat, or soy milk, and use vegan butter or coconut oil instead of dairy butter. The texture may vary slightly but will still be delicious.
How do I know when the bread is fully baked?
The bread should be golden brown and sound hollow when tapped on the bottom. For precision, use an instant-read thermometer—the internal temperature should reach 190°F (88°C).