 View Gallery
1 photo
View Gallery
1 photo
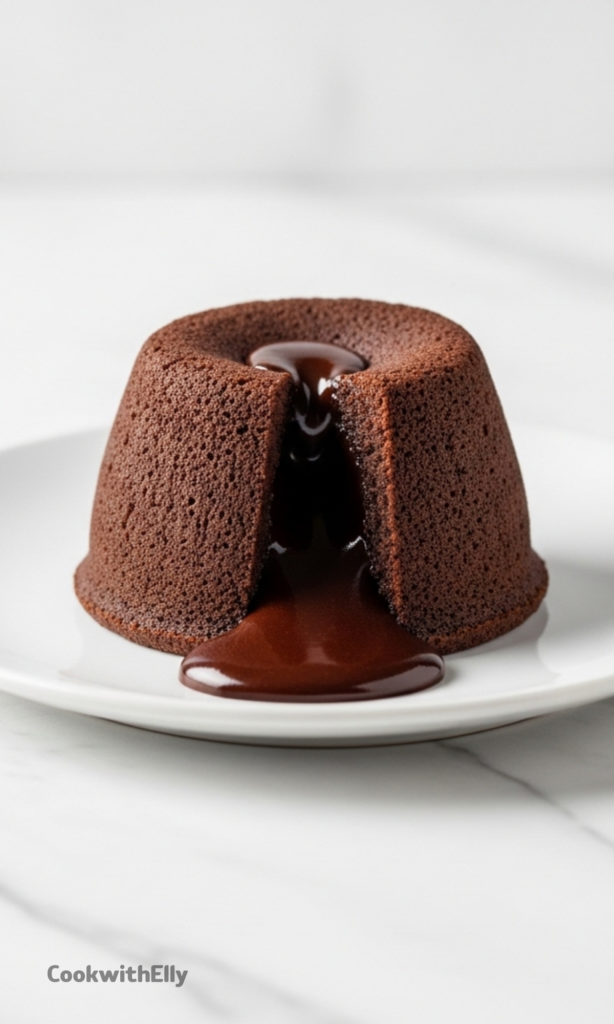
There are desserts that quietly please, and then there are desserts that stop the table mid-conversation. Chocolate lava cakes fall very firmly into that second category. The moment the spoon breaks through the soft cake and that glossy chocolate center spills out, people lean in.
What I love most is how dramatic they feel compared to how little effort they actually take. Six basic ingredients, one bowl, and a short bake time. No mixer, no chilling, no complicated steps hiding behind fancy language.
This is the kind of dessert I make when I want something special but don’t want to spend the entire evening in the kitchen. It’s just as perfect for a quiet night at home as it is for a celebration, and it never feels overdone.
These chocolate lava cakes are rich without being heavy, sweet but not cloying, and deeply chocolate-forward. There’s no frosting, no filling to prepare separately, and no tricks. The batter itself does all the work.
The best part might be how forgiving they are once you understand the timing. A minute or two makes the difference between molten and set, but even the “mistakes” are still incredibly good. Slightly less lava just means extra-fudgy cake.
Ingredients Needed for the Recipe
- Semi-sweet chocolate: This is the heart of the lava, providing deep chocolate flavor and that signature molten center.
- Unsalted butter: Adds richness and helps the chocolate melt smoothly into a glossy base.
- All-purpose flour: Just enough structure to hold the cake together while keeping the center soft.
- Confectioners’ sugar: Sweetens the batter and keeps the texture tender rather than grainy.
- Salt: Balances the sweetness and sharpens the chocolate flavor.
- Eggs and egg yolks: Create richness, structure, and that custardy interior.
How to make How to Make Chocolate Lava Cakes?
Step 1 – Prepare the Baking Dishes
Start by greasing your ramekins generously, then dust them lightly with cocoa powder. This small step makes a big difference when it’s time to invert the cakes. You want them to slide out cleanly, no sticking or tearing.
If you’re using a muffin pan instead, treat it the same way. Grease well, dust with cocoa powder, and tap out the excess. The cakes will be smaller, but the experience stays just as satisfying.
Step 2 – Preheat the Oven
Set the oven to a high temperature and let it fully preheat. Lava cakes rely on that burst of heat to cook the outside quickly while leaving the center soft. Starting with a properly heated oven matters here.
While the oven heats, you can move calmly through the rest of the steps. This recipe doesn’t rush you, which is part of why it feels so approachable.
Step 3 – Melt the Chocolate and Butter
Chop the chocolate into small pieces so it melts evenly. Place the butter in a heatproof bowl, scatter the chocolate on top, and melt gently in short bursts, stirring often.
You’re looking for a smooth, glossy mixture with no visible lumps. Once it’s melted, set it aside for a moment so it’s warm, not hot.
Step 4 – Mix the Dry Ingredients
In a small bowl, whisk together the flour, confectioners’ sugar, and salt. This step helps distribute everything evenly before it meets the chocolate.
It only takes a few seconds, but it prevents clumps later. The batter should feel cohesive and silky, not patchy.
Step 5 – Combine the Eggs
Whisk the whole eggs and extra yolks together until they’re fully blended. The extra yolks are what give these cakes their lush, almost custard-like center.
Once mixed, pour the eggs into the melted chocolate mixture. Go slowly and stir gently to keep the texture smooth.
Step 6 – Bring the Batter Together
Add the dry ingredients to the chocolate and egg mixture. Stir slowly with a spatula or spoon until everything comes together into a thick, glossy batter.
If you see a few small lumps, don’t panic. A gentle whisk or a few extra stirs will smooth them out without overworking the batter.
Step 7 – Fill the Ramekins
Spoon the batter evenly into the prepared ramekins or muffin cups. Try to keep the portions consistent so they bake at the same rate.
Set the filled dishes on a baking sheet. It makes them easier to move and keeps everything steady going into the oven.
Step 8 – Bake Just Until Set
Bake until the edges look firm but the center still appears soft. The tops won’t look fully baked, and that’s exactly what you want.
Resist the urge to leave them in longer. That soft top is the promise of molten chocolate waiting inside.
Step 9 – Invert and Serve
Let the cakes cool for just a minute, then carefully invert each one onto a plate. Use an oven mitt and move slowly, since everything is still very hot.
They should release easily, holding their shape with a gentle dome and a soft center ready to spill.
Serving Ideas
Chocolate lava cakes are wonderful on their own, but toppings turn them into a full dessert moment. The contrast between warm cake and something cool or creamy is hard to beat.
A scoop of vanilla ice cream is a classic choice, melting into the chocolate as it hits the plate. Whipped cream adds softness without overpowering the flavor.
Fresh berries bring brightness and a slight tartness that cuts through the richness. Raspberries and strawberries work especially well here.
For something indulgent, a drizzle of caramel or a spoonful of chocolate sauce leans fully into dessert territory. A little goes a long way.
Tips
- Use high-quality chocolate bars, not chocolate chips, for the best molten center.
- Measure the flour carefully to avoid a dry or dense texture.
- Do not overbake; the centers should look soft when removed from the oven.
- Prepare the ramekins thoroughly to ensure easy release.
- Serve immediately for the best lava effect.
Make-Ahead and Storage Notes
If you want to get ahead, the batter can be made in advance and refrigerated. Bring it back to room temperature before baking so it cooks evenly.
Baked lava cakes can also be frozen once fully cooled. Reheat gently, knowing the center will be slightly less fluid but still rich and satisfying.
These cakes are at their absolute best right after baking. The texture and contrast are what make them special, and time softens that magic.
That said, even leftovers rarely last long. Warmed up or eaten at room temperature, they’re still deeply chocolatey and comforting.
Once you’ve made these once, they tend to become a reliable favorite. They’re simple, impressive, and deeply satisfying in a way that feels timeless rather than trendy.
That’s the real charm of chocolate lava cakes. They don’t need reinvention. They just need a fork, a plate, and someone ready to enjoy them.
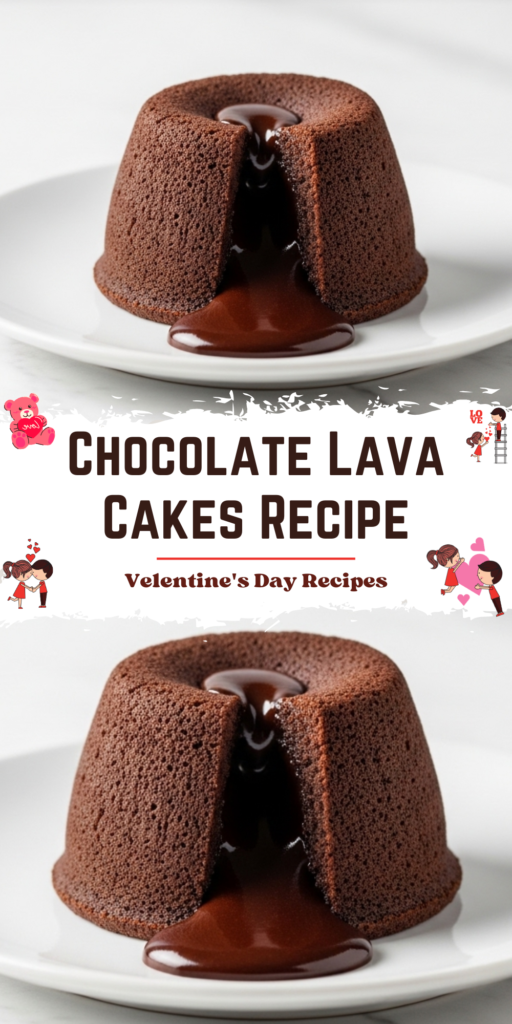
Chocolate Lava Cakes Recipe
Description
Chocolate lava cakes with their deliciously rich molten chocolate center come together with just 6 simple ingredients. Ready in only 25 minutes, this surprisingly easy and quick dessert always impresses—perfect for date night, Valentine’s Day, or any time you crave a luxurious chocolate treat. Serve warm with ice cream, fresh berries, whipped cream, or a drizzle of salted caramel for an unforgettable finish.
ingredients
Instructions
-
Spray four 6-ounce ramekins with nonstick cooking spray and dust with cocoa powder. This ensures the cakes will release easily when inverted onto plates. (Alternatively, grease and cocoa-dust 6 cups of a standard muffin pan for slightly smaller servings.)
-
Preheat oven to 425°F (218°C).
-
Coarsely chop the chocolate. Place butter in a medium heat-proof bowl, then add chopped chocolate on top. Microwave on high in 10-second increments, stirring after each until completely smooth. Set aside.
-
Whisk the flour, confectioners’ sugar, and salt together in a small bowl. In another small bowl, whisk the eggs and egg yolks until combined. Pour both mixtures into the bowl of melted chocolate. Gently stir everything together using a silicone spatula or wooden spoon until smooth and slightly thick.
-
Spoon the batter evenly into each prepared ramekin or muffin cup.
-
Place ramekins on a baking sheet and bake for 12–14 minutes until the sides appear solid and firm but the tops still look soft. (If using a muffin pan, bake for 8–10 minutes.)
-
Let cool for 1 minute. Cover each ramekin with an inverted plate and carefully flip over. Use an oven mitt—the ramekins are hot! The cakes should slide out easily. (For muffin pan versions, use a spoon to gently loosen and invert onto plates.)
-
Top immediately with vanilla ice cream, fresh berries, whipped cream, salted caramel, or raspberry sauce. Serve right away while warm and molten!
Nutrition Facts
Servings 4
Serving Size 1 cake
- Amount Per Serving
- Calories 320kcal
- % Daily Value *
- Total Fat 21gg33%
- Saturated Fat 12gg60%
- Trans Fat 0gg
- Cholesterol 145mgmg49%
- Sodium 95mgmg4%
- Potassium 180mgmg6%
- Total Carbohydrate 28gg10%
- Dietary Fiber 2gg8%
- Sugars 22gg
- Protein 6gg12%
- Calcium 4 mg
- Iron 15 mg
* Percent Daily Values are based on a 2,000 calorie diet. Your daily value may be higher or lower depending on your calorie needs.
Note
- Make Ahead: Prepare batter through step 4, cover tightly, and refrigerate for up to 2 days. Bring to room temperature before baking.
- Freezing: Baked and cooled lava cakes can be frozen for up to 3 months. Reheat in the microwave before serving.
- No Ramekins? Use a greased and cocoa-dusted muffin pan—yields 6 smaller cakes baked 8–10 minutes.
- Chocolate Tip: High-quality baking chocolate (not chips) is essential for a true molten center.
Frequently Asked Questions
Can I make these lava cakes gluten-free?
Yes! Substitute the all-purpose flour with a 1:1 gluten-free baking flour blend. For a naturally gluten-free option, try Sally’s Flourless Chocolate Cake.
Why is my lava cake not molten in the center?
It’s likely overbaked. The key is to pull the cakes out when the edges are set but the center still looks soft. Oven temperatures vary—start checking at 12 minutes. Also, ensure you’re using real baking chocolate, not chips, which contain stabilizers that prevent melting.