I love sushi with my whole heart, but I’ll be honest, rolling it perfectly after a long day is not always happening. Some nights I want all the flavors without the tiny panic of rice sticking to everything except where it should. That’s exactly why sushi bowls have earned a permanent spot in my kitchen.
Sushi bowls give you everything you crave from sushi in a way that feels relaxed and forgiving. Warm, seasoned rice, fresh toppings, creamy avocado, and that salty-sweet bite all layered together. No bamboo mat, no pressure, just a really satisfying bowl you can customize however you want.
I make these when I’m short on time, when I’m feeding picky eaters, or when I just want dinner to feel fun without being fussy. They’re fast, flexible, and honestly a little dangerous because once you start making them, you’ll want them on repeat.
Another thing I love is how personal sushi bowls can be. Everyone gets exactly what they like, piled just the way they want it. Raw fish, cooked seafood, vegetarian, extra sauce, no sauce, more crunch, less rice. It all works, and nobody’s bowl looks quite the same.
Ingredients Needed for the Recipe
Short-grain Japanese rice – This is the base of the bowl and gives you that sticky, chewy texture sushi is known for.
Water – Used to cook the rice properly so it stays fluffy instead of mushy.
Rice vinegar – Adds the signature tang that turns plain rice into sushi rice.
Sugar – Balances the vinegar with a gentle sweetness.
Salt – Rounds out the seasoning and sharpens the overall flavor.
Sushi-grade salmon or tuna – The classic protein, sliced thin for freshness and texture.
Cucumber – Brings crunch and a clean, refreshing bite.
Avocados – Adds creaminess and richness that balances the rice and fish.
Carrots – Lightly sweet and crisp, perfect for color and texture.
Edamame beans – A hearty, protein-packed addition that makes the bowl more filling.
Nori sheets – Cut into strips to give that familiar seaweed flavor.
Pickled ginger – Bright and tangy, it cuts through the richness beautifully.
Sesame seeds – Adds nutty flavor and a little crunch on top.
Soy sauce or tamari – For seasoning at the table.
Wasabi paste – Optional, but great if you like a bit of heat.
Why Sushi Bowls Just Make Sense
Sushi bowls take everything intimidating about sushi and gently remove it. No rolling, no perfect shapes, no stress if something slides out of place. You build, you eat, you enjoy, and that’s it.
They’re also incredibly practical. You can prep most of the components ahead of time, which makes weeknight dinners feel almost effortless. I’ve even set everything out buffet-style and let everyone build their own bowl, which is always a hit.
Most importantly, sushi bowls don’t sacrifice flavor for convenience. The seasoned rice, fresh toppings, and sauces come together in every bite. It feels indulgent but still light, which is a combination I never get tired of.
How to make Sushi Bowls?
Make this recipe yours—just save it to your Pinterest board!”
Step 1 – Rinse and cook the rice
Start by rinsing the rice under cold water until the water runs clear. It feels tedious, but this step removes excess starch and keeps the rice from turning gummy. Trust me, it’s worth the extra minute.
Combine the rinsed rice and water in a saucepan, bring it to a boil, then reduce the heat and cover. Let it simmer gently, then rest off the heat so the rice finishes steaming. Resist the urge to lift the lid.
Step 2 – Season the rice
While the rice is still warm, mix the rice vinegar, sugar, and salt until dissolved. This mixture is what gives sushi rice its unmistakable flavor, slightly tangy with just enough sweetness.
Gently fold the seasoning into the rice using a slicing motion rather than stirring. This keeps the grains intact and fluffy instead of mashed together.
Step 3 – Prepare the toppings
Slice the fish thinly and keep it chilled until you’re ready to assemble. If you’re using cooked or smoked proteins, just make sure everything is ready to go and nicely portioned.
Cut the vegetables into bite-sized pieces so every spoonful gets a bit of everything. This step is where you can adjust textures and colors to your liking.
Step 4 – Assemble the bowls
Divide the rice between bowls and spread it out slightly to create an even base. Then arrange the fish, vegetables, and edamame on top however you like.
Finish with nori strips, pickled ginger, and a sprinkle of sesame seeds. Drizzle with sauce or keep it simple and season at the table.
Step 5 – Serve and enjoy
Serve the bowls immediately while the rice is tender and the toppings are fresh. Chopsticks are traditional, but a spoon works just as well.
This is the moment to adjust flavors to taste, adding soy sauce, wasabi, or even a little spicy mayo if that’s your thing.
Easy Variations to Try
Sushi bowls are incredibly forgiving, which makes them perfect for experimenting. I often swap the raw fish for smoked salmon when sushi-grade fish isn’t available, and honestly, I love it just as much.
Cooked shrimp, imitation crab, or seared salmon also work beautifully. If you want something heartier, teriyaki chicken or marinated tofu fits right in without feeling out of place.
For a vegetarian version, load up on avocado, cucumber, carrots, edamame, and maybe some roasted mushrooms. The seasoned rice and nori still give you that unmistakable sushi vibe.
Serving Ideas and Pairings
Sushi bowls are filling enough to stand on their own, but they pair nicely with light sides. A simple soup or crisp appetizer keeps the meal balanced without overpowering the bowl.
I like serving them when friends come over because they feel interactive and relaxed. Everyone builds their own, and dinner turns into more of an experience than just a meal.
They also work surprisingly well for lunch, especially if you keep the components separate and assemble right before eating.
Tips
Always rinse the rice thoroughly to avoid sticky, gluey texture.
Season the rice while it’s warm so it absorbs flavor evenly.
Use sushi-grade fish from a trusted source, or swap for cooked options.
Keep toppings chilled until assembly for the freshest taste.
Cut ingredients into similar sizes for balanced bites.
Toast sesame seeds lightly for deeper flavor.
Store rice and toppings separately if prepping ahead.
Sushi bowls have become one of those recipes I lean on again and again. They’re comforting without being heavy, fresh without being fussy, and flexible enough to suit almost anyone at the table.
If you love sushi but don’t love the work that comes with it, this is the answer. One bowl, endless combinations, and zero stress. That’s a dinner win in my book.
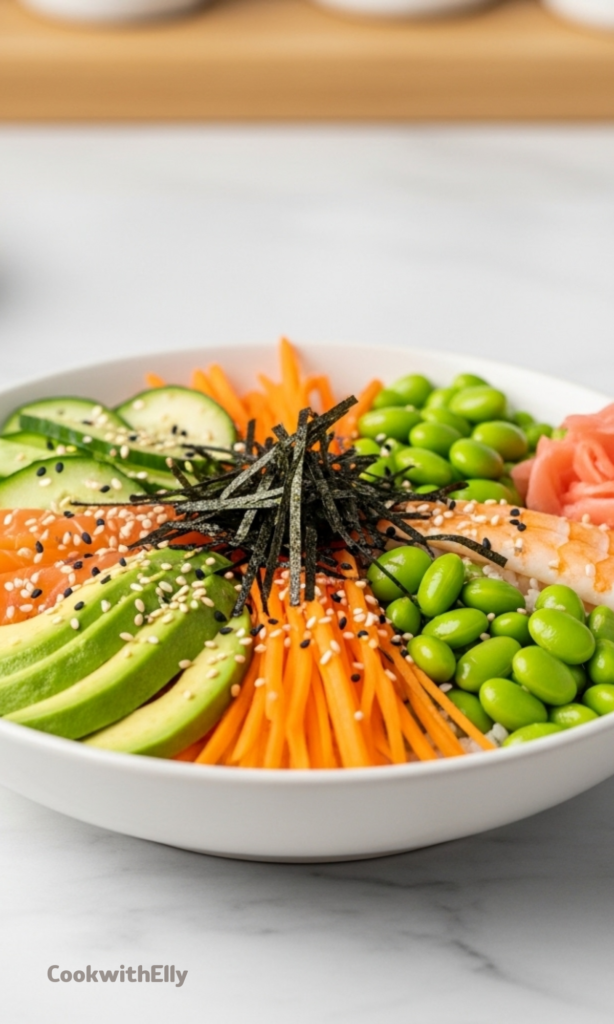
These Sushi Bowls deliver all the fresh, vibrant flavors of traditional sushi—seasoned rice, fish, and crunchy veggies—without the hassle of rolling. Fast, customizable, and packed with texture and taste, they’re perfect for busy weeknights or meal prep!
ingredients
For the Sushi Rice
2cups short-grain Japanese rice
2cups water
¼cup rice vinegar
2tablespoons sugar
1teaspoon salt
For the Bowls
8ounces sushi-grade salmon (or tuna, thinly sliced (substitute with smoked salmon, cooked shrimp, tofu, or imitation crab if preferred))
1large cucumber (diced or sliced)
2 avocados (sliced)
2 carrots (shredded or julienned)
1cup edamame beans (cooked and shelled)
4sheets nori (seaweed, cut into thin strips)
2tablespoons pickled ginger
2tablespoons sesame seeds (white or black, toasted)
soy sauce (or tamari, for serving)
wasabi paste (optional, for serving)
Instructions
1
Rinse and Cook the RiceRinse the rice under cold water until the water runs clear. In a medium saucepan, combine the rice and water. Bring to a boil over medium heat. Reduce heat to low, cover, and simmer for 15 minutes. Remove from heat and let it sit, covered, for an additional 10 minutes.
Do not lift the lid while cooking or resting.
2
Season the RiceIn a small bowl, mix the rice vinegar, sugar, and salt until dissolved. Transfer the cooked rice to a large bowl. Gently fold in the vinegar mixture with a wooden spoon using a slicing motion. Let the rice cool to room temperature.
Avoid stirring to prevent mushy rice.
3
Assemble the BowlsDivide the cooled sushi rice evenly among four bowls. Arrange the sliced fish, cucumber, avocado, carrots, edamame, and nori strips on top of the rice. Add pickled ginger and sprinkle with toasted sesame seeds.
Customize toppings based on preference or dietary needs.
4
ServeServe the bowls with soy sauce or tamari and wasabi paste on the side. Enjoy immediately with chopsticks or a spoon.
Nutrition Facts
Servings 4
Serving Size 1 bowl
Amount Per Serving
Calories480kcal
% Daily Value *
Total Fat21gg33%
Saturated Fat3.5gg18%
Trans Fat0gg
Cholesterol25mgmg9%
Sodium780mgmg33%
Potassium620mgmg18%
Total Carbohydrate58gg20%
Dietary Fiber7gg29%
Sugars8gg
Protein18gg36%
Calcium 8 mg
Iron 15 mg
* Percent Daily Values are based on a 2,000 calorie diet. Your daily value may be higher or lower depending on your calorie needs.
Note
Sushi Rice Matters – Short-grain Japanese rice is the best choice. It’s stickier and chewier, making it perfect for holding all the flavors together.
Season the Rice While Warm – This helps it absorb the vinegar-sugar-salt mix evenly, giving it that signature sushi flavor.
Sushi-Grade Fish Only! – Not all raw fish is safe to eat. Look for “sushi-grade” or “sashimi-grade” fish from a reputable source. If you’re unsure, swap it for cooked shrimp, smoked salmon, or tofu.
Make It Your Own – Not into raw fish? Try cooked teriyaki chicken, crab, or marinated tofu. Want more crunch? Top with crispy onions or toasted panko.
Storage Tips – Sushi rice is best fresh but can be stored for up to 2 days in an airtight container with a damp paper towel over it. Keep all toppings separate until ready to eat.