I start wanting apple desserts before I actually need them. It happens every year. I can be perfectly happy eating summer fruit, then one cooler morning rolls around and suddenly I want cinnamon, caramel, baked apples, and something creamy enough to make a whole dessert out of it.
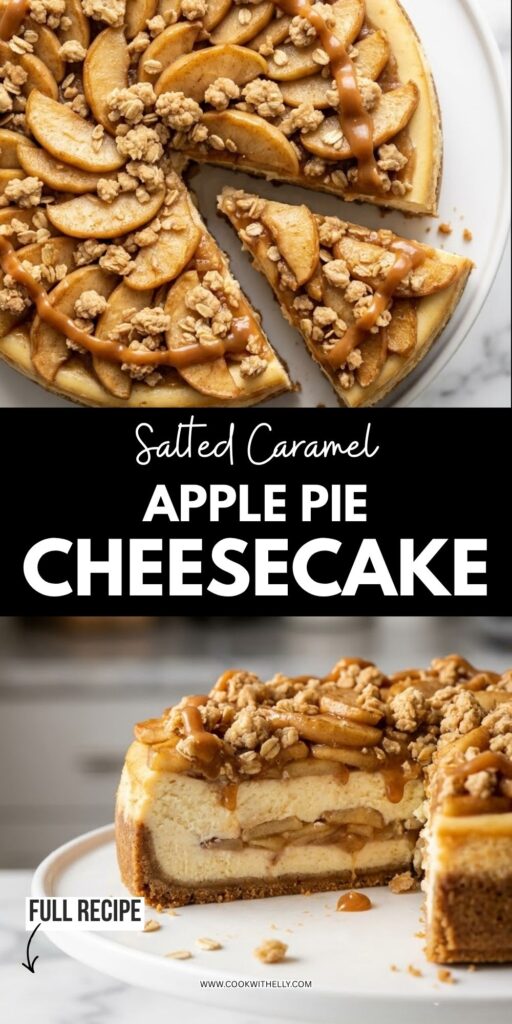
This Salted Caramel Apple Pie Cheesecake is exactly where that craving takes me. I get the buttery graham cracker crust, a creamy vanilla cinnamon cheesecake, soft caramelized apples tucked right through the middle, and then even more apples piled on top with a buttery oat crumble and salted caramel.
I will admit, this is not my quickest cheesecake. There are several little parts to it, and the cheesecake needs a long chill before I can cut it. But I have learned that I can split the work over a day or two, and that makes the whole thing feel much less dramatic.
The part I love most is the apple layer in the middle. It keeps the cheesecake from feeling like just another plain vanilla cheesecake with autumn toppings. I get actual apple pie flavor in every slice, and the salty caramel pulls everything together without making the dessert taste overwhelmingly sweet.
Ingredients I Used for the Recipe
I like having every ingredient measured before I start because this recipe has enough moving parts that searching through the pantry halfway through baking is not my idea of fun. I also bring the cream cheese, eggs, and sour cream to room temperature before mixing the filling. That small step has saved me from plenty of lumpy cheesecake batter.
- 4 medium baking apples, about 588 grams sliced: I use Honeycrisp, Jonathan, Golden Delicious, Gala, or Fuji because they hold their shape nicely. I avoid very soft apples because I do not want applesauce inside my cheesecake.
- 6 tablespoons salted butter, divided: I use 3 tablespoons for the apple filling and another 3 tablespoons for the apple topping. The butter gives the apples that rich, caramelized flavor I want.
- 2 to 4 tablespoons apple cider or water: I use cider when I have it because it adds another little layer of apple flavor.
- 2/3 cup packed light brown sugar: I divide this between the apple filling and topping to sweeten the apples and help them caramelize.
- 2 1/2 teaspoons cinnamon, divided: I use cinnamon in the apples, cheesecake, and crumble so the spice carries through the whole dessert.
- 1 teaspoon nutmeg, divided: I use it with the apples and cheesecake for that warm apple pie flavor.
- 1/2 teaspoon ground cloves, divided: I only need a little because cloves can take over quickly.
- 1/4 teaspoon allspice: I add this to the apple mixture for a deeper, warmer spice note.
- 2 to 4 teaspoons lemon juice: I add this to taste so the apples have a little brightness against all the richness.
- 4 teaspoons cornstarch plus 4 teaspoons water: I use this mixture to thicken the apple juices so they stay tucked into the cheesecake instead of running everywhere.
- 3 cups cinnamon graham cracker crumbs, about 300 grams: I use these for a crisp crust with extra cinnamon flavor.
- 1 1/2 cups salted butter, melted: I use 1/2 cup plus 3 tablespoons for the crust. The butter binds the crumbs and helps the crust bake up firm.
- 32 ounces full-fat block cream cheese: I use full-fat cream cheese because I want the cheesecake to be rich and creamy.
- 1 1/2 cups granulated sugar: I use this for the cheesecake filling.
- 4 large eggs: I bring them to room temperature and add them one at a time.
- 2 teaspoons vanilla extract: I use real vanilla for the soft background flavor it gives the cheesecake.
- 1 1/2 teaspoons cornstarch: I add this to the cheesecake batter to help give the filling a nice, sliceable texture.
- 3/4 cup full-fat sour cream: I use it for extra creaminess and a slight tang that balances the sugar.
- 1/4 cup all-purpose flour: I use this in the oat crumble.
- 1/2 cup old-fashioned rolled oats: I add oats to make the topping crunchy and buttery.
- 1/4 cup packed brown sugar: I use this in the crumble for sweetness and caramel-like flavor.
- 1/8 teaspoon salt: I add a small amount to the crumble so the sweetness does not get flat.
- 1/4 cup cold salted butter, cubed: I cut this into the crumble ingredients for those crisp little buttery pieces.
- 1 cup granulated sugar: I use this for the salted caramel sauce.
- 6 tablespoons salted butter: I add this to the caramel for richness.
- 1/2 cup plus 1 tablespoon heavy cream: I use this to turn the melted sugar and butter into a smooth caramel sauce.
- Pinch of flaky sea salt: I finish the caramel with this because that little salty bite is what keeps me coming back for another forkful.
How to Make Salted Caramel Apple Pie Cheesecake?
Step 1 - Cook the Apple Filling
I start by peeling and slicing the apples about 1/4 to 1/2 inch thick. I put them into a medium saucepan with 3 tablespoons of salted butter, 1/3 cup brown sugar, cinnamon, nutmeg, cloves, allspice, lemon juice, and 1 to 2 tablespoons of cider or water.
I cook everything over medium-high heat for about 8 to 14 minutes, stirring every so often. I want the apples tender but not falling apart. If the pan gets dry, I add another small splash of cider or water.
When the apples are ready, I mix 2 teaspoons cornstarch with 2 teaspoons water and stir it into the pan. I cook it for another 30 to 60 seconds, just until the juices thicken. Then I move the apples to a bowl and let them cool.
Step 2 - Bake the Graham Cracker Crust
I heat the oven to 350°F and grease a 9-inch springform pan. I mix the cinnamon graham cracker crumbs with 1/2 cup plus 3 tablespoons melted salted butter, then press the mixture firmly into the bottom and slightly up the sides of the pan.
I bake the crust for 10 minutes and set it aside. I keep the oven at 350°F because I will be going right into the cheesecake next.
Step 3 - Mix the Creamy Cheesecake Batter
I beat the softened cream cheese until it is smooth and creamy, usually for about 1 to 2 minutes. Then I add the granulated sugar and mix until it is incorporated.
I add the eggs one at a time, mixing just until each one disappears into the batter. Then I add the vanilla, sour cream, cornstarch, cinnamon, nutmeg, and cloves. I stop mixing as soon as everything looks combined.
I used to think mixing longer would make cheesecake smoother, but I learned the hard way that it can do the opposite of what I want. I now mix less and scrape the bowl more often.
Step 4 - Layer the Apples and Cheesecake
I pour half of the cheesecake batter over the baked crust and smooth it gently. I spoon the cooled apple filling over the batter in an even layer, keeping most of the apples away from the very edge.
I pour the remaining cheesecake batter over the apples and smooth the top with an offset spatula. At this point I always give the pan a quick visual check because I want the top level before it goes into the oven.
Step 5 - Set Up the Water Bath and Bake
I use a water bath because I want the cheesecake to bake gently and stay creamy. I prefer placing the cheesecake pan inside a larger cake pan and then setting that inside a roasting pan. I pour boiling water into the roasting pan, not directly around the cheesecake pan.
I bake the cheesecake for about 1 hour 30 minutes to 1 hour 50 minutes. I look for slightly raised edges, a matte-looking top, and a small wobble in the center. If the center still looks very loose, I give it more time.
When it is done, I turn off the oven and crack the door open. I let the cheesecake cool in the oven for 1 hour, then move it to a rack and let it cool completely.
Step 6 - Chill the Cheesecake Completely
I cover the cooled cheesecake and refrigerate it for at least 6 hours. Overnight is even better for me because it makes the whole dessert easier to plan, and the cheesecake becomes much firmer and easier to slice.
I know waiting is annoying. I have definitely stood in front of the refrigerator wanting to cut into a cheesecake early. It never feels worth it. The cleanest slices always come after the long chill.
Step 7 - Bake the Oat Crumble
I mix the flour, oats, brown sugar, cinnamon, and salt in a bowl. Then I cut in the cold cubed butter until I have a crumbly mixture with little buttery pieces throughout.
I spread it on a parchment-lined baking sheet and bake it at 350°F for about 12 to 20 minutes, stirring halfway through. I keep an eye on it because mine has taken closer to 25 minutes before. I let it cool completely before using it.
Step 8 - Make the Salted Caramel
I melt the granulated sugar in a medium saucepan, then carefully work in the butter and heavy cream. I finish the sauce with a pinch of flaky sea salt and let it cool before drizzling it over the cheesecake.
I try not to rush this part. Caramel goes from looking perfectly fine to looking like a sticky disaster if I stop paying attention, so I stay close to the stove while I make it.
Step 9 - Cook the Apple Topping
I slice another 4 medium apples, this time into thicker 1/2 to 3/4 inch pieces because I want the topping to look substantial. I cook them with the remaining butter, brown sugar, cider or water, spices, lemon juice, and the cornstarch mixture just as I did for the filling.
I let the topping cool before putting it on the cheesecake. I have found that warm apples and cold cheesecake are not a great combination for a neat finish, so I give the apples time to lose their heat.
Step 10 - Finish and Slice
I remove the chilled cheesecake from the springform pan and spoon the apple topping over the surface. Then I scatter the oat crumble generously across the apples and drizzle salted caramel over everything.
I like bringing extra crumble and caramel to the table. I know I will probably add both to my own slice, and nobody ever seems disappointed when there is a little extra.
Tips That Make This Cheesecake Easier for Me
- I use a 9-inch springform pan. The amount of batter is substantial, so I do not try squeezing everything into a smaller pan.
- I bring the dairy and eggs to room temperature. Cold cream cheese makes the batter much harder for me to get smooth.
- I do not overmix after adding the eggs. I mix just until each egg is incorporated and then move on.
- I keep the apples slightly firm. They soften more during cooking and chilling, so I do not want them completely mushy from the start.
- I use an oven thermometer. My oven has surprised me before, and cheesecake is not something I like guessing with.
- I keep the water out of the cheesecake pan. I never put the springform directly into the water because I do not want a soggy crust.
- I do not panic over a little browning. The top can puff and brown slightly while the cheesecake is still perfectly baked.
- I make the crumble ahead. It keeps well in an airtight container at room temperature for a couple of days.
- I make the caramel ahead too. I can refrigerate it for several days and gently warm it before serving if it becomes too thick.
- I make the apple filling ahead. I can refrigerate it in an airtight container for about a day, which makes the cheesecake day much easier.
How I Like to Serve and Store It
I usually serve this cheesecake cold or just slightly cool. I do not need much beside it because there is already so much happening on top, but a little freshly whipped cream is especially good when I want the slices to feel extra festive.
I like cutting fairly modest slices at first. This is a rich dessert, and between the cheesecake, apples, crumble, and caramel, a small slice goes a surprisingly long way. Then I can always come back for another piece, which I usually do.
I store leftovers covered tightly in the refrigerator for about 3 to 4 days. I keep the cheesecake chilled and add any extra caramel right before serving so the topping stays as nice as possible.
The Little Things I Love About This Apple Cheesecake
I think this recipe works because every layer has a job. The graham cracker crust gives me crunch, the cheesecake brings that cool creamy center, and the apples add a soft, warmly spiced bite that makes the whole thing taste like apple pie.
Then the crumble changes the texture again. I get those buttery oat pieces against the smooth cheesecake, and the salted caramel settles into all the little spaces between the apples. That is probably my favorite bite of the entire dessert.
I also love that I do not have to make a traditional pie crust for this. I get all the cozy apple pie flavors without trying to roll dough around a counter while flour somehow ends up everywhere. The graham cracker crust is much more forgiving, and honestly, I prefer it here.
For me, this is a dessert I make when I want something that feels special enough for a holiday table but still tastes like something I would happily eat curled up at home with a fork. It takes patience, especially with the chilling time, but I think that is part of what makes it feel like an occasion.
Once I have that first slice with the caramel dripping down the side and the apple topping piled high, I never regret making the whole thing. The kitchen may be a little messy, the refrigerator may be crowded, and I may have sampled the crumble more times than necessary, but that is pretty much how I know I made something good.