The smell hit first. Sharp, almost green, that tart rhubarb scent rising as it started to warm. It always surprises me how something so sour can promise something this comforting.
I had a bag of frozen rhubarb that I kept pushing to the back of the freezer. Too much of it, honestly. Every spring I tell myself I’ll use it up faster. I never do.
So this time I didn’t overthink it. No complicated dessert, no layers, no mixing bowls piling up. Just something quick, slightly messy, and good enough to scoop straight from the pan.
And that’s exactly what this turned into. A simple, slightly rustic Rhubarb Dump Cake that somehow feels like more effort than it actually is.
Ingredients Needed for the Recipe
4 cups chopped rhubarb - the tart base that softens beautifully while baking
1 scant cup white sugar - balances the sharpness without making it overly sweet
1 package yellow cake mix - creates that crumbly, golden topping
1 cup water - helps everything cook through and keeps it from drying out
1/3 cup melted butter - adds richness and helps form the crust
Cooking spray - keeps everything from sticking to the pan
That moment before it went into the oven
I stood there staring at the pan, slightly unsure. It looked… wrong. Dry patches of cake mix, uneven butter, rhubarb peeking through like it wasn’t fully covered.
My instinct was to grab a spoon and fix it. Mix it. Smooth it. Do something. But I stopped myself, because this kind of recipe works best when I don’t interfere.
So I left it exactly as it was. A little uneven, a little questionable. And honestly, that’s usually when things turn out the best.
How to make Rhubarb Dump Cake?
Step 1 - Prep the pan and oven
I start by preheating the oven to 350 F. While that’s going, I spray a 9×13-inch baking dish. I don’t skip this, even if the pan claims to be nonstick.
It’s one of those tiny habits that saves me from scraping stuck corners later, which I really don’t have patience for.
Step 2 - Add the rhubarb base
I take the rhubarb straight from the freezer and spread it across the bottom of the pan. No thawing. No draining.
If some pieces are clumped together, I break them apart with my hands. Not perfectly. Just enough so it’s somewhat even.
Step 3 - Sprinkle the sugar
The sugar goes right over the rhubarb. I try to scatter it evenly, but I don’t measure obsessively here.
I’ve noticed a slightly uneven sprinkle actually gives better bites. Some more tart, some sweeter. It works.
Step 4 - Add the dry cake mix
I pour the cake mix over everything. Just straight from the package.
It forms this powdery layer on top, and again, it looks unfinished. That’s normal. I resist the urge to press it down.
Step 5 - Pour water and butter
I drizzle the water across the surface, trying to hit as many dry spots as I can. Then comes the melted butter.
I don’t pour it all in one place. I move my hand around, letting it fall in thin streams. It still won’t cover everything, and that’s okay.
Step 6 - Do not mix
This is the part that feels strange every single time. I do nothing. No stirring, no smoothing.
It goes into the oven exactly like that. Layers untouched. Slightly uneven. Trusting the heat to sort it out.
Step 7 - Bake until bubbling
I bake it for about 45 minutes. Around the 30-minute mark, I start checking.
The top should turn lightly golden, and the edges will bubble. That bubbling is what I look for more than color.
What almost went wrong
One time, I added too much butter in one corner without realizing it. It pooled, soaked through, and that side turned dense instead of crumbly.
Since then, I pay more attention when pouring. Not perfectly, just enough to keep it moving across the pan.
Another small thing - I once tried to “fix” dry spots halfway through baking. Big mistake. It messed up the texture completely.
Now I leave it alone. Even if it looks uneven halfway through, it evens out more than I expect.
Tips
Use frozen rhubarb straight from the freezer - it works just as well as fresh
Don’t overdo the sugar - rhubarb needs balance, not full sweetness
Try to spread butter as evenly as possible without stressing about perfection
Resist mixing at all costs - it changes the texture completely
Look for bubbling edges as a doneness sign, not just color
Let it sit for 10 minutes before serving so it thickens slightly
If the top looks too dry early on, leave it - it usually fixes itself
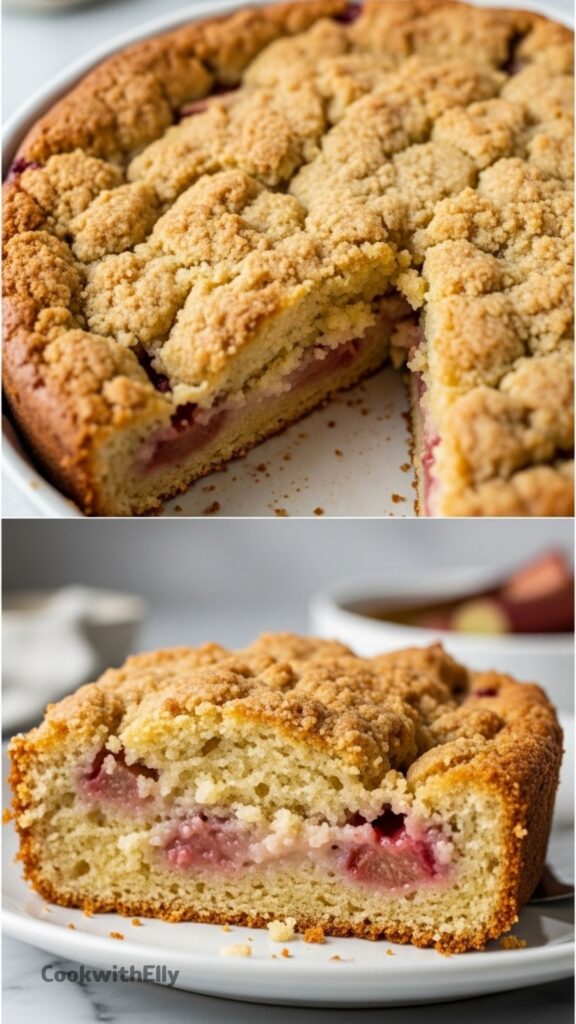
Texture and flavor notes
The top turns slightly crisp in spots and soft in others. I like that contrast. Some bites have that light crunch, others melt into the fruit.
The rhubarb underneath becomes tender and jam-like, but still holds its shape. It’s not mushy, which I appreciate.
And the flavor sits right in the middle. Not too sweet, not too sharp. Just enough tang to keep it interesting with every spoonful.
I usually eat it warm, straight from the pan. Sometimes with ice cream, sometimes not. Depends on how patient I feel that day.
This super simple Rhubarb Dump Cake is the perfect way to use up that pile of rhubarb in your freezer. With just a few ingredients and no mixing required, this dessert comes together quickly and tastes like a warm, fruity crisp or cobbler. The tartness of the rhubarb balances perfectly with the sweet yellow cake topping, creating a delightful treat that is best served warm with vanilla ice cream.
Ingredients
4cups fresh or frozen rhubarb, chopped (approx. 500g)
1scant cup white sugar (approx. 180g)
1package yellow cake mix (15.25 oz / 432g)
1cup water (240ml)
1/3cup butter, melted (75g)
Cooking spray (for greasing pan)
Instructions
1
Preheat Oven & Prep Pan – Preheat your oven to 350°F (175°C). Spray a 9x13-inch baking dish with cooking spray to prevent sticking.
2
Layer the Rhubarb – Spread the chopped fresh or frozen rhubarb evenly across the bottom of the prepared baking dish.
3
Add Sugar and Cake Mix – Sprinkle the white sugar evenly over the rhubarb. Follow this by sprinkling the dry yellow cake mix evenly over the sugar layer. Do not stir or mix these layers.
4
Add Liquids – Pour the water evenly over the cake mix. Then, drizzle the melted butter over the top, trying to cover as much surface area as possible. IMPORTANT: DO NOT MIX the ingredients.
5
Bake – Place the dish in the preheated oven and bake for approximately 45 minutes. The cake is done when the top is golden brown, the fruit is bubbling, and the rhubarb is tender.
6
Serve – Let the cake cool for about 10 minutes before serving. It is delicious served warm with a scoop of vanilla ice cream or a dollop of whipped cream.
Nutrition Facts
Servings 12
Serving Size 1 slice
Amount Per Serving
Calories290kcal
% Daily Value *
Total Fat10g16%
Saturated Fat4.5g23%
Trans Fat0.2g
Cholesterol15mg5%
Sodium320mg14%
Potassium180mg6%
Total Carbohydrate48g16%
Dietary Fiber2g8%
Sugars28g
Protein2g4%
* Percent Daily Values are based on a 2,000 calorie diet. Your daily value may be higher or lower depending on your calorie needs.
Note
For best results, use frozen rhubarb directly from the freezer without thawing to prevent excess moisture. If using fresh rhubarb, ensure it is chopped into uniform pieces for even cooking. This cake stores well in the refrigerator for up to 3 days.