The smell hits first - warm, sharp, almost jammy, with a buttery edge that makes me pause mid-stir. I’m already at the stove, spoon in hand, watching the rhubarb soften faster than I expected.
I nudge the heat down a bit. It was getting a little too lively, bubbling like it had somewhere urgent to be. I like it glossy, not collapsed into mush.
This is one of those desserts that feels simple until you actually stand there making it. Then suddenly, you’re making tiny decisions every minute, adjusting, tasting, trusting your eyes more than anything else.
And somehow, that’s what makes it good. Not perfect. Just right in that very moment.
A small pause before it all began
I almost didn’t make this today. The rhubarb sat in the fridge longer than planned, tucked behind something I kept forgetting to move.
When I finally pulled it out, the color still caught me off guard. That deep pink, almost glowing, like it was asking not to be wasted.
So I chopped it quickly, uneven pieces and all, deciding halfway through that a crumble was the only thing that made sense. No overthinking, just something warm and forgiving.
Ingredients Needed for the Recipe
800g rhubarb - chopped into small pieces, the main tart base
50g caster sugar - softens the sharpness of the rhubarb
20g butter - adds richness as the fruit cooks
2½ tsp vanilla extract - rounds out the flavor gently
1 tbsp cornflour - thickens the juices slightly
150g plain flour - forms the crumble structure
1 tsp baking powder - gives a light lift to the topping
110g unsalted butter (cold, diced) - creates that crumbly texture
45g caster sugar - sweetness in the topping
45g demerara sugar - adds crunch and a deeper flavor
How to make Rhubarb Crumble?
Step 1 - Start the rhubarb base
I toss the chopped rhubarb into a pan with sugar, butter, vanilla, and cornflour. It looks dry at first, almost like it won’t come together.
Then slowly, it shifts. The butter melts, juices release, and everything turns glossy. I stir gently, trying not to break it down too much.
Step 2 - Watch the texture
This part matters more than the timer. I keep an eye on how soft the rhubarb gets. I want it tender but still holding shape.
If it looks too watery, I let it bubble a bit longer. If it thickens too fast, I pull it off early. It’s a small window.
Step 3 - Transfer to the dish
I tip everything into a baking dish, scraping out every bit of that pink syrup. It settles into an even layer on its own.
Sometimes I leave it like this for a while if I’m not ready yet. It actually helps to get this part done early.
Step 4 - Make the crumble topping
Flour and baking powder go into a bowl. Then the cold butter. I rub it in with my fingers, a bit impatiently, until it looks like rough crumbs.
I don’t aim for perfection here. Some bigger lumps stay, and I like that. It makes the topping more interesting later.
Step 5 - Add sugars
I stir in both sugars with a fork. The demerara gives it that slight crunch, which I always notice in the first bite.
If I feel like it’s too fine, I pinch a few bits together. I want texture, not sand.
Step 6 - Assemble
I scatter the crumble over the rhubarb, making sure to cover the edges properly. If I rush this, the filling bubbles up too much.
Even then, it still sneaks through sometimes. I’ve stopped trying to control that completely.
Step 7 - Bake
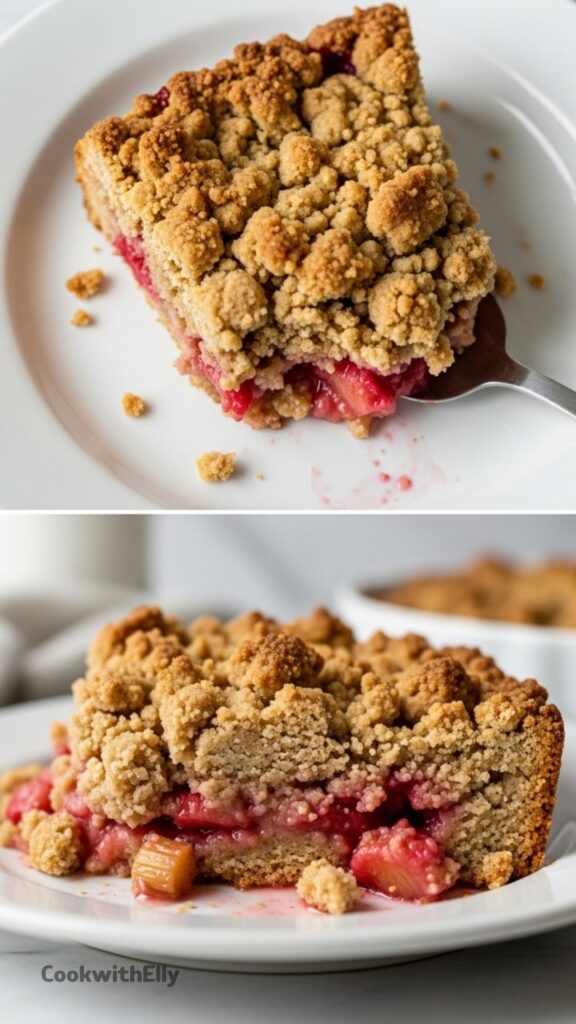
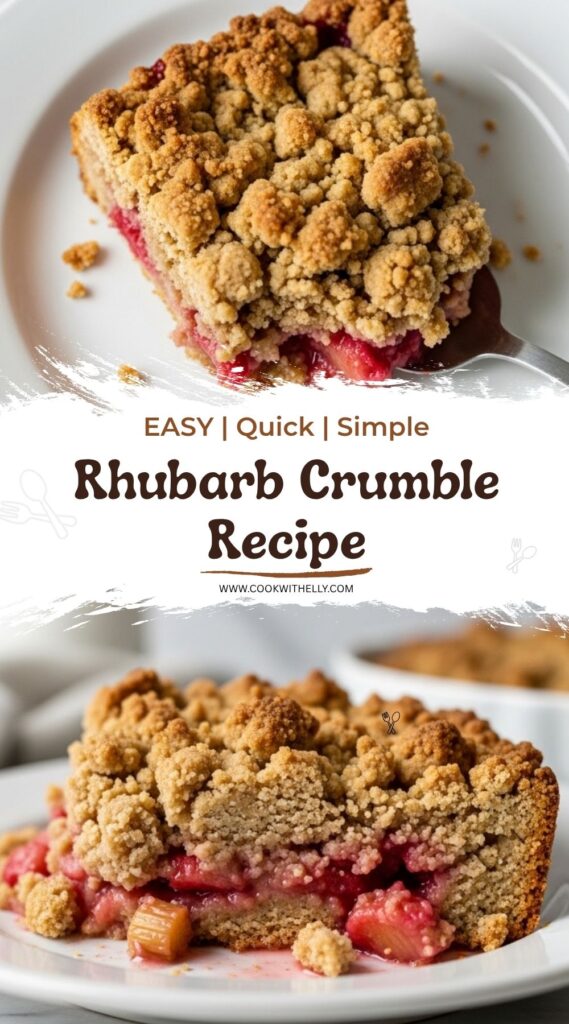
Into the oven it goes, on a tray because I’ve learned the hard way about drips. I bake until the top turns golden with darker spots.
The smell changes as it cooks. It goes from sharp to warm and sweet, and that’s when I know it’s close.
Step 8 - Let it sit
This is the hardest part. I take it out and leave it alone, even though I want to dig in immediately.
It needs that time to settle. The juices thicken slightly, and everything holds together better.
Something that almost went wrong
I once added the crumble topping too early while the rhubarb was still very hot and steaming. It softened the topping before it even hit the oven.
This time, I paused. Let the base cool just a little. Not completely, just enough so the topping stayed crumbly.
It’s a small difference, but it shows. The top stays crisp instead of turning into a soft layer.
Tips
Don’t overcook the rhubarb on the stove - it should be soft, not falling apart
Keep the butter cold for the topping to get that crumbly texture
Cover the edges well with crumble to avoid too much bubbling over
Place the dish on a tray in the oven to catch any spills
Let it rest before serving - it thickens as it cools
Make extra crumble topping and store it - it saves time later
If the topping looks too fine, pinch some chunks together for texture
I usually serve it warm, but not piping hot. There’s a point where the flavors settle and it tastes fuller.
And the leftovers? I don’t even reheat them sometimes. Cold, straight from the fridge, with a spoon standing in the dish.
It’s one of those desserts that doesn’t try too hard, and somehow ends up being exactly what I want anyway.
When the forced pink rhubarb arrives, slender and vibrant, it signals the perfect time for this comforting classic. This crumble features tender, glossy rhubarb simmered with vanilla and butter, topped with a buttery, golden-brown crisp mixture. It is arguably the best Sunday-lunch pudding, equally delightful served warm with custard or cold with cream for breakfast.
Ingredients
Rhubarb Filling
800g forced pink rhubarb (chopped into 1cm/½ inch pieces)
50g caster sugar
20g butter
2.5tsp vanilla extract (best quality)
1tbsp cornflour
Crumble Topping
150g plain flour
1tsp baking powder
110g unsalted butter (cold and diced into 1cm pieces)
45g caster sugar
45g demerara sugar
Instructions
1
Preheat and PreparePreheat the oven to 190°C (170°C Fan / 375°F). Place a baking sheet in the oven to heat up; this will catch any drips and help cook the base of the crumble.
2
Cook the RhubarbIn a saucepan over medium heat, toss the chopped rhubarb with the caster sugar, butter, vanilla extract, and cornflour. Cook for about 5 minutes, stirring gently, until the butter has melted and the mixture becomes glossy and cohesive. The rhubarb should soften slightly but not disintegrate.
3
Assemble the BaseTransfer the glossy rhubarb mixture into a pie dish (approximately 21cm/8 inches in diameter and 4cm/1¾ inches deep). You can prepare this step ahead of time and let it cool.
4
Make the Crumble ToppingIn a bowl, combine the plain flour and baking powder. Rub in the cold, diced butter using your fingertips until the mixture resembles rough oatmeal. Stir in both the caster and demerara sugars with a fork.
5
Top and BakeSprinkle the crumble mixture evenly over the rhubarb, ensuring you cover the fruit all the way to the edges to prevent excessive bubbling. Place the dish on the preheated baking sheet and bake for 35–40 minutes. The top should be golden brown and scorched in parts, with pink juices bubbling at the edges.
6
Rest and ServeRemove from the oven and let it stand for at least 15 minutes before serving. This allows the filling to set slightly. Serve warm with custard, or cold with double cream or Greek yogurt.
Nutrition Facts
Servings 6
Serving Size 1 portion
Amount Per Serving
Calories320kcal
% Daily Value *
Total Fat12g19%
Saturated Fat7g35%
Cholesterol30mg10%
Sodium150mg7%
Potassium280mg8%
Total Carbohydrate52g18%
Dietary Fiber3g12%
Sugars28g
Protein3g6%
* Percent Daily Values are based on a 2,000 calorie diet. Your daily value may be higher or lower depending on your calorie needs.
Note
Make Ahead: The crumble topping can be made up to 1 week ahead and stored in the fridge, or frozen for up to 3 months. Use directly from frozen. The rhubarb filling can be cooked and stored in the dish in the fridge for up to 24 hours before adding the topping and baking.
Keywords:
rhubarb crumble, british dessert, spring dessert, easy crumble, nigella lawson, fruit crumble