Every year when St. Patrick’s Day rolls around, I get the urge to bake something playful. Not fancy. Not complicated. Just something that makes people smile the second they see it.
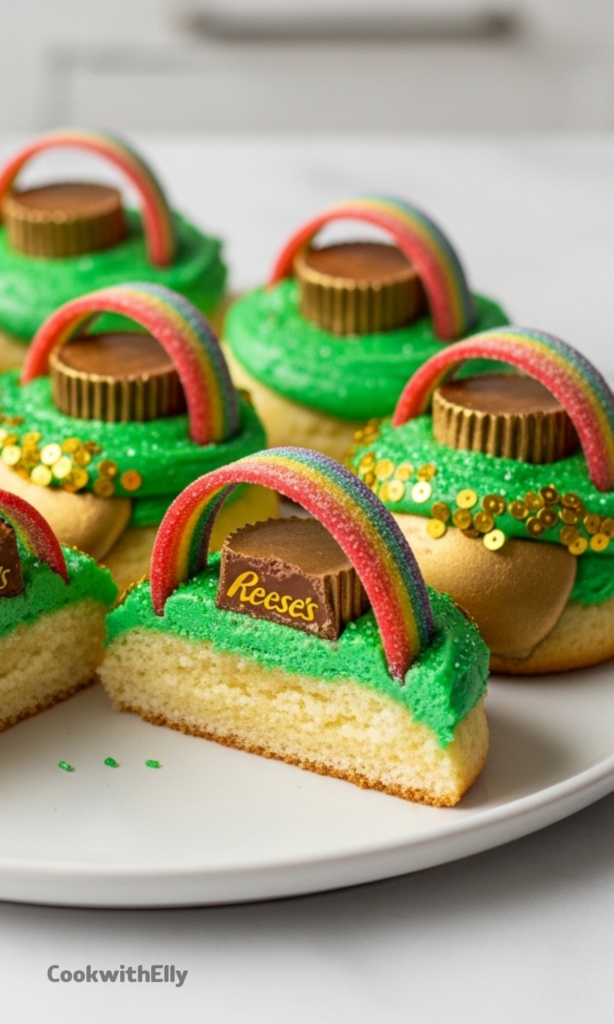
These Pot of Gold Cookies do exactly that. They are bright, cheerful, and just a little over the top in the best possible way. Soft cookies, creamy frosting, candy rainbows, and tiny golden “pots” sitting right in the center.
I love that they look like they took hours, but they actually come together without stress. The secret is starting with cake mix cookies, which keeps things simple while still tasting homemade.
They are the kind of treat kids want to help decorate and adults secretly get excited about too. Honestly, they disappear faster than any other themed dessert I make.
Why These Cookies Are So Much Fun
I’m not always into novelty desserts, but these feel different. They still taste like a real cookie, soft and buttery, not just something made to look cute for photos.
The combination of textures makes them special. You get the pillowy cookie base, smooth buttercream, a little crunch from sprinkles, and that chewy rainbow candy on top.
Decorating them is half the experience. I like setting everything out assembly-line style and letting everyone build their own version.
No two cookies look exactly alike, and that’s kind of the charm. A slightly crooked rainbow just makes it better.
Ingredients Needed for the Recipe
Yellow cake mix - Forms the base of the cookies, making them soft, quick, and reliable.
Vegetable or canola oil - Adds moisture so the cookies stay tender instead of dry.
Eggs - Help bind everything together and give structure.
Unsalted butter - The rich base for the homemade buttercream frosting.
Vanilla extract - Adds warmth and balances the sweetness.
Salt - Keeps the frosting from tasting overly sugary.
Powdered sugar - Sweetens and thickens the frosting to a fluffy consistency.
Milk or heavy cream - Adjusts the frosting texture so it spreads easily.
Green food color - Creates that festive grassy base on top of each cookie.
Yellow or gold food color - Helps give the “pot” its golden look.
Miniature peanut butter cups - Become the little pots that hold the gold.
Edible gold spray or luster dust (optional) - Adds shimmer and makes the candy look metallic.
Gold candy sequins or sprinkles - Act as the gold coins spilling from the pot.
Green sanding sugar (optional) - Adds sparkle and a bit of crunch.
Rainbow sour belts - Create the rainbow arch that makes these cookies instantly recognizable.
How to make Pot of Gold Cookies?
Make this recipe yours—just save it to your Pinterest board!”
Step 1 - Prepare the Baking Sheets
I start by preheating the oven to 350°F and lining two baking sheets with parchment paper. This keeps cleanup easy and prevents sticking.
Getting this ready first makes the whole process smoother. Once the dough is mixed, you can go straight to scooping.
Step 2 - Mix the Cookie Dough
In a large bowl, I combine the cake mix, oil, and eggs. That’s it. Stir until everything is fully blended and thick.
The dough will feel soft and slightly sticky, which is exactly what you want for a tender cookie.
Step 3 - Scoop the Cookies
I use a medium cookie scoop to portion the dough onto the baking sheets. Leaving space between them helps them spread evenly.
Keeping the cookies uniform makes decorating later much easier. Plus they bake at the same rate.
Step 4 - Bake Until Lightly Golden
The cookies bake for about 10 to 12 minutes. I watch for lightly golden edges while the centers stay soft.
They may look slightly underdone, but they firm up as they cool. That’s what gives them that chewy texture.
Step 5 - Cool Completely
I let the cookies rest on the pan for a few minutes before moving them to a rack. They need to cool fully before frosting.
If you rush this step, the frosting melts. I’ve learned that lesson the hard way.
Step 6 - Make the Buttercream Frosting
I beat the softened butter until smooth, then add vanilla, salt, and powdered sugar gradually. Mixing slowly keeps it fluffy.
A little milk goes in next, just until the frosting spreads easily without being runny.
Step 7 - Tint the Frosting
I scoop out a small portion of frosting and color it gold or yellow. The rest gets tinted green for the cookie tops.
The color instantly gives it that festive look. It’s the moment things start to feel fun.
Step 8 - Create the Pots of Gold
I arrange the miniature cups on parchment and spray them lightly with edible gold spray. Once dry, they really do look metallic.
A dab of gold frosting on top helps the sprinkles stick, turning them into tiny overflowing treasure pots.
Step 9 - Frost the Cookies
Each cookie gets a layer of green frosting spread across the top. I don’t worry about perfection because decorations hide everything.
A sprinkle of sanding sugar adds sparkle and gives a grassy effect.
Step 10 - Assemble the Decorations
I place one pot of gold in the center of each cookie, pressing gently so it stays put.
Then I tuck one end of the rainbow candy into the pot and curve it down onto the cookie to form an arch.
Step 11 - Let Them Set
I give the cookies time to sit so the frosting firms up and everything holds together.
After that, they’re ready to serve, share, and watch disappear.
Creative Variations to Try
One of the best things about this recipe is how easy it is to tweak. You can change the base flavor just by swapping the cake mix.
Vanilla, white, or even chocolate cake mix all work beautifully. Each gives the cookies a slightly different personality.
If you need a nut-free option, you can replace the peanut butter cups with caramel candies turned upside down. They still look like little pots.
You can also skip the gold spray if you prefer something simpler. The cookies will still look festive with just sprinkles and frosting.
Sometimes I use green jimmies or even shredded coconut dyed green to create a different texture on top. It’s a small change that adds variety.
Tips
Use a cookie scoop to keep the cookies evenly sized so they bake consistently.
Make sure the butter is softened before mixing the frosting to avoid a grainy texture.
Allow cookies to cool completely before decorating so the frosting stays in place.
Leave space between candies when spraying them gold for full coverage.
Work assembly-line style when decorating to make the process quicker and less messy.
If frosting feels too thick, add milk a tiny bit at a time until spreadable.
Handle the rainbow candy gently so it doesn’t tear when shaping the arch.
Decorate on parchment paper for easy cleanup.
Storage and Make-Ahead Ideas
These cookies store surprisingly well, which makes them great for parties or school events. I keep leftovers in an airtight container at room temperature.
They stay soft for up to five days, though in my house they rarely last that long.
If you want to prepare them ahead, you can bake the cookies a day or two early and decorate later. That breaks the work into manageable pieces.
You can also freeze the undecorated cookies for longer storage. Just thaw them at room temperature before adding frosting and toppings.
If freezing fully decorated cookies, store them in a single layer so the rainbows don’t get crushed. A little planning keeps them looking their best.
Whether you make them the same day or ahead of time, they hold their charm. And honestly, they bring a little extra joy to the table, which is exactly why I keep coming back to them every year.
These Pot of Gold Cookies bring together easy cake mix cookies, a layer of homemade buttercream, and a dash of playfulness with miniature pots of gold and rainbow belts. Simple, delightful, and perfect for adding a touch of whimsy to your festive St. Patrick's Day party. A fun baking activity for kids and a sweet treat everyone will love!
ingredients
Cookies
1(15.25 ounce) box yellow cake mix
½cup canola or vegetable oil
2 large eggs
Frosting
¾cup unsalted butter (room temperature)
1 ½teaspoon vanilla extract
¼teaspoon salt
3cups powdered sugar
1-3tablespoons milk or heavy cream (as needed for consistency)
green food color
yellow or gold food color
Decorations
18 Reese's miniature cups (unwrapped)
edible gold spray or luster dust (optional)
¼cup gold candy sequins or round gold sprinkles
⅓cup green sanding sugar (optional)
5-6 rainbow sour belts (cut into 1 ½ inch strips)
Instructions
Cookies
1
Preheat the oven to 350°F (175°C).
2
Line two large baking sheets with parchment paper and set aside.
3
Mix the cake mix, oil, and eggs in a large bowl until well combined.
4
Drop scoops of dough onto the prepared baking sheets using a medium cookie scoop, leaving at least two inches between each cookie.
5
Bake for 10-12 minutes or until the edges are lightly golden.
6
Allow the cookies to cool on the baking sheets for 5 minutes before transferring to a wire rack to finish cooling.
Frosting
7
Beat the butter in a large bowl with a hand or stand mixer until smooth and creamy.
8
Add the vanilla, salt, and 1 cup of powdered sugar and beat until well combined. Add the remaining powdered sugar 1 cup at a time, beating well after each addition.
9
Add the milk ½ tablespoon at a time until the desired consistency is reached.
10
Remove ¼ cup of the frosting and transfer it to a small bowl. Add a few drops of yellow or gold food color and mix until well combined.
11
Add a few drops of green food color to the remaining frosting in the large bowl and beat until well combined.
Decorating
12
Arrange the Reese's cups on a parchment-lined baking sheet, leaving an inch or two between each cup.
13
Spray the top and sides of the Reese's cups with the gold spray and set aside to dry.
14
Once the gold spray has dried, spread a small amount of gold frosting over the top of the Reese's cups and dip them in the gold candy confetti to create the pot of gold.
15
Frost each of the cookies with a layer of green frosting and sprinkle the sanding sugar over the top.
16
Place a pot of gold in the center of each cookie.
17
Gently press the short side of the rainbow belt into the pot of gold. Drape the rainbow belt in an arch shape over the side of the pot of gold and into the frosted cookie to create the rainbow.
18
Allow the frosting to set before serving and enjoying.
Nutrition Facts
Servings 18
Serving Size 1 cookie
Amount Per Serving
Calories380kcal
% Daily Value *
Total Fat18gg28%
Saturated Fat8gg40%
Trans Fat0gg
Cholesterol35mgmg12%
Sodium220mgmg10%
Potassium80mgmg3%
Total Carbohydrate52gg18%
Dietary Fiber1gg4%
Sugars38gg
Protein3gg6%
Calcium 4% mg
Iron 6% mg
* Percent Daily Values are based on a 2,000 calorie diet. Your daily value may be higher or lower depending on your calorie needs.
Note
Pot placement tip: Leave at least 1 inch between Reese's cups when spraying with gold for even coverage.
Uniform cookies: Use a cookie scoop for consistent size and even baking.
Cool completely: Ensure cookies are fully cooled before frosting to prevent melting.
Soft butter: Use room temperature butter for smooth, creamy frosting without graininess.
Nut-free option: Substitute Reese's cups with Rolo candies for those with nut allergies.
Keywords:
pot of gold cookies, st patricks day cookies, cake mix cookies, rainbow cookies, festive cookies, easy dessert, kids baking