Pickled red onions are one of those tiny kitchen upgrades that somehow make everything taste brighter. I’ve kept a jar in my fridge for years, and honestly, they’re the kind of thing I reach for almost without thinking.
They’re sweet, tangy, a little crunchy, and they turn boring salads into something you actually look forward to eating.
And the best part? They’re ridiculously easy to make. You only need five ingredients and about five minutes of hands-on time.
The rest is just waiting, which is the part I never mind—because the payoff is always worth it. Once you try them, you’ll start seeing them as a pantry staple, not just a fun little garnish.
Ingredients Needed for the Recipe
Red onions – the star of the show; they turn bright pink and stay crisp when pickled.
White vinegar – gives that classic tangy pickle flavor and helps the onions soften just enough.
Water – balances the vinegar so the pickling liquid isn’t too sharp.
Cane sugar – adds sweetness and rounds out the acidity so the onions taste balanced.
Sea salt – enhances the flavors and keeps the onions tasting bright instead of flat.
Garlic cloves (optional) – for a subtle savory kick that pairs well with sandwiches and bowls.
Mixed peppercorns (optional) – add a peppery depth without overpowering the sweetness.
How to make Pickled Red Onions?
Step 1 – Slice the onions thinly
Start by peeling the red onions and slicing them thin. I like to use a mandoline because it makes uniform slices quickly, and honestly, it just looks prettier in the jar. But a sharp knife works too, if you’re more comfortable that way.
Try to slice them as evenly as possible so they pickle at the same rate. If some slices are thick and others are thin, you’ll end up with a mix of crunchy and soft onions in the same jar, which is fine—just not as satisfying.
Step 2 – Divide the onions between jars
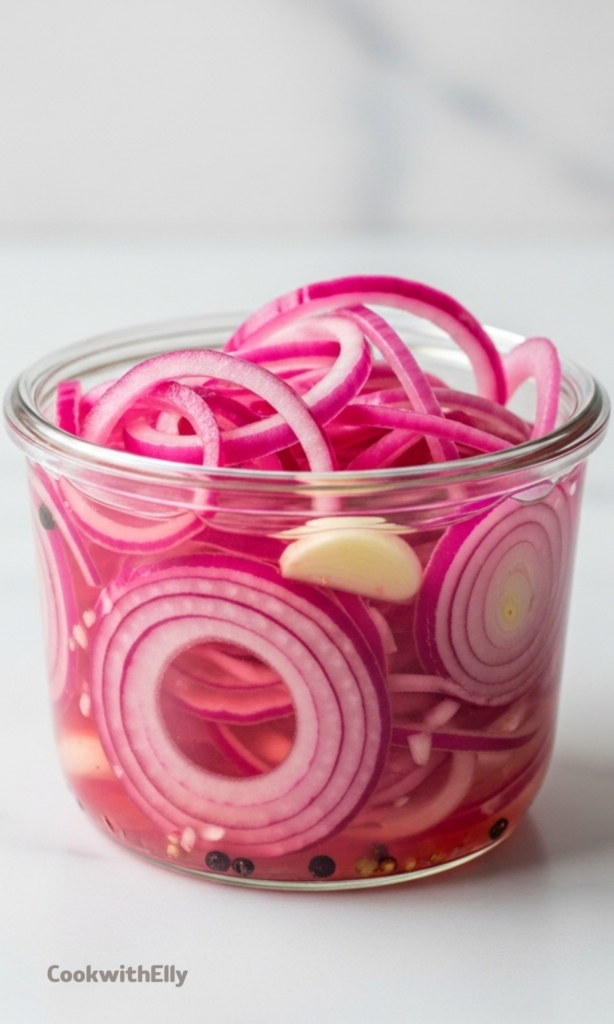
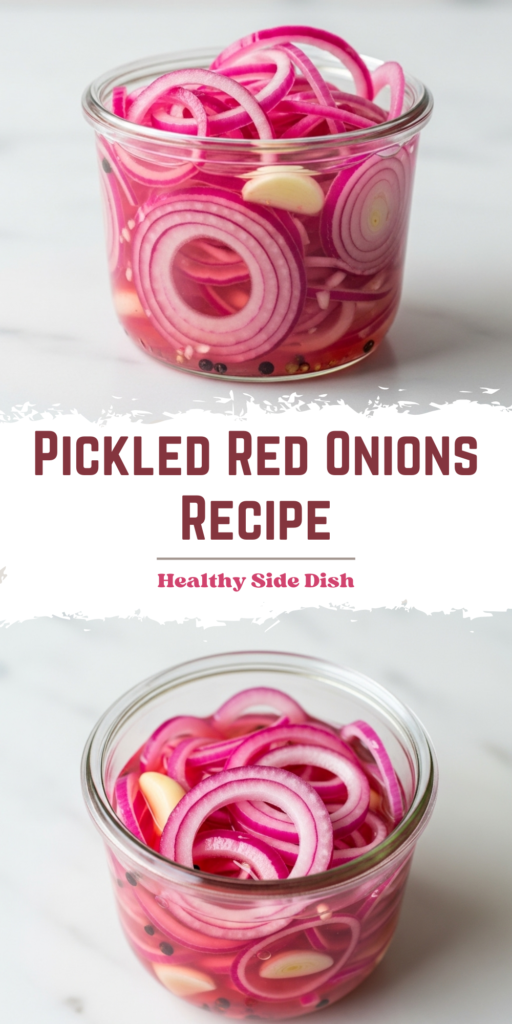
Once the onions are sliced, divide them between two 16-ounce jars or three 10-ounce jars. I like using glass jars because you can see the color transformation, and they’re easy to store in the fridge.
If you’re using garlic and peppercorns, add them to the jars now. This is also the time to decide if you want your onions to taste more garlicky or more peppery, because those flavors will infuse as they sit.
Step 3 – Make the pickling brine
In a medium saucepan, heat the vinegar, water, sugar, and salt over medium heat. Stir until the sugar and salt dissolve completely. This only takes about a minute, so don’t walk away and get distracted—though I admit I’ve done that before.
The brine should smell bright and a little sweet, not sharp. Once everything is dissolved, take the pot off the heat and let it cool slightly before pouring it over the onions.
Step 4 – Pour the brine over the onions
Carefully pour the brine over the onions in each jar, making sure the liquid covers them completely. You want the onions fully submerged so they pickle evenly and don’t dry out or turn mushy.
Leave a little space at the top of the jar to allow the brine to expand slightly as it cools. This is also a good time to press the onions down gently with a spoon so they’re all submerged.
Step 5 – Cool, cover, and refrigerate
Let the jars cool to room temperature before sealing them. This is important because if you cover them while the brine is still hot, condensation can form inside and dilute the flavor.
Once cooled, put the lids on and transfer the jars to the fridge. The onions will be ready when they turn bright pink and become tender, which can take anywhere from 1 hour to overnight depending on how thin you sliced them.
Variations to Try
One of the things I love about this recipe is how flexible it is. You can keep the base recipe as is and still change the flavor by swapping out one ingredient.
For example, you can mix white wine vinegar with rice vinegar for a softer, more floral taste. Or try a blend of apple cider vinegar and white vinegar for a tangy punch. These swaps don’t make the recipe complicated, but they do make it feel new.
Tips
Slice the onions thin if you want them ready in about an hour. Thicker slices take longer, but they stay crunchier.
Let the brine cool slightly before pouring it over the onions to avoid cooking them.
If you want more complex flavor, add garlic cloves or mixed peppercorns to the jar.
Use a mandoline if you want consistent thickness—your jars will look more uniform, and the onions pickle evenly.
Store the jars in the fridge for up to 2 weeks, but I always finish mine sooner because they disappear fast.
Don’t overfill the jars—leave a little headspace so the brine covers the onions properly.
How to Store and Keep Them Fresh
These pickled onions store really well in the fridge, and I usually keep them in 16-ounce mason jars because they fit neatly and don’t take up too much space. If you’re anything like me, you’ll end up making them in batches, so having multiple jars is helpful.
They’ll keep for up to two weeks, though they rarely last that long in my kitchen. The key is to keep them sealed and cold, and try to use clean utensils when you scoop them out. A dirty spoon can introduce bacteria and shorten their shelf life.
Serving Ideas (Because You’ll Want to Use Them Everywhere)
Pickled red onions are honestly the easiest way to upgrade almost any dish. I use them on avocado toast when I want something sharp and tangy to cut through the richness, and they’re equally great on sandwiches or burgers.
They’re also amazing on bowls—grain bowls, burrito bowls, even simple rice and beans. They add a bright pop of flavor that makes the whole dish feel more intentional, like you actually planned your meal instead of just throwing things together.
And don’t forget Mexican food—tacos, breakfast burritos, and any kind of taco bowl love pickled onions. The acidity helps balance spicy flavors, and the sweetness adds a nice contrast. Honestly, they make everything taste a little more lively.
Why You’ll Keep Making Them
What I love about this recipe is how effortless it is. You don’t need fancy equipment, and you don’t need a lot of time. The ingredients are simple, but the result is something that feels special.
Once you’ve made a batch, you’ll start noticing how much more interesting your meals become. Even plain leftovers feel upgraded when you add a spoonful of pickled onions. It’s the kind of small change that makes cooking feel more fun, and eating feel more satisfying.
If you haven’t tried making pickled red onions before, give this recipe a shot. I promise you’ll wonder why you didn’t start sooner.
Want to jazz up your next salad or bowl? Add pickled red onions! Tangy, sweet, and a little crunchy, these vibrant pink onions give almost any dish a bright pop of flavor. Ready in as little as 1 hour and made with just 5 simple ingredients, they’re an easy, versatile condiment you’ll want to keep on hand at all times.
ingredients
2small red onions (thinly sliced)
2cups white vinegar
2cups water
⅓cup cane sugar (or regular granulated sugar)
2tablespoons sea salt
optional
2 garlic cloves (peeled)
1teaspoon mixed peppercorns
Instructions
1
Thinly slice the red onions (a mandoline works best for uniform slices). Divide them evenly between two 16-ounce jars or three 10-ounce jars. Add garlic cloves and peppercorns to each jar if using.
2
In a medium saucepan, combine white vinegar, water, cane sugar, and sea salt. Heat over medium heat, stirring until the sugar and salt dissolve completely—about 1 minute.
3
Let the brine cool slightly (just a few minutes), then pour it over the onions in the jars until fully submerged.
4
Allow the jars to cool to room temperature, then seal with lids and refrigerate.
5
The onions will be ready to eat once they turn bright pink and tender—about 1 hour for very thin slices or up to overnight for thicker ones. They’ll keep in the fridge for up to 2 weeks.
Nutrition Facts
Servings 8
Serving Size 2 tablespoons
Amount Per Serving
Calories30kcal
% Daily Value *
Sodium580mg25%
Potassium25mg1%
Total Carbohydrate7g3%
Sugars6g
Calcium 15 mg
* Percent Daily Values are based on a 2,000 calorie diet. Your daily value may be higher or lower depending on your calorie needs.
Note
Vinegar variations: Try substituting part of the white vinegar with apple cider vinegar, white wine vinegar, or rice vinegar for nuanced flavor.
Sugar-free option: The sugar can be omitted or replaced with a sugar substitute like Swerve for a sharper, less sweet pickle.
Uses: Perfect on avocado toast, grain bowls, tacos, burgers, sandwiches, salads, or as a bright garnish for rich dishes.