There are days when I just want something crunchy. Not a salad, not nuts. I mean that loud, satisfying snap you get from a real chip. When I started eating low carb, that was the one thing I missed the most.
That is exactly how these keto cheese chips became a regular thing in my kitchen. They are simple, almost shockingly simple, and somehow still feel like a treat. No complicated prep, no fancy tricks.
I love recipes that fit into real life. The kind you can throw together between work emails or while dinner is in the oven. These cheese chips do that. And the best part is they support your keto goals without feeling like a compromise.
I have shared plenty of bowl-style meals before, hearty soups, even comfort food ideas. But sometimes you just need a snack. Something you can grab, dip, or crumble over a salad for extra crunch.
Why Keto Cheese Chips Are So Popular
If you have ever followed a keto plan, you know how fast carb-heavy snacks can sneak in. Crackers, pretzels, tortilla chips. They are everywhere. These cheese chips solve that problem in the easiest way possible.
They are made entirely from cheese. That means they are naturally low in carbs and high in healthy fats, which fits perfectly into a ketogenic lifestyle. You are not replacing chips with something bland. You are upgrading.
I also love that they feel indulgent. Melted cheese baked until golden and crisp tastes rich and satisfying. A small handful goes a long way, and I always feel full and happy after.
On busy days, I pair them with leftovers from dinner. Maybe a warm bowl of soup or grilled chicken. They add texture and make even a simple meal feel complete.
Ingredients Needed for the Recipe
Shredded cheddar cheese - This is the main base. It melts beautifully and crisps up into sturdy chips with a bold flavor.
Shredded mozzarella cheese - Adds stretch and a slightly milder taste. It helps balance the sharpness of cheddar.
Parmesan cheese - Brings a salty, nutty bite and extra crispness around the edges.
Optional spices (paprika, garlic powder, or chili flakes) - For adding a subtle kick or smoky depth if you want more personality.
Parchment paper - Not edible, but important. It prevents sticking and helps the chips lift off cleanly.
I usually mix two cheeses together because I like the layered flavor. But if all I have is cheddar, that works just fine. The beauty of this recipe is how flexible it is.
How to make Keto Cheese Chips: Easy Recipe with Health Benefits?
Step 1 - Preheat and Prepare
Start by preheating your oven to 400°F. A hot oven is key because it melts the cheese quickly and helps it crisp instead of turning rubbery.
Line a baking sheet with parchment paper. Do not skip this. Cheese sticks aggressively, and parchment makes cleanup almost effortless.
Step 2 - Portion the Cheese
Scoop small mounds of shredded cheese onto the baking sheet. I use about one tablespoon per pile, leaving space between each one.
The cheese will spread as it melts, so give it room. If they touch, you will end up with one giant sheet. Not the worst problem, but individual chips are easier to snack on.
Step 3 - Flatten Gently
Lightly press each mound down with the back of a spoon. You are not smashing it flat, just shaping it into a small circle.
This helps them cook evenly and gives you that classic chip look. If you want thinner chips, spread them slightly more.
Step 4 - Bake Until Golden
Slide the tray into the oven and bake for about 5 to 8 minutes. Keep an eye on them. Cheese can go from perfectly golden to too dark pretty quickly.
You are looking for bubbly centers and lightly browned edges. That golden ring is where the crunch happens.
Step 5 - Cool and Crisp
Once they are done, take the tray out and let the chips cool completely. This part matters more than people think.
They firm up as they cool. If you try to move them too soon, they may bend or tear. Give them a few minutes and they will lift off easily.
Serving Ideas That Keep It Interesting
I rarely eat these plain, even though they are great on their own. Most of the time I serve them with guacamole or a creamy dip. The contrast between crisp cheese and smooth dip is just perfect.
They also work beautifully alongside soup. I once paired them with a cozy winter bowl inspired by meals I love making in colder months. The crunch balanced the warmth so nicely.
Sometimes I crumble them over a salad instead of croutons. It feels a little fancy, but it takes zero extra effort. Plus, you avoid the carbs without missing texture.
For gatherings, I arrange them on a platter with sliced veggies and a few dips. They disappear fast. Even people who are not eating keto grab them without hesitation.
Tips
Use freshly shredded cheese if possible. Pre-shredded varieties sometimes contain anti-caking agents that affect melting.
Keep the cheese piles small and evenly sized so they bake at the same speed.
Watch the oven closely during the last few minutes to avoid over-browning.
Let the chips cool completely before removing them from the parchment.
If they turn out chewy, bake them a minute longer next time.
Store them only after they are fully cooled to maintain crispness.
Flavor Variations to Try
One of my favorite things about this recipe is how easy it is to change the flavor. A sprinkle of smoked paprika gives them a subtle warmth that feels cozy and rich.
When I want something bold, I add a pinch of chili flakes and a dusting of garlic powder. It turns them into the perfect partner for a creamy dip.
You can even experiment with different cheeses. Pepper jack adds heat. Gouda brings a slightly sweet, smoky note. Each batch feels new without changing the method.
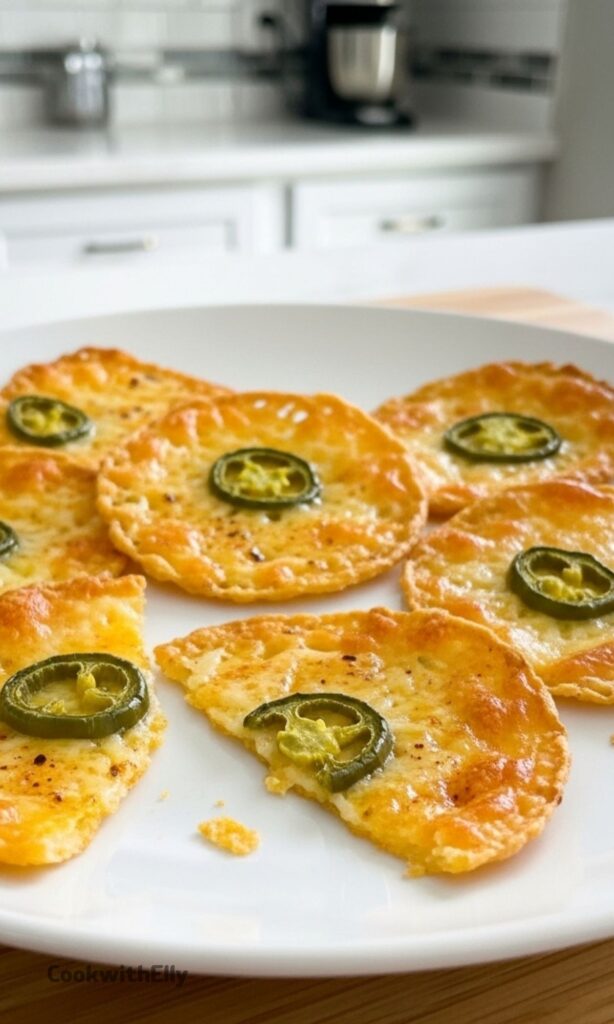
For a fun twist, I sometimes press a tiny jalapeño slice into the center before baking. It looks impressive and tastes even better.
Storage and Make-Ahead Advice
If you somehow have leftovers, store them in an airtight container at room temperature. Moisture is the enemy of crisp chips, so avoid the fridge if you can.
I usually place a small piece of paper towel inside the container to absorb any extra moisture. It helps keep them crunchy for a couple of days.
You can also make them ahead for parties. I often bake a double batch in the morning if I know guests are coming over.
Just let them cool completely before storing. When it is time to serve, they are ready to go. No reheating needed.
The Health Benefits Behind the Crunch
Because these chips are made from cheese alone, they are naturally low in carbohydrates. That makes them ideal for anyone following a ketogenic or low carb lifestyle.
They are rich in healthy fats, which help keep you satisfied longer. I notice I snack less overall when I choose something filling like this instead of carb-heavy options.
Cheese also contains protein and important nutrients like calcium. While I do not eat them as a health supplement, it is nice knowing they bring more than just flavor.
Most importantly, they help me stay consistent. When I do not feel deprived, I am far more likely to stick with my eating habits long term. And that matters more than any single snack.
Keto cheese chips are simple, yes. But they are also practical, satisfying, and honestly kind of fun to make. Every time I hear that little crunch, I remember why I keep coming back to this recipe.
These keto cheese chips are a savory, low-carb snack that's sure to satisfy your crunchy cravings. Made with just Swiss and Parmesan cheese, jalapeño peppers, and a touch of chili powder, these homemade cheese crisps pack a flavorful punch while keeping carbs minimal. Perfect for dipping, snacking, or adding crunch to salads—ready in under 15 minutes!
ingredients
1cup Swiss cheese (shredded)
1cup Parmesan cheese (shredded)
4 jalapeño peppers (finely chopped, seeds removed for milder heat)
1/2tsp chili powder (or to taste)
Instructions
1
Preheat oven to 375°F (190°C). Line a baking sheet with parchment paper or a silicone baking mat.
2
In a medium bowl, combine shredded Swiss cheese, Parmesan cheese, and chili powder. Mix well.
3
Fold in the finely chopped jalapeño peppers until evenly distributed.
4
Spoon about 1 to 1½ tablespoons of the cheese mixture onto the prepared baking sheet, forming 2-inch rounds. Leave at least 1 inch between each mound as they will spread while baking.
5
Bake for 4–5 minutes, or until edges are golden brown and centers are bubbly. Watch closely to prevent burning.
6
Remove from oven and let cool on the baking sheet for 2–3 minutes, then transfer to a wire rack to cool completely. Chips will crisp up as they cool.
7
Serve immediately or store in an airtight container at room temperature for up to 2 days.
Nutrition Facts
Servings 20
Serving Size 1 chip (approx. 2-inch round)
Amount Per Serving
Calories42kcal
% Daily Value *
Total Fat3gg5%
Saturated Fat2gg10%
Trans Fat0gg
Cholesterol8mgmg3%
Sodium91mgmg4%
Potassium16mgmg1%
Total Carbohydrate0.4gg1%
Dietary Fiber0.1gg1%
Sugars0.2gg
Protein3gg6%
Calcium 108mg mg
Iron 0.1mg mg
* Percent Daily Values are based on a 2,000 calorie diet. Your daily value may be higher or lower depending on your calorie needs.
Note
Make them extra crispy: Let chips cool completely on a wire rack—this allows steam to escape and ensures maximum crunch.
Flavor variations: Swap jalapeños for sun-dried tomatoes, add bacon bits, or try ranch seasoning, everything bagel spice, or smoked paprika.
Air fryer method: Cook at 375°F (190°C) for 3–4 minutes, checking frequently to avoid burning.
Microwave shortcut: Place small cheese mounds on parchment and microwave on high for 60–90 seconds until bubbly; cool to crisp.
Storage tip: Store cooled chips in an airtight container with a paper towel to absorb moisture; best enjoyed within 2 days.