There’s something deeply satisfying about serving a spread that looks impressive but secretly took very little effort. These Easy Individual Charcuterie Cups are exactly that kind of win. They feel thoughtful, festive, and just a little fancy, without requiring a giant board or a stressful setup.
I started making these when I got tired of hovering over one big charcuterie board, refilling crackers and watching people awkwardly crowd around it. Individual cups solved everything at once. Everyone gets their own perfect little mix, and the table stays calm.
They’re portable, easy to hold, and surprisingly generous for their size. You can walk, chat, snack, and never worry about balancing a plate. For parties, game days, and holidays, they’ve become my go-to appetizer.
The best part is how flexible they are. You can keep things classic or completely customize each cup depending on who’s coming over. Meat lovers, cheese enthusiasts, veggie snackers—everyone ends up happy.
I also love that they can be mostly prepped ahead. When guests arrive, I want to enjoy the moment, not juggle knives and cheese blocks. These cups let you do the work early and relax later.
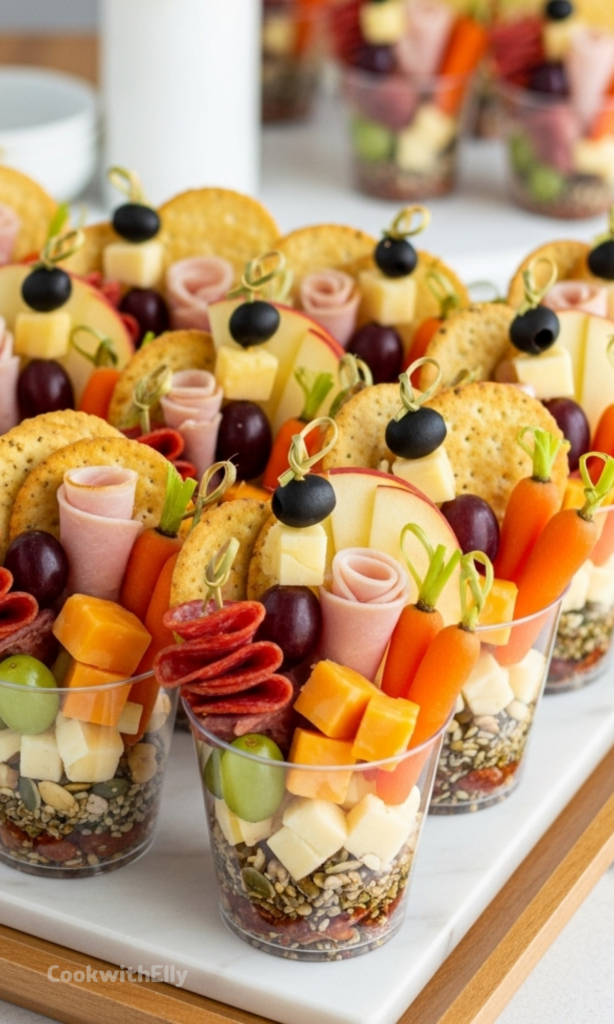
Ingredients Needed for the Recipe
Crackers – These add crunch and act as the base for meat-and-cheese bites.
Salami or pepperoni – A classic cured meat that brings bold, savory flavor.
Ham or turkey – Adds variety and a lighter, softer texture to balance the cured meats.
Thick-cut cheddar cheese – Sharp and sturdy, perfect for slicing into bite-sized pieces.
Havarti cheese – Creamy but firm enough to stay neat inside the cups.
Asiago cheese cubes – A slightly nutty option that adds depth and interest.
Grapes – Fresh, juicy, and easy to use without any prep stress.
Fuji apple slices – Crisp and lightly sweet, added just before serving.
Black olives – Salty little bites that cut through the richness.
Baby carrots – Optional, but great for balance and color.
Nuts, seeds, and dried fruit – The hearty base layer that adds texture and variety.
This combination creates a cup that feels full without being overwhelming. Each ingredient has a purpose, and together they cover salty, creamy, crunchy, and fresh all in one.
How to make Easy Individual Charcuterie Cups?
Make this recipe yours—just save it to your Pinterest board!”
Step 1 – Prep the Ingredients
Start by laying out all of your ingredients so everything is visible and within reach. I like to slice cheeses first, then meats, and save fruit for last so it stays fresh. This small order makes a difference.
If you’re adding any extras that require prep, like cheese balls or marinated items, do those ahead of time. Having everything ready before assembly keeps the process calm and surprisingly quick.
Step 2 – Set Up the Cups
Arrange your empty cups on a large tray or counter. Seeing them all lined up makes it easier to divide ingredients evenly. I usually use 9-ounce clear cups so the layers show.
This is also when I grab toothpicks or small skewers. Having them ready saves you from fumbling halfway through filling the cups.
Step 3 – Build the Base Layer
Start with the heavier items at the bottom. Nuts, seeds, dried fruit, and grapes work perfectly here. They create a sturdy base and keep delicate ingredients from getting crushed.
I aim for a small handful per cup, enough to feel substantial without taking over. This layer also helps the cups feel balanced when carried.
Step 4 – Add Crackers and Cheese
Next, slide in the crackers along the side of the cup. Keeping them upright helps them stay crisp. Then add the cheese, mixing types for variety.
I usually add four to six pieces of cheese per cup. Cutting them into smaller bites makes everything easier to eat and keeps the cup from feeling crowded.
Step 5 – Fold in the Meats
Roll or gently fold the meats before adding them. This saves space and instantly makes the cups look more polished. Two pieces per cup is usually just right.
Place the meats near the cheese so guests can easily build a bite without digging around. Thoughtful placement matters more than you’d think.
Step 6 – Finish with Fruit and Extras
Add grapes, berries, or apple slices near the top. This keeps them fresh and visible. If you’re using apples, add them right before serving.
Finish with olives, baby carrots, or pickles, using toothpicks if needed. These final touches add color and make each cup feel complete.
Why These Cups Work So Well for Entertaining
There’s something comforting about giving guests their own portion. No sharing, no reaching, no awkward hovering. Everyone gets the same thoughtful experience.
They also move easily from kitchen to table to patio. You can serve them on a tray, a platter, or even nestle them in ice to keep everything cool.
From a hosting perspective, they remove so much guesswork. You know exactly how much to make, and cleanup is refreshingly simple.
Creative Variations to Try
Once you’ve made these a couple of times, it’s hard not to start experimenting. That’s part of the fun. You can tailor them to seasons, themes, or even specific guests.
For a holiday feel, add dried cranberries, candied pecans, or a festive cheese. For game day, go heavier on meats and crunchy snacks.
You can even create different styles on the same tray. Labeling isn’t necessary—people love discovering what’s in their cup.
Tips
Layer heavier ingredients on the bottom to protect softer items.
Fold meats to save space and improve presentation.
Keep crackers near cheese and meat for easy bite-building.
Add sliced fruit right before serving to keep it fresh.
Use toothpicks to separate items and add height.
Plan on one to two cups per person to avoid leftovers.
Serving and Storage Notes
I recommend keeping the charcuterie cups chilled until you’re ready to serve. Prepping them up to two hours ahead works well, as long as crackers and sliced fruit are added later.
Once served, they can sit out at room temperature for up to four hours. After that, it’s best to discard anything left. These cups don’t store well once assembled.
If you’re serving outdoors or over a longer period, placing the cups on a tray over ice keeps everything fresh without fuss.
These Easy Individual Charcuterie Cups have become one of those recipes I rely on again and again. They’re simple, flexible, and always get compliments, which is honestly the best kind of recipe to have in your back pocket.
These Individual Charcuterie Cups are easy to assemble, versatile, and perfect for parties, game days, and holidays. More portable than a traditional charcuterie board, these cups let guests enjoy a curated mix of meats, cheeses, fruits, nuts, and crunch—all in one convenient, handheld serving!
ingredients
Meats & Cheeses
12slices salami or pepperoni
12slices ham or turkey (prosciutto also works well)
12slices thick-cut cheddar cheese (cut into smaller pieces)
12slices Havarti cheese (cut into smaller pieces)
24cubes Asiago cheese
Fruits & Vegetables
60 grapes (about 5 per cup)
1small Fuji apple (thinly sliced; add just before serving)
24whole black olives
12 baby carrots (optional)
Crunch & Extras
36 crackers (or use bagel chips, pretzels, or breadsticks)
1.5cups nuts, seeds, and dried fruit mix (e.g., almonds, pistachios, candied pecans, raisins)
Instructions
1
Begin by laying out twelve 9-oz clear plastic cups. Prep all ingredients: slice cheeses, cut apple (if using), and portion meats.
2
Layer each cup starting with heavier items on the bottom: add about 2 tablespoons of nuts/seeds/dried fruit and 5 grapes.
3
Add 2–3 crackers along the side or top layer to prevent sogginess.
4
Fold or roll 2 pieces of meat (e.g., salami and ham) and place them in the cup.
5
Add 4–6 pieces of assorted cheese (cheddar, Havarti, Asiago).
6
Tuck in extras like a baby carrot, black olive, or apple slice (add apple just before serving to prevent browning).
7
For visual appeal and ease of eating, insert large toothpicks through olives, pickles, or cheese cubes.
8
Refrigerate cups until ready to serve (up to 2 hours ahead). Keep chilled on ice during serving if outdoors.
Nutrition Facts
Servings 12
Serving Size 1 cup
Amount Per Serving
Calories320kcal
% Daily Value *
Total Fat20gg31%
Saturated Fat8gg40%
Trans Fat0gg
Cholesterol45mgmg15%
Sodium720mgmg30%
Potassium210mgmg6%
Total Carbohydrate22gg8%
Dietary Fiber2gg8%
Sugars10gg
Protein14gg29%
Calcium 15 mg
Iron 8 mg
* Percent Daily Values are based on a 2,000 calorie diet. Your daily value may be higher or lower depending on your calorie needs.
Note
Make ahead: Assemble up to 2 hours before serving. Add crackers and fresh fruit (like apples) right before serving to maintain texture.
Storage: Not recommended for leftovers—mixed textures don’t store well. Plan 1–2 cups per guest.
Serving tip: Place cups on a tray over ice to keep cold during parties.
Customize: Swap ingredients based on dietary needs—use vegan cheese, omit meat, or add marinated mozzarella balls.
Keywords:
charcuterie cups, individual charcuterie, party appetizer, no-cook appetizer, holiday snacks, game day food