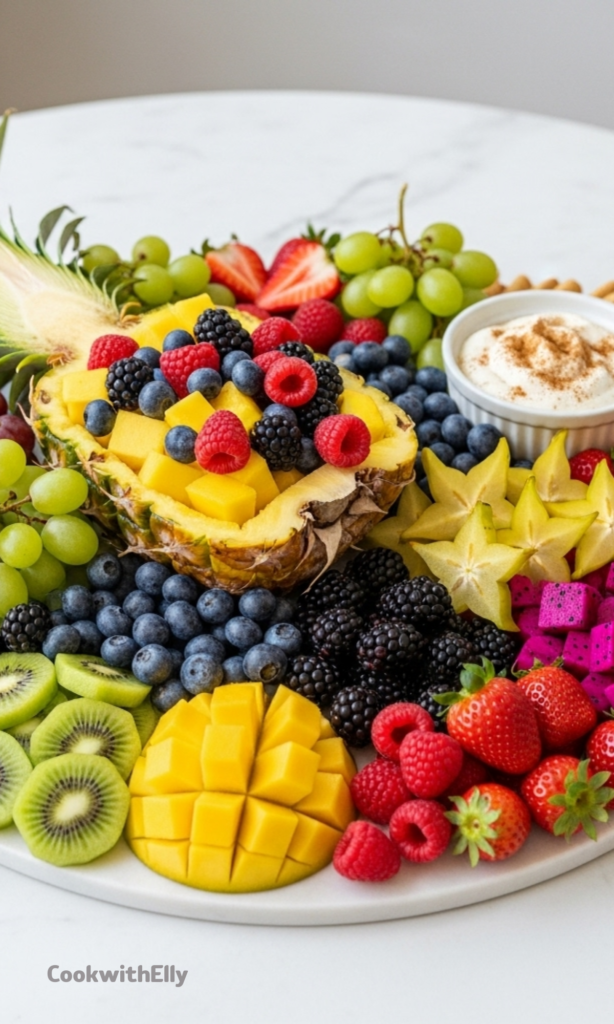
A fruit charcuterie board is one of those dishes that looks wildly impressive but is secretly very simple. It’s colorful, fresh, flexible, and always feels like a little celebration no matter when you serve it.
I love how a fruit charcuterie board instantly brightens a table, even before anyone takes a bite. The colors pull people in, and suddenly everyone is hovering, pointing, and asking what they should try first.
For me, this board shines most at breakfast and brunch, when people want something light but still special. Juicy fruit alongside warm dishes feels balanced, easy, and honestly a little luxurious.
Another reason I keep coming back to this idea is how forgiving it is. There’s no exact formula, no strict rules, just good fruit arranged with care.
What Makes a Fruit Charcuterie Board So Appealing
A fruit charcuterie board works because it taps into variety without being overwhelming. Every bite is different, which keeps people interested from the first grape to the last slice of pineapple.
It also invites grazing instead of committing to a single dessert or side. Guests can take as much or as little as they want, which always feels more relaxed.
I’ve noticed that fruit boards tend to bring people back for seconds without them even realizing it. A strawberry here, a kiwi slice there, and suddenly the board is half gone.
Seasonal fruit makes a huge difference, both in flavor and appearance. When fruit is ripe and in season, you don’t need to do much else to make it shine.
Ingredients Needed for the Recipe
Pineapple – Acts as the visual anchor of the board and adds bold, tropical sweetness.
Green and Red Grapes – Provide easy grab-and-go bites and a mix of sweet and crisp textures.
Mango – Adds a soft, juicy contrast and bright color.
Blueberries – Fill small gaps and bring a pop of deep color.
Raspberries – Add delicate texture and a slightly tart bite.
Kiwi – Brings vibrant green color and fun shapes to the board.
Blackberries – Offer rich flavor and balance sweeter fruits.
Strawberries – Classic crowd-pleaser that works sliced or whole.
Star Fruit – Adds visual interest with its natural star shape.
Kumquat – Introduces a tart note that cuts through sweetness.
Pink Dragonfruit – Provides stunning color and mild, refreshing flavor.
Oranges – Add brightness and juiciness, especially when sliced into wedges.
Fruit Dip – Ties everything together with a creamy, sweet element.
Choosing the Right Board for Your Fruit
The board itself sets the tone before any fruit is added. Wood, marble, or slate all work, so it really comes down to the look you love.
I personally gravitate toward wood boards because they feel warm and natural. They also make bright fruit colors stand out in the best way.
Round boards are especially nice for fruit because they encourage a flowing, circular arrangement. Nothing feels boxed in or overly structured.
That said, don’t let the board stop you if you don’t have a “perfect” one. A large platter or tray can work just as well.
How to make Fruit Charcuterie Board?
Make this recipe yours—just save it to your Pinterest board!”
Step 1 – Prepare the Pineapple Base
Slice the pineapple in half lengthwise and carefully scoop out the center. Leave the leafy top attached because it adds height and texture.
Place both halves onto a large round board or platter. This will become the focal point of the entire arrangement.
Step 2 – Wash and Prep the Fruit
Wash all fruit thoroughly and let it dry completely. Excess moisture can make the board slippery and less appealing.
Slice, peel, or cut fruit into different shapes and sizes. This variety is what makes the board feel abundant and interesting.
Step 3 – Arrange the Fruit in Sections
Start placing fruit around the pineapple in loose clusters. Group similar colors and textures, but don’t worry about perfection.
Fill the hollowed pineapple with smaller fruits like berries to maximize space. Spread color evenly across the board.
Step 4 – Add the Fruit Dip
Prepare your fruit dip and spoon it into a small, pretty bowl. A light sprinkle of cinnamon adds a subtle finishing touch.
Place the dip directly on the board, making sure it’s easy to reach from multiple sides. Then step back and admire your work.
Serving Ideas That Always Work
This fruit charcuterie board pairs beautifully with breakfast spreads. I love serving it alongside baked casseroles, rolls, and crisp bacon.
It also works surprisingly well as a light dessert option. Add melted chocolate or a rich dip and watch guests gravitate toward it.
For brunch, I sometimes add yogurt and granola nearby. That small addition turns the board into a build-your-own parfait moment.
If you’re hosting kids, this board becomes the first thing they reach for. Bright fruit feels fun and familiar without being boring.
Tips
Use fruit that is ripe but still firm for the best texture.
Mix colors evenly across the board so no area feels dull.
Cut fruit into different shapes to keep the layout dynamic.
Leave some fruit whole for easy snacking.
Add the dip just before serving to keep it fresh.
Don’t overcrowd the board; space helps everything stand out.
Fun Variations to Make It Your Own
One of my favorite things about a fruit charcuterie board is how adaptable it is. You can swap fruits based on season, mood, or what’s available.
For a festive twist, arrange the fruit in a wreath shape and scatter seasonal garnishes. Small details can completely change the vibe.
You can also lean into themes, like tropical fruits only or berries in every form. Limiting the selection can actually make it feel more intentional.
Adding a few cheeses or nuts introduces contrast and turns the board into something heartier. It’s a great option for evening gatherings.
How to Store and Prep Ahead
This board is surprisingly prep-friendly, which I always appreciate when hosting. Most fruits can be washed and sliced a day in advance.
Store prepared fruit separately in airtight containers in the refrigerator. This keeps flavors fresh and prevents unwanted moisture.
Fruits like bananas and apples should always be cut just before serving. They brown quickly and don’t hold up as well.
If you have leftovers, cover everything tightly and refrigerate for up to two days. Stir the dip before serving again to refresh it.
A fruit charcuterie board isn’t about perfection or precision. It’s about abundance, color, and sharing something simple that feels special.
Every time I make one, it disappears faster than I expect. That’s how I know it’s doing exactly what it’s meant to do.
This fruit charcuterie board is a colorful, refreshing display of seasonal fruits that’s as beautiful as it is delicious. Perfect for breakfast, brunch, dessert, or as a healthy appetizer, it pairs wonderfully with creamy dips like marshmallow fruit dip or cheesecake dip. It’s a no-cook, easy-to-assemble crowd-pleaser that brings freshness and joy to any table!
ingredients
Fruit Selection (Choose 6–10 based on preference and availability)
1whole pineapple (halved, center scooped out for serving bowl)
2cups green and red grapes (some left on vine for visual appeal)
2cups mango (peeled and cubed)
1cup blueberries (stems removed)
1cup raspberries (stems removed)
3 kiwis (peeled and sliced or cut into fun shapes)
1cup blackberries (stems removed)
2cups strawberries (some whole, some halved)
1whole star fruit (sliced into stars)
1cup kumquats (sliced, optional for tart contrast)
1half pink dragonfruit (scooped and cubed for vibrant color)
2whole oranges (sliced or cut into wedges)
Optional Dips & Add-ons
1batch marshmallow fruit dip (or substitute with yogurt or whipped cream)
cheese cubes or soft brie (optional for savory-sweet pairing)
nuts (e.g., almonds, walnuts) (optional for added crunch)
Instructions
1
Prepare the BaseSlice a pineapple in half lengthwise and scoop out the center to create a natural fruit bowl. Place both halves on a large round wood or marble charcuterie board.
2
Wash and Prep FruitWash and thoroughly dry all fruit. Peel, slice, or cut into bite-sized pieces as needed. Avoid prepping apples or bananas too far in advance to prevent browning.
3
Arrange the BoardArrange fruit in colorful sections around the pineapple halves. Fill the pineapple cavities with berries or small fruit pieces for a stunning centerpiece effect.
4
Add DipPrepare your chosen fruit dip (e.g., marshmallow fruit dip) and spoon it into a small decorative bowl. Place it on the board and optionally sprinkle with cinnamon for extra flair.
Nutrition Facts
Servings 20
Serving Size 1 cup assorted fruit + 2 tbsp dip
Amount Per Serving
Calories120kcal
% Daily Value *
Total Fat0.5g1%
Saturated Fat0.1g1%
Sodium5mg1%
Potassium280mg8%
Total Carbohydrate30g10%
Dietary Fiber4g16%
Sugars22g
Protein1.5g3%
Calcium 2 mg
Iron 1 mg
* Percent Daily Values are based on a 2,000 calorie diet. Your daily value may be higher or lower depending on your calorie needs.
Note
Make Ahead: Most fruits can be prepped up to 24 hours ahead and stored separately in airtight containers in the fridge. Assemble just before serving.
Prevent Browning: Toss apples or pears in a little lemon juice if using.
Festive Touch: Arrange fruit in holiday shapes (e.g., wreath for Christmas, heart for Valentine’s) for themed gatherings.
Serve With: Pairs beautifully with breakfast casserole, cinnamon rolls, or as a light dessert after dinner.
Keywords:
fruit charcuterie board, fresh fruit platter, fruit board, healthy dessert, fruit appetizer, no-cook recipe