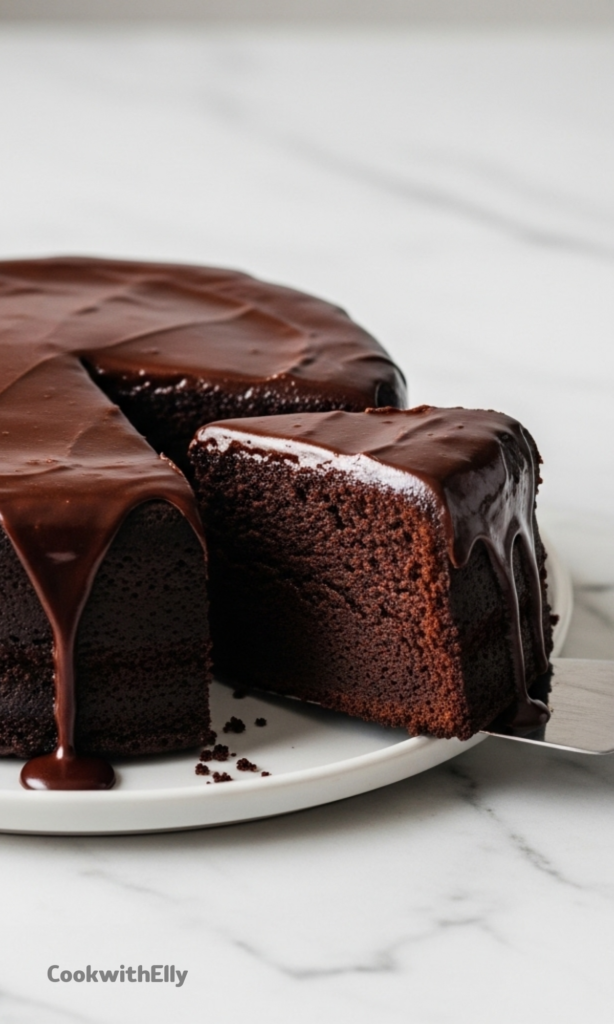
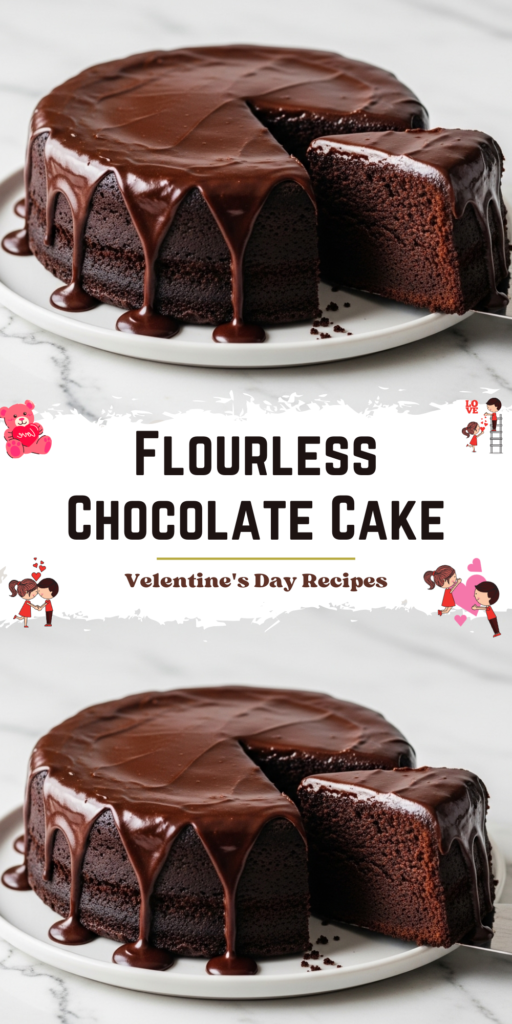
This flourless chocolate cake is the kind of dessert I make when I want silence at the table, the good kind. The kind where everyone takes a bite and forgets to talk for a second. It is dense, glossy, unapologetically chocolate, and honestly, a little dramatic.
I have baked this cake for holidays, quiet weekends, and one random Tuesday when the day needed saving. It never asks for flour or fuss, just attention and decent chocolate. I am Elly, and this is one of those recipes I trust completely.
The texture sits somewhere between a cake and a truffle. Soft in the center, lightly crackled on top, and finished with a ganache glaze that does not hold back. This is not a shy dessert, and it should not be.
Why This Cake Works So Well
There is something comforting about a recipe with no flour and no leavening. Fewer variables, fewer chances to overthink things. The structure comes from eggs and cocoa, and that makes the crumb rich and tight in the best way.
The mix of melted chocolate and cocoa powder gives depth instead of flat sweetness. You taste chocolate first, then chocolate again, and then somehow more chocolate. It feels intentional, not excessive.
I also love that this cake welcomes different occasions. It fits beautifully into celebrations where flour is avoided, and it also feels special enough for a dinner party. You do not need a reason to make it, but it behaves like you do.
Ingredients Needed for the Recipe
Semisweet or bittersweet chocolate chips – this forms the backbone of the cake and the glaze.
Unsalted butter – adds richness and helps create that smooth, dense texture.
Granulated sugar – sweetens the cake without overpowering the chocolate.
Table salt – sharpens and balances all the sweetness.
Espresso powder – optional, but it deepens the chocolate flavor subtly.
Vanilla extract – optional, for warmth and a rounder finish.
Large eggs – they provide structure and body in place of flour.
Dutch-process cocoa powder – intensifies the chocolate flavor and firms the crumb.
Heavy cream – used only for the glaze, creating that silky finish.
Pan Prep and Oven Notes
This cake does best in a simple metal pan, nothing fancy. I stick with an 8-inch round because it gives the right thickness without drying out the edges. Parchment on the bottom is not optional in my kitchen.
The oven runs a bit hotter than most cakes, and that is intentional. The heat sets the outside quickly while the center stays tender. Trust the process, even if it feels a little bold.
How to make ?
Step 1 - Prepare the Pan and Oven
Preheat your oven to 375°F and lightly grease an 8-inch round metal pan. Cut a circle of parchment, grease it too, and press it into the bottom. This cake likes to stick, so do not rush this step.
Set the pan aside and take a breath. Once the batter is ready, things move quickly.
Step 2 - Melt the Chocolate and Butter
Add the chocolate chips and butter to a microwave-safe bowl. Heat gently until the butter melts and the chocolate softens, then stir until smooth. If needed, reheat briefly, but keep it gentle.
You can also melt everything over very low heat on the stove. Either way, you want a glossy, unified mixture with no lumps.
Step 3 - Build the Batter
Transfer the melted chocolate to a mixing bowl. Stir in the sugar, salt, espresso powder if using, and vanilla. The mixture will thicken slightly and smell incredible.
Add the eggs and beat just until smooth. Sprinkle in the cocoa powder and mix until combined, stopping as soon as it comes together.
Step 4 - Bake the Cake
Spoon the batter into the prepared pan and smooth the top. Bake for about 25 minutes, until a thin crust forms and the center feels set but soft. The cake will look serious, not fluffy.
Remove from the oven and let it cool in the pan for five minutes. This short rest helps it hold together when turned out.
Step 5 - Turn Out and Cool
Run a knife gently around the edges and turn the cake onto a serving plate. The top becomes the bottom, and that is perfectly fine. A few crumbs on the edge are part of the charm.
Let the cake cool completely before glazing. Warm cake and glaze do not get along.
Step 6 - Make the Chocolate Glaze
Place the chocolate chips in a heatproof bowl. Heat the cream until small bubbles appear around the edges, then pour it over the chocolate. Stir briefly and let it rest for five minutes.
Stir again, slowly at first, then more confidently, until smooth and shiny. If needed, reheat gently and stir again.
Step 7 - Glaze and Set
Spoon the glaze over the cooled cake and nudge it toward the edges. Let it drip naturally, resisting the urge to overwork it. The glaze should feel relaxed, not controlled.
Allow the cake to sit for several hours so the glaze can set. This waiting is worth it, even if it tests your patience.
Serving Moments That Shine
This cake slices best with a sharp knife dipped in hot water and wiped dry. Clean cuts matter here, especially if you are serving guests. It shows off that dense interior.
I usually serve it plain, because it does not need help. Sometimes a few berries or a light dusting of something simple feels right. The cake always leads the conversation.
Tips
Use good-quality chocolate since the flavor is front and center.
Do not overbake; the center should stay soft and rich.
Let the cake cool fully before glazing to avoid a messy finish.
Toast sliced almonds if using them, for extra texture and aroma.
Clean the knife between slices for the neatest presentation.
Variations I Actually Use
Sometimes I lean into the espresso powder and use the full amount. It gives a faint mocha note that feels grown-up and cozy. Other times, I skip it entirely and let the chocolate speak alone.
I have also added a pinch of cinnamon once, just to see. It was subtle and warm, not spicy. Small changes go a long way in a cake this focused.
Storing and Making Ahead
This cake keeps beautifully at room temperature for a day, loosely covered. After that, I move it to the fridge, where it becomes even fudgier. Just bring slices back to room temperature before serving.
You can make the cake a day ahead and glaze it the next morning. That actually reduces stress and gives the flavors time to settle. Future you will appreciate that choice.
This flourless chocolate cake has earned its place in my regular rotation. It is reliable, indulgent, and honest about what it is. When I want a dessert that feels like a promise kept, this is the one I reach for.
This rich, intensely chocolatey cake is naturally gluten-free and flourless, making it perfect for Passover or anyone avoiding gluten. With a fudgy interior and a glossy chocolate ganache glaze, it’s an elegant yet simple dessert that delivers maximum flavor with minimal ingredients.
ingredients
Cake
1cup semisweet chocolate chips ((170g))
8tablespoons unsalted butter ((113g), at room temperature)
3/4cup granulated sugar ((149g))
1/4teaspoon table salt
1 to 2teaspoons espresso powder (optional)
1teaspoon vanilla extract (optional)
3large eggs
1/2cup Dutch-process cocoa ((42g))
Glaze
1cup semisweet chocolate chips ((170g))
1/2cup heavy cream ((113g))
Instructions
1
Preheat the oven to 375°F (190°C). Lightly grease an 8" round metal cake pan. Cut a piece of parchment paper to fit the bottom, grease it, and place it in the pan.
2
In a microwave-safe bowl, combine the chocolate chips and butter. Heat until melted and smooth, stirring occasionally. Alternatively, melt gently over low heat on the stovetop.
3
Transfer the melted mixture to a mixing bowl. Stir in sugar, salt, espresso powder (if using), and vanilla extract.
4
Add the eggs and beat briefly until smooth. Mix in the Dutch-process cocoa just until combined.
5
Pour the batter into the prepared pan and bake for 23–27 minutes, or until a thin crust forms on top and an instant-read thermometer reads at least 200°F (93°C) in the center.
6
Cool the cake in the pan for 5 minutes. Run a knife around the edges, then invert onto a serving plate. Let cool completely before glazing.
7
To make the glaze: Place chocolate chips in a heatproof bowl. Heat the heavy cream until bubbles form around the edge (do not boil). Pour over chocolate, let sit 5 minutes, then stir until smooth.
8
Spoon the ganache over the cooled cake, allowing it to drip down the sides. Let set for several hours before slicing.
Nutrition Facts
Servings 8
Serving Size 1 slice
Amount Per Serving
Calories289kcal
% Daily Value *
Total Fat21g33%
Saturated Fat12g60%
Cholesterol95mg32%
Sodium180mg8%
Potassium180mg6%
Total Carbohydrate25g9%
Dietary Fiber3g12%
Sugars20g
Protein4g8%
Calcium 4 mg
Iron 15 mg
* Percent Daily Values are based on a 2,000 calorie diet. Your daily value may be higher or lower depending on your calorie needs.
Note
For clean slices: Dip a sharp knife in hot water and wipe dry between cuts.
Garnish ideas: Top with toasted sliced almonds, fresh berries, or a dusting of confectioners’ sugar.
Storage: Keep covered at room temperature for up to 3 days or refrigerate for up to 1 week.