What I love most is how forgiving it is. You don’t have to be an experienced baker at all. If you can mix batter and stir pudding, you’re already halfway there. And the end result still looks like something you spent way more time on.
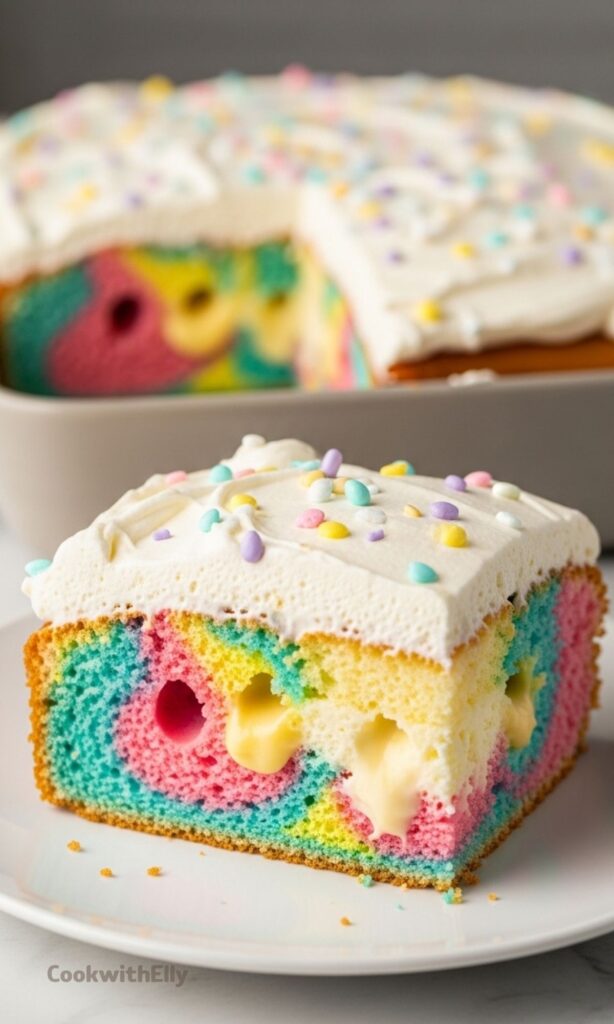
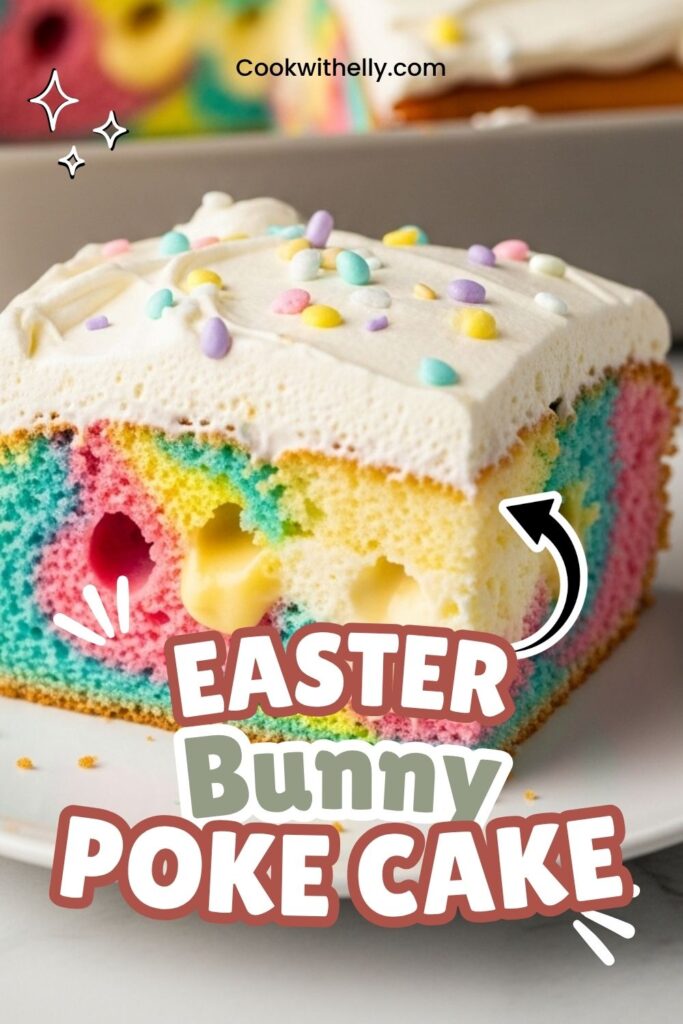
It’s also one of those desserts that makes people smile before they even take a bite. Bright colors, soft texture, creamy topping… it just fits Easter perfectly.
Ingredients Needed for the Recipe
White cake mix plus ingredients on the box – This forms the base of the cake. I stick with white cake mix because it shows off those pastel colors beautifully.
Instant cheesecake pudding mix – This is what gives the cake that soft, creamy texture inside every bite.
Milk – Used to prepare the pudding and keep it smooth and pourable.
Cool Whip whipped topping – Adds a light, fluffy layer on top that balances the richness of the pudding.
Easter sprinkles or candies – These are for decoration and bring that festive Easter feel.
Gel food coloring (pink, purple, yellow, light blue) – Helps create those soft pastel swirls without thinning the batter.
How to make Easter Poke Cake with Cheesecake Pudding (Easy Bunny Cake Recipe)?
Step 1 – Prepare the Oven and Pan
Start by preheating your oven to 350 degrees F. Lightly grease a 9 x 13 inch baking dish so the cake doesn’t stick later.
I usually don’t overthink this part. Just make sure every corner is coated, especially the edges where cakes like to cling a bit.
Step 2 – Mix the Cake Batter
Prepare the white cake mix according to the instructions on the box. Once it’s smooth and ready, divide it evenly into four bowls.
This step feels a little messy sometimes, but it’s worth it. Try to keep the portions close so the colors bake evenly.
Step 3 – Add the Colors
Add gel food coloring to each bowl - one pink, one purple, one yellow, and one light blue. Stir each one until the color is fully blended.
I like to go slow here. A little color goes a long way, and it’s easier to deepen it than to fix it if it gets too dark.
Step 4 – Layer and Swirl
Spoon the colored batters into your baking dish, alternating colors as you go. Don’t worry about perfection.
Once everything is in, use a toothpick or knife to gently swirl the colors together. Not too much, though. You want a marbled look, not one blended color.
Step 5 – Bake the Cake
Bake the cake for about 25 minutes, or until a toothpick inserted in the center comes out clean.
Your kitchen will smell amazing at this point, and the colors will still peek through the top just a bit.
Step 6 – Poke the Holes
Let the cake cool for around 10 minutes. Then take the handle of a wooden spoon and poke holes all over the cake.
I space them about one and a half inches apart and go about three quarters of the way down. This is what lets the pudding soak in later.
Step 7 – Cool Completely
Let the cake cool completely before adding anything else. This part matters more than it seems.
If the cake is still warm, the pudding won’t set right and can turn a bit runny.
Step 8 – Make the Pudding
In a medium bowl, whisk together the milk and both boxes of cheesecake pudding mix until it thickens slightly.
It should still be pourable but not watery. That balance makes all the difference.
Step 9 – Add the Pudding
Pour the pudding evenly over the cake, making sure it fills the holes. Use a spatula to gently spread it across the top.
I like to tap the pan lightly on the counter to help the pudding settle into the cake.
Step 10 – Chill the Cake
Place the cake in the refrigerator for about 20 minutes so the pudding can set properly.
This step locks everything together and gives that signature poke cake texture.
Step 11 – Add the Topping
Spread the Cool Whip over the top in an even layer. Don’t rush this part, it’s the final look.
Finish with Easter sprinkles or candies right before serving for that bright, festive finish.
Why This Cake Works So Well for Easter
There’s something about pastel colors and creamy textures that just fits the season. This cake checks both boxes without needing any complicated decorating skills.
It’s also incredibly easy to make ahead. I usually prepare it the day before and let it chill overnight, which honestly makes it even better.
The pudding soaks deeper into the cake, the flavors settle, and everything just feels more complete by the next day.
Tips
Place the cake pan on a cutting board before adding pudding to make moving it easier.
Tap the pan gently after pouring pudding so it settles into the holes.
Use gel food coloring instead of liquid to avoid thinning the batter.
Don’t over-swirl the batter or the colors will blend too much.
Add sprinkles closer to serving time to keep them from softening.
Make the cake a day ahead for better texture and flavor.
Use the handle of a wooden spoon for evenly sized holes.
Serving Ideas for Spring Gatherings
I almost always serve this cake chilled, straight from the fridge. It slices clean and holds its shape really well, which makes it perfect for gatherings.
For Easter brunch, I like pairing it with fresh berries on the side. It adds a little freshness and balances the sweetness.
It’s also great for potlucks or family dinners because it travels easily. Just cover the pan and you’re good to go.
And honestly, it’s one of those desserts that works for all ages. Kids love the colors, adults love the texture. It just fits.
Simple Variations to Try
If you want to switch things up a little, this recipe is really flexible. You can play around without worrying too much about messing it up.
Sometimes I swap the cheesecake pudding for vanilla pudding when I want a lighter flavor. It still turns out soft and delicious.
Use different pastel shades for baby showers or spring birthdays.
Add mini chocolate eggs or marshmallow chicks on top.
Try a lemon pudding version for a brighter flavor.
Use homemade whipped cream instead of Cool Whip if you prefer.
Mix in crushed candies for a more playful texture.
Every version still keeps that soft, creamy bite that makes poke cakes so good. That part never changes, and honestly, it’s why I keep coming back to this recipe.
It’s easy, it’s cheerful, and it always brings people back for seconds. That’s kind of the goal, right?
This Easter Poke Cake is one of those bright, cheerful desserts that instantly makes the table feel festive and fun. Between the colorful marbled cake layers and the creamy cheesecake pudding topping, this easy Easter dessert is guaranteed to steal the show at any spring gathering. It uses a simple white cake mix transformed into a vibrant, make-ahead treat that stays moist and delicious for days.
ingredients
Cake Base
1box white cake mix (16 oz, plus ingredients called for on the box (eggs, oil, water))
1tsp gel food coloring (pink (Fuchsia))
1tsp gel food coloring (purple (Violet))
1tsp gel food coloring (yellow (Lemon Yellow))
1tsp gel food coloring (light blue (Sky Blue))
Topping & Filling
2boxes instant cheesecake pudding mix (3.5 oz each)
3.5cups milk (cold, whole milk preferred)
1tub whipped topping (8 oz (Cool Whip), thawed)
0.5cup Easter sprinkles or candies (for garnish)
Instructions
1
Preheat and PrepPreheat your oven to 350°F (175°C). Grease a 9x13 inch baking dish thoroughly.
Placing the pan on a cutting board before adding pudding later makes it easier to move without spilling.
2
Prepare BatterPrepare the white cake mix according to the package directions using the required eggs, oil, and water.
3
Color the BatterDivide the prepared cake batter evenly into four separate bowls. Tint each bowl with pink, purple, yellow, and light blue gel food coloring, stirring until the color is evenly mixed.
Gel food coloring provides vibrant pastel colors without thinning the batter.
4
Assemble and BakeSpoon the colored batters into the prepared baking dish, alternating colors as you go. Use a toothpick to gently swirl the colors together for a marbled look. Bake for 25 minutes until a toothpick inserted in the center comes out clean.
5
Poke HolesLet the cake cool for about 10 minutes. Use the handle of a wooden spoon to poke holes across the cake about 1.5 inches apart, going about three-quarters of the way through. Allow the cake to cool completely.
The wooden spoon handle creates the perfect size hole to hold the pudding without the cake falling apart.
6
Make PuddingIn a medium bowl, whisk together the cold milk and both boxes of instant cheesecake pudding until slightly thickened.
7
Soak the CakePour the pudding evenly over the cooled cake, spreading it gently so it fills the holes. Gently tap the pan on the counter to help the pudding settle.
8
Chill and TopRefrigerate the cake for 20 minutes until the pudding sets. Spread the whipped topping over the top and garnish generously with Easter sprinkles or candies.
If using hard confetti sprinkles, add them closer to serving time to keep them crisp.
Nutrition Facts
Servings 12
Serving Size 1 slice
Amount Per Serving
Calories385kcal
% Daily Value *
Total Fat15.5gg24%
Saturated Fat6.2gg31%
Trans Fat0gg
Cholesterol45mgmg15%
Sodium420mgmg18%
Potassium180mgmg6%
Total Carbohydrate58gg20%
Dietary Fiber0.5gg2%
Sugars38gg
Protein4.5gg9%
Calcium 12% mg
Iron 4% mg
* Percent Daily Values are based on a 2,000 calorie diet. Your daily value may be higher or lower depending on your calorie needs.
Note
Make Ahead: This cake is perfect for making the day before. Store it covered in the refrigerator until ready to serve.
Sprinkle Tip: If you prefer crisp sprinkles, add them just before serving. If you like them soft, add them before refrigerating overnight.
Pudding Variation: You can swap cheesecake pudding for vanilla pudding if you prefer a lighter flavor profile.
Transport: Because this is a sheet cake, it travels very well to potlucks and church gatherings. Keep it chilled in a cooler if traveling long distances.