Let's be honest, the idea of decorating Christmas cookies can feel a little intimidating, can't it?
All that meticulous piping and perfect royal icing feels more like a high-stakes craft project than a fun kitchen activity.
A Snowy Night of Inspiration
The story of these cookies began for me during our first December after moving to the mountains near Asheville.
We were tucked inside during a massive snowstorm, the world outside a silent, magical blanket of white, and that peaceful, wintry scene sparked the whole idea.
Ingredients Needed for the Recipe
Gathering everything first makes the process smooth and simple, almost relaxing.
Here’s what you’ll need to create your own snowy nightscape.
Very Soft Salted Butter: The star of the shortbread, giving it that rich, melt-in-your-mouth texture. It must be very soft for easy hand-mixing.
Powdered Sugar: Used in the dough, the glaze, and the buttercream for sweetness and a smooth, lump-free consistency.
Vanilla & Peppermint Extract: Vanilla for the cookie base, and peppermint for that classic, refreshing holiday flavor in the decorations.
All-Purpose Flour & Cornstarch: The flour provides structure, while the cornstarch is the secret for an ultra-tender, crisp cookie that holds its shape.
Half and Half or Milk: This loosens the glazes and buttercream to just the right, workable consistency.
Blue Paste Food Coloring: To create that deep, beautiful nighttime sky on each cookie.
Tiny White Nonpareils: These are your gently falling snowflakes, perfect for sprinkling.
Pearlized Snowflakes (optional): A lovely little sparkly touch for the top of each piped tree.
Why This Shortbread Dough is a Dream
This particular dough is my absolute go-to for cut-out cookies, and you'll understand why after your first batch.
It comes together in one bowl with just a spoon, no electric mixer required, which means less cleanup and more satisfaction.
How to make Easy Decorated Christmas Cookies?
The magic is in the method, and I've broken it down into simple, foolproof stages. Just follow along.
Make this recipe yours—just save it to your Pinterest board!”
Step 1 - Make the Dough
In a medium bowl, stir that very soft butter until it's creamy and smooth.
Add the powdered sugar and vanilla, and mix by hand for about 30 seconds until it's fluffy and well blended.
Step 2 - Bring It Together
Sprinkle the flour and cornstarch evenly over the butter mixture, then stir until a shaggy dough forms.
Turn it out onto a lightly floured surface, press it into a ball, give it a few gentle kneads until smooth, and then flatten it into a disk.
Step 3 - Roll and Cut
Roll the dough out to a ⅜-inch thickness, keeping your surface and pin lightly floured to prevent sticking.
Cut out your circles, place them on parchment-lined pans, and re-roll the scraps until all the dough is used.
Step 4 - Chill and Bake
This chill is non-negotiable, it ensures your cookies keep their perfect shape. Refrigerate the cutouts for at least an hour.
Bake in a preheated 350°F oven for 12-16 minutes, until the edges just hint at gold, then let them cool completely.
Step 5 - Create the Night Sky Glaze
Whisk together powdered sugar, half and half, and a little peppermint extract until smooth and thick but pourable.
Now, dip a knife tip into your blue food coloring and swirl it in, stirring until you achieve a gorgeous, deep evening blue.
Step 6 - The Dip, Drip, and Flip
Here's the fun, easy technique. Holding a cookie by the edges, dip the top surface fully into the blue glaze.
Lift it, let the excess drip back into the bowl for 20-30 seconds, then quickly flip it over and give a gentle jiggle for an even coat.
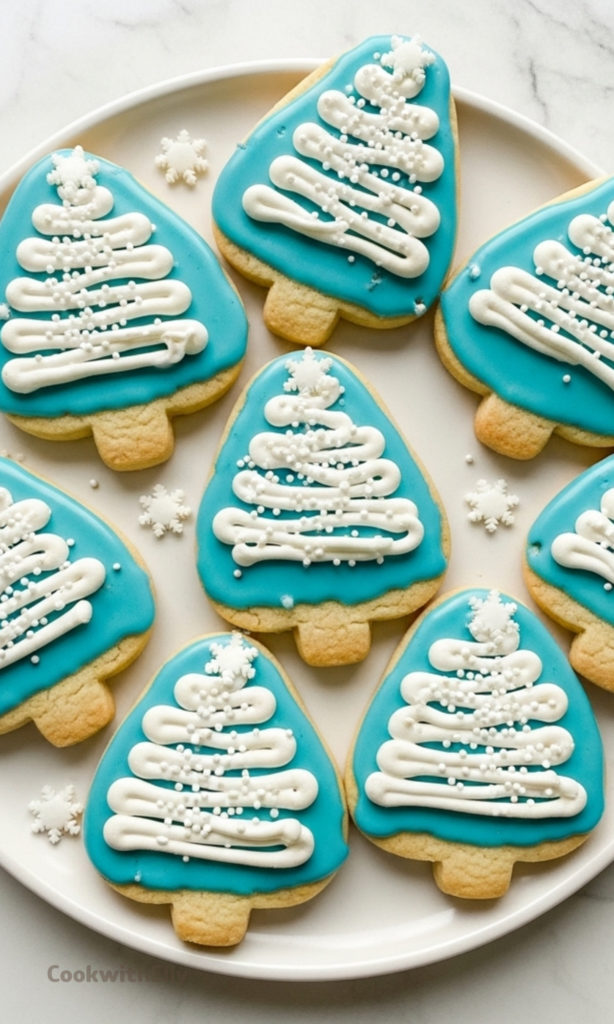
Step 7 - Add the First Snowfall
Immediately after flipping each cookie, sprinkle the wet glaze with a pinch of those tiny white nonpareils.
Let this "night sky" set for about 15-30 minutes before you move on to the trees.
Step 8 - Pipe the Evergreen Trees
Stir together the simple buttercream piping mixture: soft butter, powdered sugar, a touch of half and half, and peppermint extract.
Spoon it into a piping bag fitted with a small round tip, like a Wilton #3, and you're ready to create.
A Little Trick for Perfect Trees
If you worry about making trees the same size, here's a clever helper method I use.
Cut a simple tree shape from paper, lay it on a cookie, and lightly trace the edges with a sharp knife tip to create a faint guide.
Step 9 - Decorate and Finalize
Following your guide or just freehanding it, pipe the tree by making increasingly wider squiggles from the top down.
Right away, add a few more nonpareil "snowflakes" on the tree and crown it with a pearlized snowflake if you like.
Essential Tools for Stress-Free Baking
A couple of specific tools can make this process even more enjoyable, though they're not strictly mandatory.
A rolling pin with removable thickness rings guarantees every cookie is an even ⅜-inch, which is perfect for dipping.
And pre-cut parchment sheets eliminate the fuss of tearing paper, while a box of disposable piping bags makes cleanup a breeze.
Tips
To quickly soften butter, microwave it on the lowest power setting (like 10%) in 20-second increments until soft but not melted.
When cutting cookies, press down firmly but don't twist the cutter, as twisting can seal the edges and prevent a good rise.
If your glaze develops bubbles after mixing, stir it very slowly to help them settle and vanish for a smooth finish.
Short on chilling time? Pop the cutout cookie sheets into the freezer for 10-15 minutes instead of the fridge for an hour.
Always taste your glaze after adding a small amount of extract first, as strengths vary wildly between brands.
If a cookie puffs up slightly in the center after baking, gently press it flat with a spatula while it's still warm.
Flavor Variations to Love
While peppermint is wonderfully festive, this recipe is a fantastic canvas for other flavors, too.
Try almond extract in the glaze for a delicate, sophisticated note, or orange extract for a bright, cheerful twist.
Vanilla is always a classic, and a bit of lemon or coconut extract can transport these cookies to a whole different season.
The point is to make them your own, to match your personal holiday taste memories.
Make-Ahead and Storage Secrets
The true beauty of this recipe is its flexibility; you can break it into stages across days.
The un-baked, cut-out dough circles can be frozen on a pan, then transferred to a bag for baking weeks later.
Fully baked and cooled cookies can be stored in an airtight container at room temperature for several days before decorating.
And once decorated, they keep beautifully in a single layer in a tin, staying delicious for about a week.
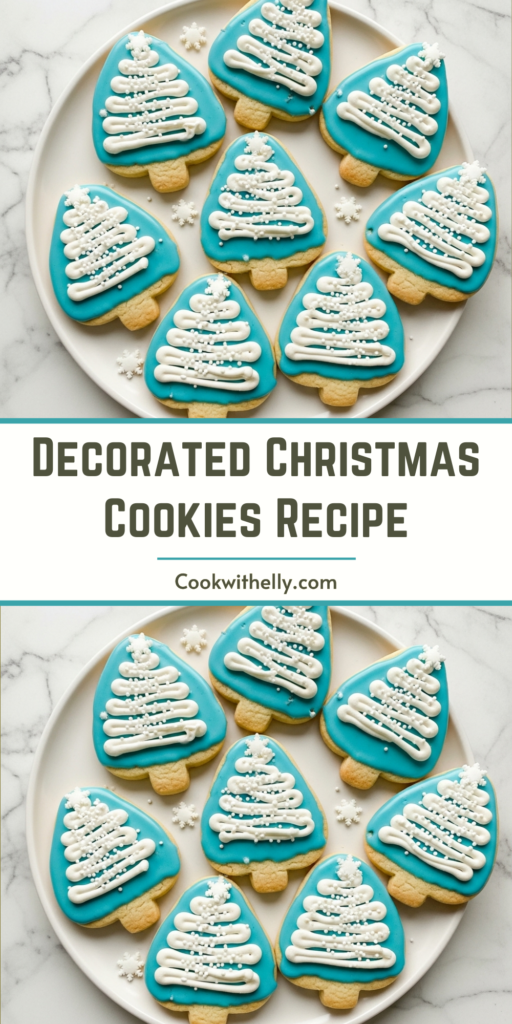
Don't fancy yourself as a fancy cookie maker? These Easy Decorated Christmas Shortbread Cookies are one-bowl, no-mixer-required, and simply delicious! Featuring a buttery shortbread base, a vibrant blue mint glaze, and snowy white piped trees, they look like they came from a fine bakery—but are totally doable at home, even with kids!
ingredients
For the cookies:
8ounces very soft salted butter (2 sticks)
1/2cup powdered sugar
1teaspoon vanilla extract
1 3/4cups all-purpose flour
1/4cup cornstarch
For the mint glaze:
2cups powdered sugar
4tablespoons half and half (or milk, maybe more)
1/4–1teaspoon peppermint extract (adjust to taste)
as needed blue paste food coloring (e.g., Wilton Delphinium Blue)
For the buttercream piping:
1tablespoon very soft butter
1cup powdered sugar
1 1/2–2tablespoons half and half (or milk)
1/2teaspoon peppermint extract
as needed white nonpareils (for “snow”)
optional mini white pearlized snowflakes (for tree topper)
Instructions
For the cookies:
1
Line 2 sheet pans with parchment paper. Set aside.
2
Place soft butter in a medium mixing bowl. Stir with a wooden spoon until smooth. Add powdered sugar and vanilla; mix by hand for 30 seconds until fluffy.
3
Add flour and cornstarch. Stir until shaggy. Turn onto a lightly floured surface, knead briefly, and form into a disk.
4
Roll dough to ⅜-inch thickness. Cut into circles and place on pans. Re-roll scraps as needed.
5
Chill cutouts for at least 1 hour (or up to 24 hours).
6
Preheat oven to 350°F. Bake cookies for 12–16 minutes until edges just begin to turn golden. Cool completely.
For the glaze:
7
Whisk powdered sugar, half and half, and ¼ tsp peppermint extract. Add more extract to taste. Mix in blue food coloring until desired shade is reached.
8
Pour glaze into a shallow bowl.
To glaze the cookies:
9
Dip top of each cookie into glaze, let excess drip off for 20–30 seconds, then flip and gently jiggle to spread evenly.
10
Let glazed cookies dry 15–30 minutes.
For the buttercream piping:
11
Stir soft butter until smooth. Add powdered sugar, 1½ tbsp half and half, and peppermint extract. Mix to a thick but pipeable consistency; add more liquid if needed.
12
Fill a pastry bag fitted with a Wilton #3 round tip. Pipe simple Christmas trees from top to bottom, making lines progressively wider.
13
Immediately sprinkle with white nonpareils and optional snowflake topper. Let dry completely.
Nutrition Facts
Servings 24
Serving Size 1 cookie
Amount Per Serving
Calories120kcal
% Daily Value *
Total Fat6gg10%
Saturated Fat4gg20%
Trans Fat0gg
Cholesterol15mgmg5%
Sodium55mgmg3%
Potassium20mgmg1%
Total Carbohydrate16gg6%
Dietary Fiber0gg0%
Sugars10gg
Protein1gg2%
Calcium 15 mg
Iron 0.3 mg
* Percent Daily Values are based on a 2,000 calorie diet. Your daily value may be higher or lower depending on your calorie needs.
Note
Tip: For even rolling, use an adjustable rolling pin with removable thickness guides (⅜-inch recommended).
Storage: Store in an airtight container for up to 10 days or freeze before or after decorating.
Flavor options: Substitute peppermint with almond, vanilla, orange, or coconut extract.
Kid-friendly: Prep dough ahead and let kids handle decorating—great holiday activity!
Keywords:
christmas cookies, shortbread cookies, easy decorated cookies, holiday baking, no mixer cookies