There's something about the holidays that makes us all a little more creative, a little more willing to get our hands messy in the kitchen.
And these Christmas cake pops? They’re the perfect, playful canvas for all that festive spirit.
A Little Sweet Magic in Every Pop
What I love most about this process, honestly, is the transformation. It starts with a simple, humble cake.
Then, with a little frosting and a lot of imagination, you create these adorable, handheld treats that just radiate joy.
Ingredients Needed for the Recipe
Here’s what you’ll need to gather. The beauty is in the simplicity, really, and the fact that you can tailor so much of it.
Boxed Cake Mix: This is your flavor foundation. A classic white or yellow mix is wonderfully neutral, but a gingerbread or chocolate mix? Divine.
Ingredients for the Mix: Just the usual suspects—water, oil, and eggs. They bring the cake to life.
Frosting: This is the glue, the binder. A tub of vanilla works perfectly, but I’m a sucker for a homemade cream cheese frosting myself.
Candy Melts: Your edible paint. You’ll want a few Christmas colors like red, green, white, and maybe brown for those cute reindeer.
Decorations: This is where the personality shines through. Think sprinkles, edible eyes, mini pretzels, and sanding sugar.
Cake Pop Sticks: The little handles that make them pops. Essential, and thankfully, easy to find.
How to make Christmas Cake Pops?
This isn't a fussy process, I promise. It's more like following a series of fun, little steps that lead to a big, sweet payoff.
Step 1- Bake and Crumble
First, bake your cake according to the package directions, in any pan you like. Let it cool completely.
Then, get ready for the slightly therapeutic part—crumble that entire cake into fine, even crumbs in a large bowl. Use your fingers, it’s the best tool.
Step 2- Bind with Frosting
Now, add your frosting to the crumbs. Start with about three-quarters of the container.
Mix it in with a spoon or spatula until the mixture holds together when you squeeze it. It should feel like a soft, moldable dough, not sticky.
Step 3- Shape and Chill
Using a cookie scoop or a tablespoon, portion the dough and roll it into smooth balls. Place them on a parchment-lined baking sheet.
For now, just get them into uniform shapes. Pop the whole tray into the freezer for a solid 15-20 minutes. This chill is non-negotiable.
Step 4- Insert the Sticks
Take your sticks and dip the very tip of one into some melted candy coating. This little dab acts like edible superglue.
Gently push the coated end about halfway into a chilled cake ball. Repeat with all of them. The cold cake holds the stick firm.
Step 5- The Big Dip
Melt your candy coating in a deep, narrow cup. Stir it until perfectly smooth. Now, take a cake pop by the stick and fully submerge it.
Lift it out, tap off the excess coating gently, and let the pop hover over the cup for a moment. The goal is a smooth, even shell.
Step 6- Decorate and Set
This is the moment for sprinkles. Add them immediately, while the coating is still wet, so they stick beautifully.
Then, stand the pop upright in a Styrofoam block or a stand to dry completely. This keeps that perfect round shape.
Your Secret Weapon for Perfect Pops
Honestly, the biggest trick is that initial chill. A cold cake ball is so much easier to work with.
It doesn’t crumble when you insert the stick, and it sets the coating faster, giving you a smoother finish every single time.
Tips
If your candy melts seem too thick or lumpy, stir in a teaspoon of coconut oil or shortening. It thins them to a perfect dipping consistency.
Work in small batches. Keep most of your shaped cake balls in the fridge, only taking out a few at a time to dip.
For intricate details like faces or belts, let the base coat harden completely. Then use a piping bag or a toothpick with a different colored melt.
Flavor Twists to Try
Don't feel locked into vanilla. The cake and frosting combo is your playground.
A spice cake with cinnamon buttercream creates a wonderfully warm, festive pop all on its own.
Try a chocolate cake mixed with peppermint frosting, then dip in white coating and crush candy canes on top.
Or, for something a little decadent, use a red velvet cake mix and cream cheese frosting. Dip them in dark chocolate—absolute magic.
Gifting and Presentation Ideas
These pops aren't just for your own dessert table. They make the most heartfelt, homemade gifts.
Once they're completely set, you can wrap each one individually in a little clear cellophane bag, tied with a ribbon.
Arrange a few in a simple mug or a pretty mason jar for a charming, edible centerpiece.
Or, line them up on a festive plate, and watch them disappear at your holiday party. They always do.
Storage for Freshness
You've put in the work, so let's keep them delicious. Store your finished cake pops in a single layer in an airtight container.
They’ll be happiest in the refrigerator, where they’ll stay fresh and firm for up to a week.
If you need to make them further ahead, you can freeze the undipped, shaped cake balls for a month.
Just thaw them in the fridge before you add the sticks and coating. It’s the ultimate holiday time-saver.
Bring festive cheer to your dessert table with these Christmas Cake Pops—adorable, bite-sized treats that are as fun to make as they are to eat! Perfect for holiday parties, gifting, or decorating your Christmas dessert spread, these pops are a guaranteed crowd-pleaser for kids and adults alike.
ingredients
Cake Base
1box white cake mix (or flavor of choice)
1cup water
0.5cup vegetable oil
3 egg whites
Frosting & Coating
16oz vanilla frosting (store-bought or homemade)
12oz candy melts (red, green, white, or brown (for reindeer))
mini Reese’s cups (for ornament toppers (optional))
Equipment
24 cake pop sticks
1 styrofoam block or cake pop stand (for drying)
Instructions
Basic Cake Pops
1
Bake the CakePreheat oven to 325°F (163°C). Grease a 9x13 baking dish. Combine cake mix, water, oil, and egg whites in a large bowl. Beat on medium speed for 2 minutes. Pour into the dish and bake 25–30 minutes, or until a toothpick comes out clean. Let cool completely.
2
Crumble & MixCrumble the cooled cake into fine crumbs using your hands. Add vanilla frosting and mix until the texture is like playdough—moist but not sticky.
3
Shape & FreezeScoop about 1 tablespoon of mixture and roll into balls (or shape into cones for trees). Place on a parchment-lined tray and freeze for 10–15 minutes until firm.
4
Insert SticksDip the end of each cake pop stick into melted candy coating (acts as glue), then insert into each ball. Return to freezer for 5–10 minutes.
5
Dip & DecorateMelt candy melts in a microwave-safe bowl at 50% power, stirring every 30 seconds until smooth. Dip each pop fully, tap off excess, and immediately add sprinkles or decorations before coating sets.
Holiday Variations
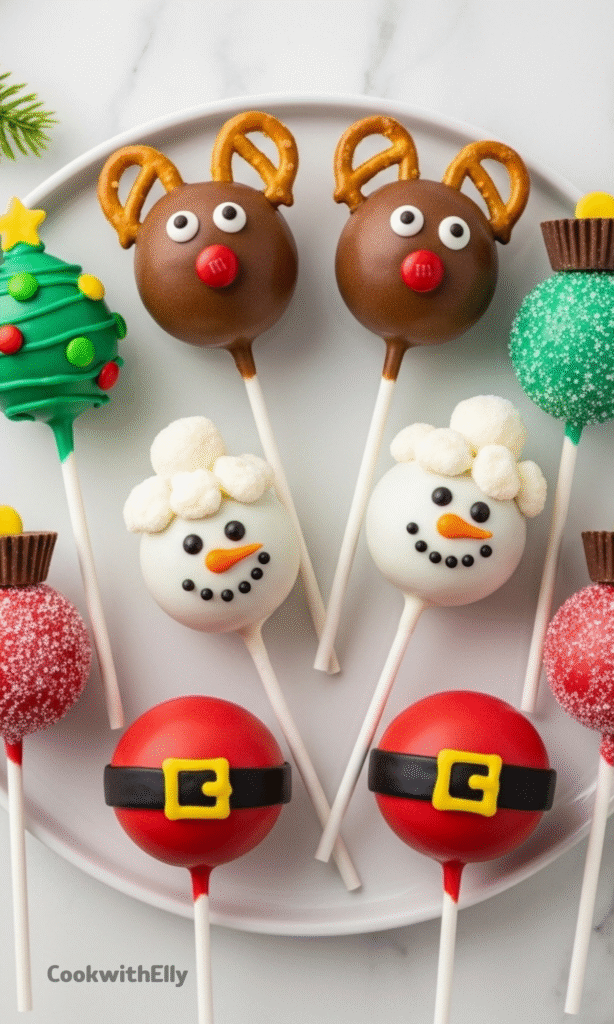
6
Christmas Tree PopsShape cake mixture into cones. Dip in green candy melts. While wet, add round sprinkles as ornaments and a star sprinkle on top.
7
Reindeer PopsRoll into balls. Press half a mini pretzel into each side for antlers. Dip in brown candy melts. Add candy eyes and a red M&M or red hot for the nose.
8
Snowman PopsDip round pops in white candy melts. While still wet, press a large round sprinkle (as hat) on top with a small sprinkle in the center (puff). Pipe on black eyes and an orange triangle (nose) using melted candy in a piping bag.
9
Santa Belt PopsDip in red candy melts. Once hardened, pipe a black belt around the middle and add a yellow rectangle as a buckle.
10
Ornament PopsDip in any color candy melt, roll in sanding sugar or sprinkles, and top with a mini Reese’s cup as a hanger.
Nutrition Facts
Servings 24
Serving Size 1 pop
Amount Per Serving
Calories210kcal
% Daily Value *
Total Fat10gg16%
Saturated Fat6gg30%
Trans Fat0gg
Cholesterol15mgmg5%
Sodium140mgmg6%
Potassium45mgmg2%
Total Carbohydrate28gg10%
Dietary Fiber0gg0%
Sugars22gg
Protein2gg4%
Calcium 40 mg
Iron 0.5 mg
* Percent Daily Values are based on a 2,000 calorie diet. Your daily value may be higher or lower depending on your calorie needs.
Note
Use any cake flavor—chocolate, red velvet, or spice cake all work beautifully!
Chill thoroughly before dipping to prevent pops from falling off sticks.
Thin candy melts with 1 tbsp shortening if too thick for smooth dipping.
Store upright in styrofoam or a cake pop stand to avoid smudging designs.
Make ahead: Freeze undipped cake balls for up to 1 month. Dip 1–2 days before serving.