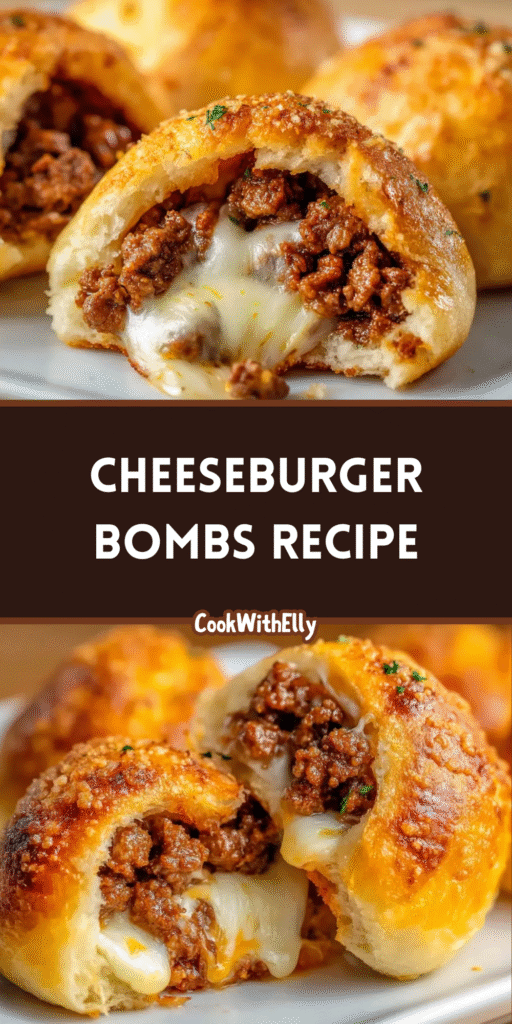
Imagine, if you will, all the glorious, messy joy of a fully-loaded bacon cheeseburger, but tucked neatly into a soft, golden, handheld pocket of dough. That’s the magic of Cheeseburger Bombs, a creation so clever and delicious it feels like a little culinary victory.
They are the ultimate solution for when you crave that classic cookout flavor but want something a bit more fun, and frankly, a lot less messy to eat. Each bite is an explosion of savory ground beef, crispy bacon, melted cheese, and that perfect tangy crunch from the pickles.
It’s the kind of food that makes everyone, from kids to adults, light up with excitement. They’re perfect for parties, game days, or just turning an ordinary weeknight dinner into something truly special.
Why These Will Become Your New Go-To
Honestly, the appeal of these little bombs is hard to overstate. They combine the comforting, familiar taste of a backyard barbecue with the incredible convenience of a pop-in-your-mouth snack.
You get that wonderful textural play—the soft, fluffy biscuit, the savory and tender beef, the crispy bacon, and the gooey cheese—all in one perfectly contained package. No more losing your toppings out the back of the bun!
They are also incredibly social food. Placed in the middle of a table with a few dipping sauces, they invite conversation and sharing, creating a warm, communal eating experience that a regular burger just can't match.
Ingredients Needed for the Recipe
Gathering your ingredients is the first step on this delicious journey. You'll be pleasantly surprised at how simple and accessible everything is, with many items you likely already have in your kitchen.
Bacon: Slice the raw bacon into ¼-inch thick strips before cooking.
Beef: I like 85%-lean ground beef for a good balance of flavor and not too much grease.
Onion + Garlic: These aromatics are non-negotiable for building a deep, savory flavor base.
Ketchup: It adds a touch of acidity and sweetness to the filling, and of course, makes a great dipping sauce later!
Worcestershire Sauce: This is your secret umami weapon, enhancing the rich, meaty flavor of the beef.
Pickles: Finely chopped dill pickles are essential for that fresh, briny flavor and a bit of crucial crunch.
Biscuit Dough: Store-bought refrigerated dough is the simplest choice, creating that wonderfully soft and fluffy "bun."
Cheese: Freshly shredded cheddar cheese melts beautifully, but feel free to use your favorite melty cheese.
Butter & Sesame Seeds: For brushing on top, giving them a gorgeous golden-brown, buttery finish that looks just like a sesame seed bun.
The Secret to the Perfect Filling
Creating the filling is where the real flavor is built, and it’s about more than just browning some meat. You're building layers of taste and texture that will sing inside that biscuit dough.
Starting the bacon first is a chef's trick—it renders out the fat, which you can then use to cook the onions and beef, infusing everything with that smoky, porky goodness. It’s a simple step that adds a tremendous amount of depth.
And don't rush the sauté! Letting the onions become truly translucent and the garlic become fragrant is what transforms them from sharp raw alliums into sweet, aromatic pillars of flavor that support the entire dish.
How to make Cheeseburger Bombs?
Getting Your Station Ready
First things first, preheat your oven to 375°F. This gives it plenty of time to reach the perfect temperature for baking. Line a baking sheet with parchment paper, which is a lifesaver for easy cleanup and preventing any sticky situations.
Now, grab a large skillet. You'll want to place it over a steady medium heat—this is your main stage for building the incredible filling that goes inside these bombs.
Cooking the Bacon to Crispy Perfection
Take your sliced bacon and scatter it in the cold skillet. Letting it heat up gradually helps the fat render out beautifully, resulting in bacon that is crispy, not burnt.
Cook it, stirring occasionally, until it's reached that perfect state of crispiness. Then, use a slotted spoon to remove it, leaving that glorious, flavorful bacon fat behind in the pan. Trust me, you want that.
Building the Savory Beef Base
To that bacon fat, add your ground beef and the chopped onion. Cook this, breaking up the beef with your spoon, for a good 7 to 10 minutes.
You're looking for the beef to be fully cooked through and the onion to have softened and turned translucent. This is the foundation of your flavor, so give it the time it needs.
Unlocking the Aromatics
Just when you think the beef is done, add the minced garlic. Garlic burns easily, so you only need to cook it for about one minute, just until it becomes incredibly fragrant.
This is the moment your kitchen will smell absolutely amazing. Now, this is crucial: drain off any excess grease from the skillet. This ensures your filling isn't greasy and your biscuit dough won't become soggy.
Bringing It All Together
Take the skillet off the heat. This is important because you don't want the next ingredients to cook, just to mingle. Stir in the ketchup, Worcestershire sauce, chopped pickles, and that wonderful cooked bacon you set aside earlier.
Give it a really good mix, making sure every component is evenly distributed. You should have a cohesive, incredibly savory filling that already tastes like the best burger you've ever had.
Preparing the Dough Pockets
While your filling is cooling slightly, turn your attention to the biscuit dough. Separate the biscuits and, on a lightly floured surface, roll each one out until it's about ¼ inch thick.
Don't roll them too thin, or they might tear when you assemble the bombs. You're aiming for a sturdy but pliable little circle, ready to be stuffed with goodness.
The Art of Assembly
Now for the fun part! Divide your beef filling among the center of each rolled-out biscuit circle. Then, top that with a generous pinch of your freshly shredded cheddar cheese.
Carefully gather the edges of the biscuit dough up and over the filling, pinching them firmly together at the top to form a neat little bundle or bomb. The goal is to completely enclose the filling, creating a sealed pocket.
The Final Touch Before Baking
Place each bomb, seam side down, onto your prepared baking sheet. This ensures they don't pop open while baking. Give them a little space, as they will expand a bit as they cook.
Brush the tops and sides generously with the melted butter. This is what will give them that beautiful, golden-brown, bakery-worthy color. For the full burger bun effect, sprinkle a pinch of sesame seeds over the top of each one.
Transforming into Golden Goodness
Slide the baking sheet into your preheated oven and bake for about 20 minutes. You'll know they're done when the biscuit dough is fully cooked and has turned a deep, appetizing golden brown.
The smell wafting from your oven will be absolutely torturous in the best way possible. Let them cool for just a minute or two before serving—that cheese filling will be molten hot!
Tips
For the absolute best results, make sure to drain the cooked beef mixture thoroughly. A little bit of fat is flavor, but too much will make the bombs greasy and can cause the dough to become soggy or even tear.
When you're rolling out the biscuit dough, find that sweet spot. You want it thin enough to enclose the filling without being too bulky, but not so thin that it develops weak spots and allows the cheesy, beefy interior to burst through during baking.
That final brush of melted butter isn't just for show. It gives the bombs a rich flavor and a wonderfully soft, golden crust. The sesame seeds, while optional, are a brilliant touch that makes them look just like miniature burger buns.
How Can I Make These Ahead of Time?
Life gets busy, and the ability to prepare food in advance is a true gift. The good news is that Cheeseburger Bombs are wonderfully amenable to being made ahead, ensuring you can be a stress-free host or enjoy a quick meal on a hectic day.
You can fully assemble the bombs up to the point of baking, place them on the baking sheet, and then cover them tightly with plastic wrap. They can happily rest in the refrigerator for several hours, or even overnight.
When you're ready, simply take them out, let them sit at room temperature for about 20 minutes while the oven preheats, then brush with butter, add sesame seeds, and bake as directed. You might need to add a minute or two to the baking time since they’ll be going in cold.
What Are The Best Dipping Sauces?
While these bombs are flavor-packed on their own, dipping them just elevates the entire experience, adding another layer of creamy, tangy, or spicy goodness. It’s a chance to get creative and cater to everyone’s preferences.
Classic ketchup and yellow mustard are always a win, offering that familiar, comforting taste. For something with a bit more zing, a homemade burger sauce—a creamy blend of mayo, ketchup, mustard, relish, and spices—is absolutely divine.
Don't be afraid to think outside the box, either. A smoky BBQ sauce, a creamy ranch, or even a spicy sriracha mayo can provide a fantastic contrast to the savory, cheesy filling inside the bombs.
Creative Variations to Shake Things Up
The basic recipe is a masterpiece, but it's also an incredible canvas for your own culinary creativity. Feel like a burger artist and customize these to your heart's content, or to use up what you have in the fridge.
Love jalapeños? Add some finely diced fresh or pickled ones to the filling for a spicy kick. For a "Western Burger" vibe, mix in some finely chopped roasted green chilies. You could even swap the ground beef for ground turkey, chicken, or a plant-based alternative.
Experiment with cheeses, too! Pepper jack would be fantastic for some heat, while Swiss cheese would give you a "Royale" feel. A sprinkle of everything bagel seasoning on top instead of sesame seeds? Yes, please. The possibilities are truly endless.
Prep Time
20 mins
Cook Time
20 mins
Rest Time
5 mins
Total Time
45 mins
Difficulty:
easy
Cooking Temp:
375
F
Servings:
8
Estimated Cost:
medium
Calories:
380
Best Season:
Summer, Fall, Winter
Description
These hearty little Cheeseburger Bombs blew me away with their delicious flavor! Biscuit dough buns are stuffed full of ground beef, bacon, cheese, ketchup, and pickles, then baked until hot. It’s everything I love about bacon cheeseburgers in a convenient handheld pocket of goodness that’s easy to dip!
Preheat the oven to 375°F (190°C). Line a baking sheet with parchment paper.
2
In a large skillet over medium heat, cook the bacon until crisp. Remove with a slotted spoon and set aside.
3
Add ground beef and chopped onion to the same skillet. Cook, breaking up the beef with a spoon, until beef is browned and onion is translucent (7–10 minutes). Add garlic and cook 1 more minute until fragrant. Drain excess grease.
4
Remove skillet from heat. Stir in ketchup, Worcestershire sauce, chopped pickles, and cooked bacon.
5
Roll out each biscuit to about ¼-inch thickness. Divide the beef mixture and shredded cheese evenly among the biscuits. Fold edges up and pinch seams tightly to form sealed balls. Place seam-side down on the prepared baking sheet.
6
Brush tops with melted butter and sprinkle with sesame seeds (if using).
7
Bake for 20 minutes, or until biscuits are golden brown and cooked through.
8
Serve warm with ketchup and/or mustard for dipping.
Nutrition Facts
Servings 8
Serving Size 1 bomb
Amount Per Serving
Calories380kcal
% Daily Value *
Total Fat21gg33%
Saturated Fat9gg45%
Trans Fat0gg
Cholesterol60mgmg20%
Sodium720mgmg30%
Potassium320mgmg10%
Total Carbohydrate28gg10%
Dietary Fiber1gg4%
Sugars4gg
Protein19gg38%
Calcium 15% mg
Iron 15% mg
* Percent Daily Values are based on a 2,000 calorie diet. Your daily value may be higher or lower depending on your calorie needs.
Note
Make sure to drain excess fat from the beef to avoid greasy filling. Don’t roll the dough too thin or the filling may burst through.
Customize with your favorite burger toppings like caramelized onions, tomatoes, avocado, or coleslaw.
You can also use ground turkey or chicken for a lighter version.