There are meals that feel a little nostalgic the moment they hit the plate, and grilled cheese is definitely one of them. I have made it on the stove for years, but the first time I tried it on a Blackstone griddle, I realized something right away. This simple sandwich can actually get even better.
The griddle gives the bread this deep golden crispness that is hard to match in a regular pan. At the same time, the cheese melts slowly and evenly, turning perfectly gooey inside. It feels like a small upgrade to a comfort food classic, but the difference is noticeable.
Another thing I love is how fast everything cooks when the whole surface of the griddle is working for you. Instead of making sandwiches one at a time, I can cook several at once and feed everyone without standing over the stove forever.
This Blackstone grilled cheese has become one of those easy weeknight dinners I fall back on again and again. A couple slices of buttery bread, some good cheese, and a hot griddle. That’s honestly all it takes.
Ingredients Needed for the Recipe
Salted butter - Spread on the bread to create that rich flavor and help the outside turn beautifully crisp and golden on the griddle.
Bread - The base of the sandwich. Sourdough, Texas toast, artisan bread, or even homemade white bread all work well and hold the melted cheese nicely.
Cheese - The star of the sandwich. American cheese melts smoothly, while cheddar, mozzarella, or pepper jack can add different flavors and textures.
Ingredients That Make a Big Difference
Grilled cheese might seem basic, but the ingredients you choose really shape the final sandwich. Bread with a sturdy texture tends to hold up best because it stays crisp while the cheese melts inside.
I often use sourdough or thick sliced sandwich bread. Sometimes I even make a loaf of white bread at home and slice it slightly thicker than usual. That extra thickness gives the sandwich a satisfying bite.
The cheese is where you can really play around. American melts beautifully, which makes it perfect for that classic creamy center. But I also like mixing cheeses, a little cheddar for flavor and mozzarella for stretch.
How to make Blackstone Grilled Cheese?
Step 1 - Prepare the Bread
Start by spreading softened butter on one side of each slice of bread. Make sure the butter reaches all the edges because those edges are what create that evenly crisp crust on the griddle.
Place one slice of bread on a cutting board with the buttered side facing down. This keeps the butter ready for cooking while you build the sandwich.
Step 2 - Add the Cheese
Lay two to four slices of cheese over the bread. I usually like using enough cheese to fully cover the surface so every bite melts together nicely.
If you are mixing cheeses, layer them so they melt evenly. Something creamy like American can go against the bread while sharper cheeses sit in the middle.
Step 3 - Close the Sandwich
Place the second slice of bread on top with the buttered side facing up. Now the sandwich is ready for the griddle and both outer sides already have butter.
Press the sandwich gently with your hand so everything stays in place. No need to smash it, just enough to keep the layers steady.
Step 4 - Heat the Blackstone
Preheat the Blackstone griddle to medium low heat. The ideal temperature sits between 300°F and 325°F, which allows the bread to toast slowly without burning.
Add a light layer of butter or oil to the griddle surface. This step helps prevent sticking and adds another layer of flavor.
Step 5 - Cook the First Side
Place the sandwich on the griddle and let it cook for about two to three minutes. During this time the butter will start sizzling and the bread slowly turns golden.
Watch the edges of the bread closely. Once you see that warm golden color creeping up the sides, it is usually ready to flip.
Step 6 - Flip and Finish Cooking
Use a wide spatula to flip the sandwich carefully. The second side cooks another two to three minutes until the bread is crisp and the cheese melts completely.
If you want extra gooey cheese, cover the sandwich briefly with a dome or metal bowl. The trapped heat helps melt the center perfectly.
Step 7 - Serve While Hot
Remove the grilled cheese from the griddle and let it rest for about a minute before cutting. This quick pause helps the melted cheese settle slightly inside.
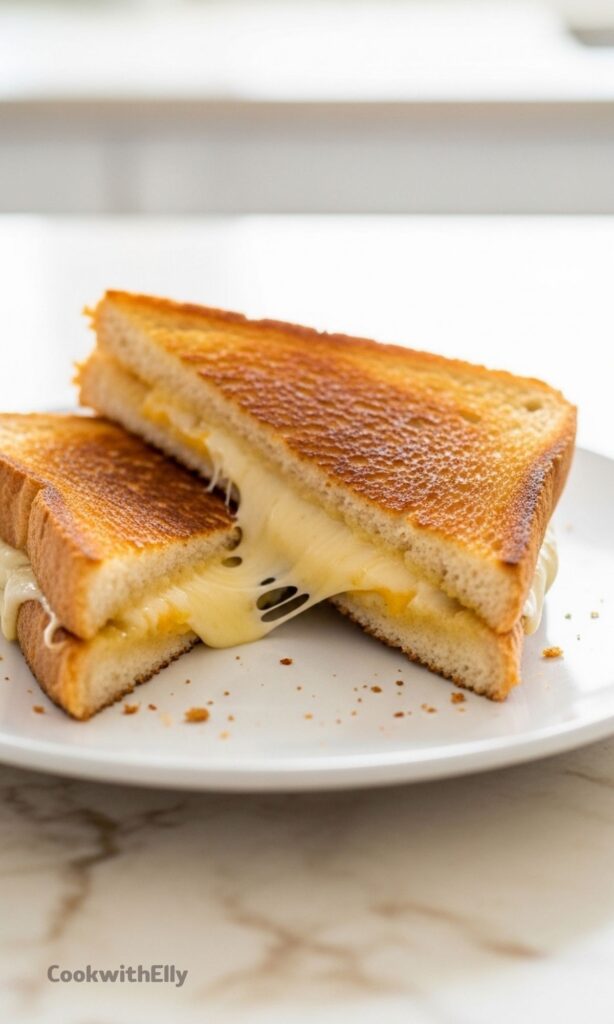
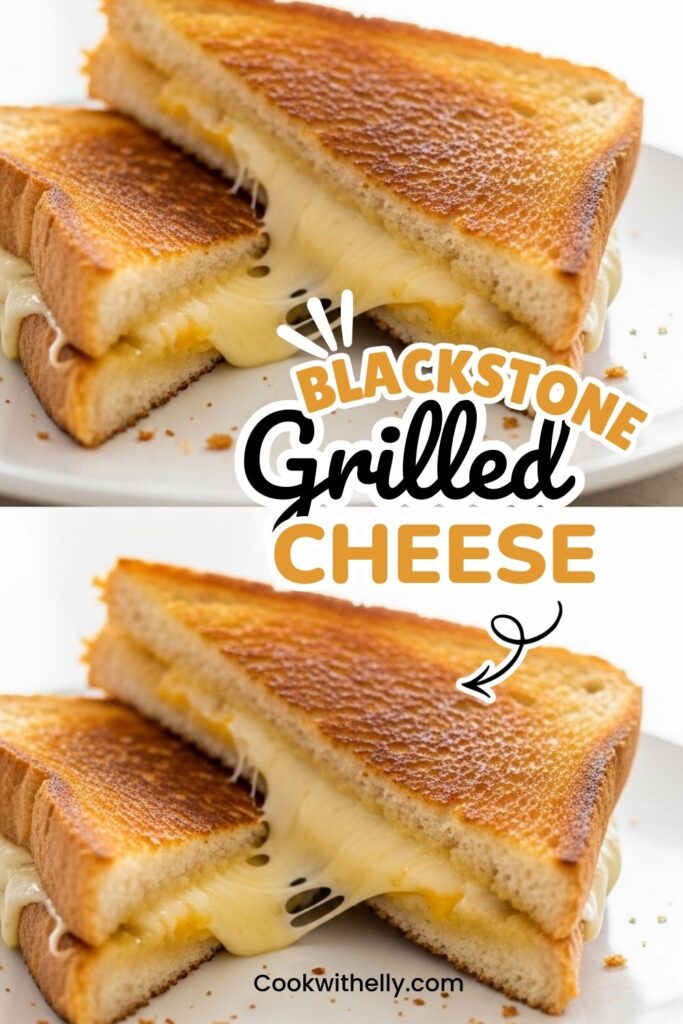
Slice the sandwich in half and serve it warm. The crispy bread and melted cheese combination is honestly hard to beat.
Fun Ways to Customize Your Grilled Cheese
Once you get comfortable making grilled cheese on the Blackstone, it becomes a great base for experimenting. Even small additions can turn a simple sandwich into something a little more interesting.
I sometimes slide in thin tomato slices when I want a fresh contrast to the rich cheese. Other days, crispy bacon or caramelized onions sneak their way into the sandwich.
Jalapenos are another favorite in my kitchen. Just a few thin slices add a bit of heat that balances the creamy cheese really well.
Add thin tomato slices for freshness and a slight tang.
Mix different cheeses like cheddar and mozzarella for deeper flavor.
Include crispy bacon for extra texture and richness.
Spread a little pesto inside the bread for a bright herbal flavor.
Layer caramelized onions for a slightly sweet twist.
Serving Ideas That Work Perfectly
A grilled cheese sandwich already feels satisfying on its own, but pairing it with something simple can turn it into a complete meal. One of the most classic pairings is tomato soup.
The creamy soup and crisp sandwich just belong together. I still dip my grilled cheese into the soup the same way I did years ago. Some habits are worth keeping.
On warmer days I lean toward lighter sides. A fresh green salad or even a handful of crunchy pickles works nicely beside the sandwich.
Serve with warm tomato soup for the classic comfort meal.
Add a simple side salad for a lighter dinner.
Pair with pickles or coleslaw for extra crunch.
Cut sandwiches into strips for easy dipping.
Tips
Keep the griddle temperature between 300°F and 325°F so the bread crisps slowly while the cheese melts properly.
Use softened butter so it spreads evenly across the bread without tearing it.
Cover the sandwich briefly with a dome or bowl to help the cheese melt faster.
Wait until the bread edges turn golden before flipping the sandwich.
Use a wide spatula for flipping so the sandwich stays intact.
Choose thicker bread slices to prevent soggy centers.
Cook several sandwiches at once on the Blackstone to save time during busy dinners.
Let the sandwich rest for a minute after cooking so the cheese settles slightly before slicing.
Grilled cheese may be simple, but making it on a Blackstone turns it into something a little special. The crisp bread, the gooey cheese, and the easy cooking process all come together in a way that feels effortless.
Whenever I want a fast meal that everyone actually gets excited about, this is one of the first things I think of. A hot griddle, good bread, and plenty of cheese. Sometimes the simplest meals really are the best ones.
If you are looking for a game-changer in your quick family dinner lineup, this Blackstone Grilled Cheese is perfect. With golden, buttery bread encasing melty, gooey cheese, all crisped to perfection on the Blackstone, this easy meal is sure to please. It's the perfect weeknight go-to that comes together faster than you could dash to the store for a last-minute meal fix. Making grilled cheese on the Blackstone griddle is guaranteed to bring everyone to the table with eager smiles and hungry bellies.
ingredients
2tablespoons salted butter (at room temperature)
2slices bread (sourdough, Texas toast, artisan, or white bread)
2 to 4slices cheese (American, cheddar, mozzarella, or pepper jack)
Instructions
1
Spread butter on one side of each slice of bread. Place one piece of bread butter side down on a cutting board and layer the cheese slices evenly.
2
Add the remaining piece of bread on top, butter side up.
3
Heat your Blackstone Griddle to medium-low heat (300°F to 325°F / 150°C to 160°C). Lightly butter the griddle surface.
Use an infrared thermometer for accuracy if available
4
Place the assembled sandwich on the griddle. Cook for 2-3 minutes until the bottom is golden brown and crispy.
Cover with a metal dome or lid to help melt the cheese
5
Carefully flip using a wide spatula. Cook the other side for 2-3 minutes until golden brown and cheese is fully melted.
Wait until edges turn golden before flipping for best results
6
Remove from griddle, let rest for 1 minute, then slice and serve immediately.
Nutrition Facts
Servings 1
Serving Size 1 sandwich
Amount Per Serving
Calories660kcal
% Daily Value *
Total Fat43gg67%
Saturated Fat25gg125%
Trans Fat1gg
Cholesterol100mgmg34%
Sodium900mgmg38%
Potassium200mgmg6%
Total Carbohydrate36gg12%
Dietary Fiber2gg8%
Sugars4gg
Protein20gg40%
Calcium 40% mg
Iron 10% mg
* Percent Daily Values are based on a 2,000 calorie diet. Your daily value may be higher or lower depending on your calorie needs.
Note
Heat Is Key: Keep griddle temp between 300°F–325°F (medium-low) to avoid burning while ensuring perfect melt.
Cover for Melt: Use a metal dome or griddle lid to create a steam bath that melts cheese evenly while bread crisps.
Get Creative: Add crispy bacon, sliced tomato, caramelized onions, jalapeños, or a smear of pesto to elevate your sandwich.
Flip Technique: Wait until edges turn golden brown before flipping. Use a wide spatula for a secure, intact flip.
Serving Suggestion: Pair with tomato soup or a simple side salad for a complete meal.